

In a recent post, we introduced the common integration patterns we see used for B2B SaaS. In this post, we'll examine the event-driven integration pattern, including an in-depth look at an example integration. While much of what we'll cover has general applicability to SaaS integrations, this post will focus on integrations as built within Prismatic, and our example will use the Prismatic integration designer.
The event-driven integration is probably the most common type of integration we see with B2B SaaS apps, making up perhaps 80% of the integrations that teams build on Prismatic. When an event occurs in a source system (for example, a customer record is updated in CRM or an invoice is paid in POS), data is sent to a destination system.
A huge benefit of event-driven integrations is the near-real-time data exchange. Data from the source app is transferred to the destination app in a few seconds (or however long it takes the integration to run). This ensures that data in the destination app stays very close to current with the data in the source app.
Pub/Sub systems are the key
Webhooks — event-triggered requests to an app — are perhaps the most common type of pub/sub (publisher/subscriber) system our customers have. However, there are other pub/sub systems such as Amazon SNS, Apache Kafka, or email. In each case, these systems provide you with something you subscribe to as the starting point for the integration, and the integration can run immediately upon being notified by the source system that new data is available.
For the sake of simplicity, we'll be focusing on integrations that use webhooks throughout the balance of this post. And while Prismatic commonly uses the term webhook, some companies use different terms. For example, Salesforce refers to these as Outbound Messages, and Slack calls them Events. Other terms sometimes seen for a webhook are web callback, inverse API, or streaming API.
Regardless of what a webhook is called, the bottom line is that something changes in the source system, which causes the source system to send a payload outside the system. When the destination system creates a webhook endpoint (or webhook URL), it tells the source system, "when thing changes, let me know at this address." That is, it is limited to defining where the source system sends the payload.
For example, you could set up a webhook in a warehouse app to notify you when the quantity for an item is updated. When an update occurs in the warehouse app, the system might send a payload like this to the endpoint in the destination app:
123456789101112131415
For a well-designed event-driven API, let's consider GitHub, which has a variety of events that can trigger a webhook. GitHub also provides the shape of the payload sent via each webhook. When you integrate with GitHub, you'll create endpoints to receive those payloads.
Three types of event-driven integrations
Types of event-driven integrations are as follows:
- Import
- Export
- Two-way
In the remainder of this post, we'll take a look at each of these in turn, explore some best practices for how to build them in Prismatic, and then take an in-depth look at an example of a two-way event-driven integration.
Looking at one-way import integrations
Now, let's start laying out the possible pieces of a one-way event-driven import integration. This is an import of data from the third-party app into your app based on events in the third-party app. These integrations are relatively easy to build, as far as integrations go. Once you've built a couple of this type within Prismatic, you should be able to put the next ones together pretty quickly and with a minimum of components.
One webhook or multiple webhooks?
You may initially be importing a single, simple payload and may want to subscribe to only one webhook (for a single event in the app). However, you should probably build the integration to subscribe to several webhooks (if available) to support the different payloads you may eventually need to receive. Since the scope of an integration often changes over the course of development, it's good not to restrict things too much as you start developing the integration.
A single integration, for example, may allow you to get updated customer records from a third-party system and updated order records from the same system. These different payloads may all be provided to your app via the same integration, but they may be sent via multiple webhooks in the third-party app. Or the third-party app may have a single webhook for everything it publishes via its API, in which case you'll receive customer, order, and any other data at the same endpoint and then route it as needed via the integration. After all, you can always ignore/strip out data from a payload that you don't need.
Multiple webhooks require branching or flows to manage the data
To support multiple webhooks in the third-party app, you can either use branching or set up a unique flow within the integration for each event type. If your integration is simple and handles a small number of webhook events, then branching may be the best option. If, however, the integration is more complex, with substantially different logic for multiple payloads, it is better to use flows.
For an example of flows to support multiple events, consider Salesforce. You might have one flow in your integration that supports the opportunity update event, with separate flows for the opportunity create event and the contact create event. By setting things up this way, each flow handles a small piece of the overall integration, and code used in separate flows is tailored precisely to the payload the flow is processing. However, you have all the flows in a single integration to make overall development and support much easier.
If the third-party app supports it, you could create a separate webhook for each flow. You could then use a pre-process flow with a single endpoint to funnel everything into an initial screening process. The pre-process flow will then examine incoming payloads (based on defined criteria) and dispatch them to the integration's other flows.
Deploy-time flows help start things correctly
While you can set up any number of different flows to organize things within your integration, beginning the integration with a deploy-time flow helps to ensure that the webhooks are set up accurately. Deploy-time flows are set to run when you (or one of your customers) activate the integration. Since a deploy-time flow knows the webhook URLs (endpoints) for all its sibling flows, it can define those endpoints for the third-party app and your app. This ensures that each payload is sent to the correct endpoint. Please note that deploy-time flows are useful for any event-driven integration — not just the import integration.
Setting up a third-party app component for import integrations
If you are integrating with a common app for which Prismatic already has a component, you shouldn't need to write any custom code for this import. If you need to integrate with a niche app in your industry, then you will need to build a custom component, but that should be straightforward. In many cases, this component consists of actions to create, list, and remove endpoints for the webhooks in the third-party app.
You might also have a scenario where the third-party app returns a subset of needed data (maybe IDs of records that have changed but not the actual records themselves). In this scenario, you may need to wrap a bit of the third-party API with your component to get the records associated with the IDs before sending the entire payload to the next step in the integration.
Setting up your app component for import integrations
If your app has an API, you'll want to build a custom component that wraps your API for import purposes. This will allow you to build import integrations from many different third-party apps and reuse your custom component in each case instead of needing to build a new custom component each time to connect to your API. After your first couple import integrations, you shouldn't have to make further changes to the custom component. Once you reach that point, most teams are able to hand off building additional import integrations to technical non-developers.
If your app doesn't have an API with webhooks or another pub/sub system, you may need to use scheduled integrations to pass data through a third party. We'll be examining scheduled integrations in more detail in an upcoming post.
Looking at one-way export integrations
Now that we've looked at the one-way event-driven import integration, let's flip everything around and look at the reverse. The primary difference between an export integration and an import integration is that the export integration starts with your application, giving you absolute control over the events which trigger webhooks with payloads that feed your integration.
As with the one-way import integration, you'll probably be working with webhooks as the starting point, incorporating a deploy-time flow, and then building other flows (or branches) as necessary. In addition to all of that, you'll need to set up the functionality in the following sections (since we didn't cover this in the one-way import integration section).
Setting up your app for export integrations
You'll want to write the core product functionality for the export one time, so you don't have to keep building additional functionality. The best approach is to set up your app with an API that includes events, webhooks, and the corresponding payload definitions. Doing this saves considerable time for your developers since they won't need to keep defining new export functionality for the API. Instead, you'll be able to use Prismatic to create integrations that subscribe to your webhooks, filter/transform the resulting payloads, and send the data to the third-party app.
If your app does not have an API, you'll probably need to use scheduled integrations instead of event-driven ones.
Setting up your app component for export integrations
In a one-way export, the component to handle the export from your app tends to be simple. You've already done the hard work by setting up your app with an API. As a result, this component usually consists of actions to create, list, and remove endpoints for the webhooks in your app.
Setting up the third-party app component for export integrations
If a standard component is available on Prismatic to access the third-party API, you will want to use that. But, if you need to build a custom component, you'll want to wrap the third-party API so you can reuse this component any time you have an integration that requires you to export data to this third-party system. We discussed this same approach to wrap your API in a component when importing data into your app.
Looking at two-way event-driven integrations
A two-way event-driven integration melds the one-way event-driven export and the one-way event-driven import into a single integration. The import will have its flow or flows, and the export will have its flow or flows, but everything is contained within a single integration. A two-way integration most likely uses a custom component for your app but a built-in component for the third-party app (since this is both an import and export integration).
Based on our experience, we recommend doing two-way integrations as a single integration using multiple flows instead of assembling the pieces into several one-way integrations. Building a single integration simplifies integration development, deployment, and support. Your customers will then have a single integration to activate in the marketplace, while your customer-facing teams will have a single integration to support.
We'll use a two-way integration with multiple flows for the example in the next section to demonstrate how this approach works.
Example of event-driven integration
We've looked at types of event-driven integrations; now, let's look at one event-driven integration in detail. This is a two-way integration with Salesforce and the Acme app. We'll set up the integration to receive multiple types of data from Salesforce to place into Acme and retrieve other data from Acme to place into Salesforce. We'll also ensure that the integration starts up and shuts down properly.
To do this, we've organized the integration into the following flows:
- Deploy
- Salesforce account
- Salesforce opportunity
- Acme opportunity update
- Tear-down
Now, let's look at the details for each of these flows as laid out in the Prismatic integration designer.
Deploy flow
This is the flow that runs before any other flow and sets them up for success. It uses actions from the built-in Salesforce component (third-party component for import) for steps 2, 3, and 4. The final step in this flow uses an action from the custom Acme component (your app component for export).

Here are the steps:
- When you or your customer activates an instance of this integration, the flow starts with Deploy Trigger.
- The Get Current User step retrieves user data for the user who authenticated the instance with Salesforce.
- The Set Up Opportunity Outbound Message and Set Up Account Outbound Message steps set up the webhooks in Salesforce so that it will send opportunity and account data to sibling flows in this integration. Salesforce refers to webhooks as “Outbound Messages.”
- The Create an Opportunity Webhook step sets up a webhook in Acme to send opportunity updates to Salesforce from Acme.
Salesforce account flow
This flow handles data going from Salesforce to Acme to either update existing account data or create new accounts. The Salesforce Account Trigger uses an action from the built-in Salesforce component (third-party component for import). The two Acme steps use actions from the Acme custom component (your app component for import).

Here are the steps:
- Salesforce sends account data via the webhook to an endpoint in the integration (Salesforce Account Trigger).
- The New Account? step determines if the integration needs to create a new account in Acme or update an existing one.
- The Create an Account step runs if a new account is needed in Acme. The Update an Account step runs if an existing account in Acme should be updated.
Salesforce opportunity flow
This flow is just like the account flow above, except it works with opportunity data instead of account data.

Here are the steps:
- Salesforce sends opportunity data via the webhook to an endpoint in the integration (Salesforce Opportunity Trigger).
- The New Opportunity? step determines if the integration needs to create a new account in Acme or update an existing one.
- The Create an Opportunity step runs if a new opportunity is needed in Acme. The Update an Opportunity step runs if an existing opportunity in Acme should be updated.
Acme opportunity update flow
The last two flows have been from Salesforce to Acme. This flow is going in the opposite direction to support an export of data from Acme to Salesforce. The first step uses an action from the custom Acme component (your app component for export). The final step uses an action from the built-in Salesforce component (third-party app component for export).
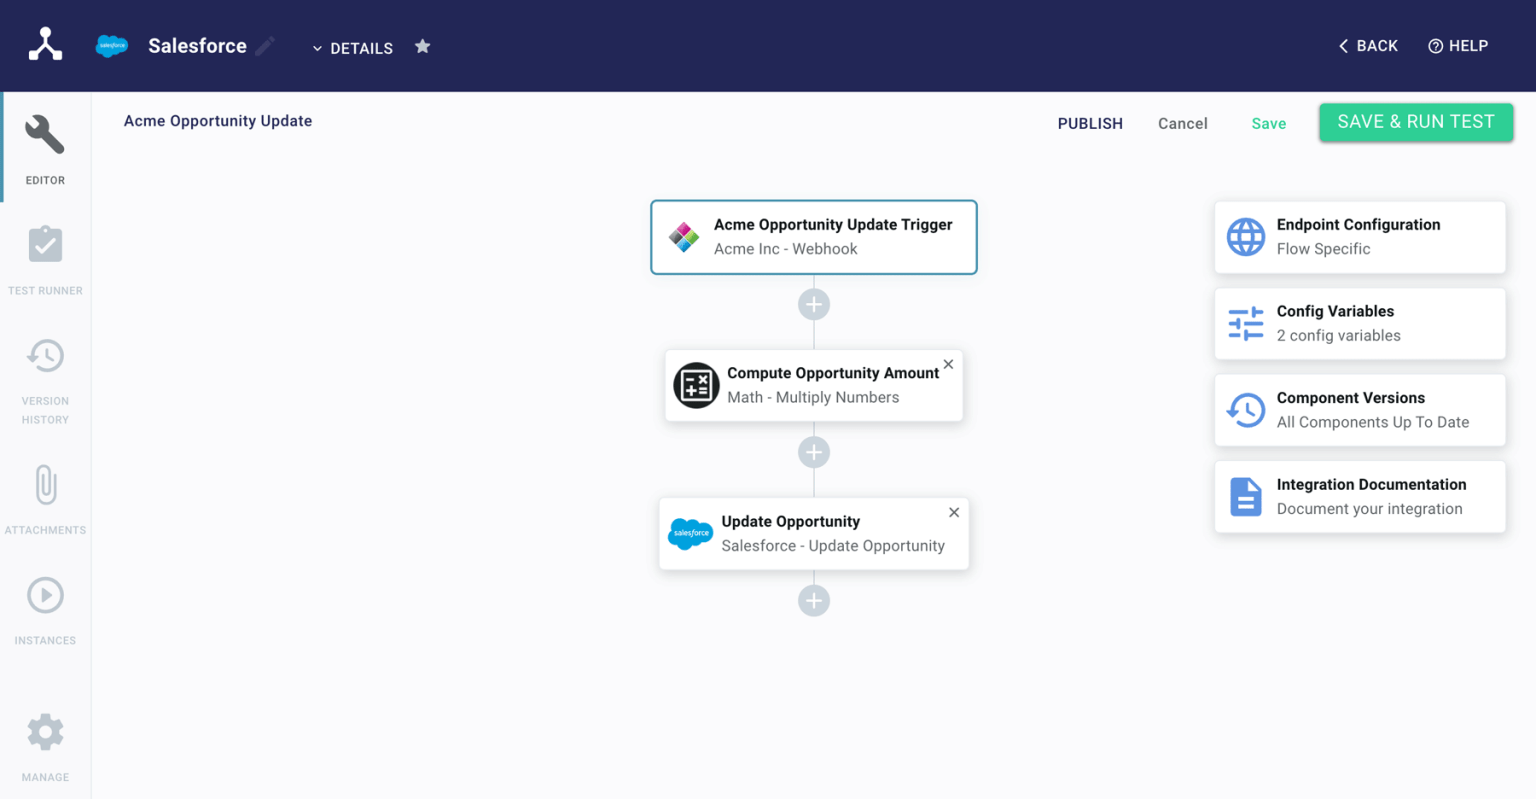
Here are the steps:
- When certain opportunity data is updated in Acme, the webhook set up in the Deploy flow sends data to the endpoint in the first step in this flow (Acme Opportunity Update Trigger).
- Data from step one is used to calculate the new value for the opportunity amount.
- Then, the integration sends the data off to Salesforce to update the opportunity amount there.
Tear-down flow
Much like the deploy flow ensures that you have everything needed to start the integration, this flow ensures that the integration can be shut down properly. It uses actions from both the built-in Salesforce component (third-party app component for import) as well as the custom Acme component (your app component for export).

Here are the steps:
- When this instance is disabled, it notifies the Tear Down Trigger step.
- The integration then lists all the Salesforce webhooks (outbound messages).
- After listing the Salesforce webhooks, the integration loops over those webhooks used in this instance and removes them.
- Finally, the integration removes the Acme webhook for updating opportunities.
And there we have it: one two-way event-driven integration with five flows. Of course, you could make this far more complex with additional webhooks, flows, and logic — but this is a start.
Conclusion
Understanding common patterns and best practices for B2B SaaS integrations, including the event-driven integration types we've looked at here, will save you time and rework as you create the integration plan for your existing or upcoming app.
Try Prismatic for free or contact us to learn more about how we can help your team deliver integrations faster.


