Endpoint Configuration
Webhook triggers can be configured for an integration in one of three ways, depending on your needs:
- Instance and Flow Specific: Each flow on each instance gets its own unique endpoint. This is the default configuration.
- Instance Specific: Each instance gets a unique endpoint, and the integration determines which flow to run based on header or payload data. This is useful when each customer can configure their own webhook endpoint, but all webhook events are sent to the same endpoint. You can route a "Create Widget" request to a "Create Widget" flow and an "Update Gadget" request to an "Update Gadget" flow.
- Shared: All customers' instances of the integration share an endpoint. Data in the header or payload determines which customer and flow should run. This is useful when you are only allowed to configure a single webhook URL in a third-party app for all of your customers' webhook events.
When deciding on a webhook endpoint configuration, ask yourself two questions:
- Do my webhook endpoints need to be the same for each of my customers, or can customers be configured to use different webhook endpoints?
- If my customers can have unique webhook endpoints, can webhooks be configured to send data to unique endpoints depending on what activity they're responding to? For example, if a third-party app invokes an integration when it has an inventory update or when a new order is created, can those two activities be configured to invoke distinct webhook endpoints?
Once you have answers to those questions, you can choose the appropriate webhook endpoint configuration.
The shared endpoint configuration is useful when the third-party app you're integrating with sends webhook requests one at a time (i.e. one request is for customer A, the next request is for customer B, etc.). Your preprocess flow can determine which customer to dispatch the request to.
If the third-party app sends requests in bulk (i.e. one request is an array of updates, with a few for Customer A and a few for Customer B), you should reach for a "router" integration to break down and route all requests to their respective destinations. See Single-Endpoint Webhooks.
Selecting endpoint configuration
- Low-Code
- Code-Native
To configure your integration's endpoint settings, click the Endpoint Configuration button on the top of the integration designer. From the Endpoint Type tab, select one of the three endpoint types listed above.
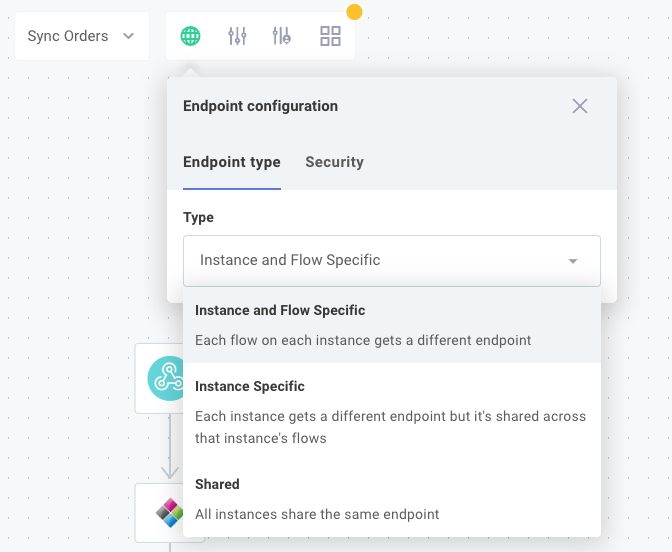
Depending on what endpoint type you choose, you will be presented with different configuration options (described next).
By default, instances of integrations that you deploy will be assigned unique webhook URLs - one URL for each flow. We call this Instance and Flow Specific endpoint configuration. Alternatively, you can choose Instance Specific endpoint configuration (each instance gets its own webhook URL and all flows share the single URL) or Shared endpoint configuration, where all flows of all instances share one URL.
To specify endpoint type, add an endpointType property to the integration() definition in src/index.ts.
It can have values "instance_specific", "flow_specific", or "shared_instance" and defaults to "flow_specific":
import { integration } from "@prismatic-io/spectral";
import flows from "./flows";
import { configPages } from "./configPages";

export default integration({
  name: "shared-endpoint-example",
  description: "Shared Endpoint Example",
  iconPath: "icon.png",
  flows,
  configPages,
  componentRegistry,
  endpointType: "instance_specific",
});
When Instance Specific or Shared endpoint configuration is selected, you need some logic to determine which flow (and which customer's instance in the case of Shared) should be run. This can be done with or without a preprocess flow, and both methods are described below.
Instance and flow-specific endpoint configuration
This is the default configuration. When an instance is deployed to a customer, each flow within the instance is assigned its own webhook endpoint.
Customer A's "Update Inventory" flow has a unique endpoint that is different from Customer A's "Process Order" flow endpoint and different from Customer B's "Update Inventory" flow endpoint.
Integrations that use this endpoint configuration often set up webhooks with a deploy trigger and remove them with an instance remove trigger.
Instance-specific endpoint configuration
When an instance is deployed to a customer, that instance is assigned a single webhook endpoint. The flows that comprise the instance all share that endpoint. Each customer's instance has a unique endpoint, so Customer A's instance of the "Acme ERP" integration will have one endpoint, and Customer B's instance of the same integration will have a different endpoint.
If flows share an endpoint, which flow is executed? Since several flows share an endpoint URL, you need a way to determine which flow should run when data is sent to your endpoint. You can determine which flow to run in two ways:
- Without a preprocess flow. You can send the name of the flow that should run as an HTTP header or as a value in the HTTP payload.
- With a preprocess flow. You can designate one flow of your integration to be a preprocess flow - that flow will determine which sibling flow should run.
Instance-specific endpoint without a preprocess flow
If you do not use a preprocess flow, you can send the name of the flow to run as an HTTP header or as a value in the HTTP payload.
Flow name from HTTP payload
For example, you could send the name of the flow you'd like to execute as part of your payload like this:
curl https://hooks.prismatic.io/trigger/EXAMPLE== \
  --header "Content-Type: application/json" \
  --data '{"myFlowName":"Update Inventory","item":"widgets","quantity":5,"state":"removed"}'
Within the Endpoint Configuration drawer, you could choose to reference results.body.data.myFlowName to determine which flow to run:
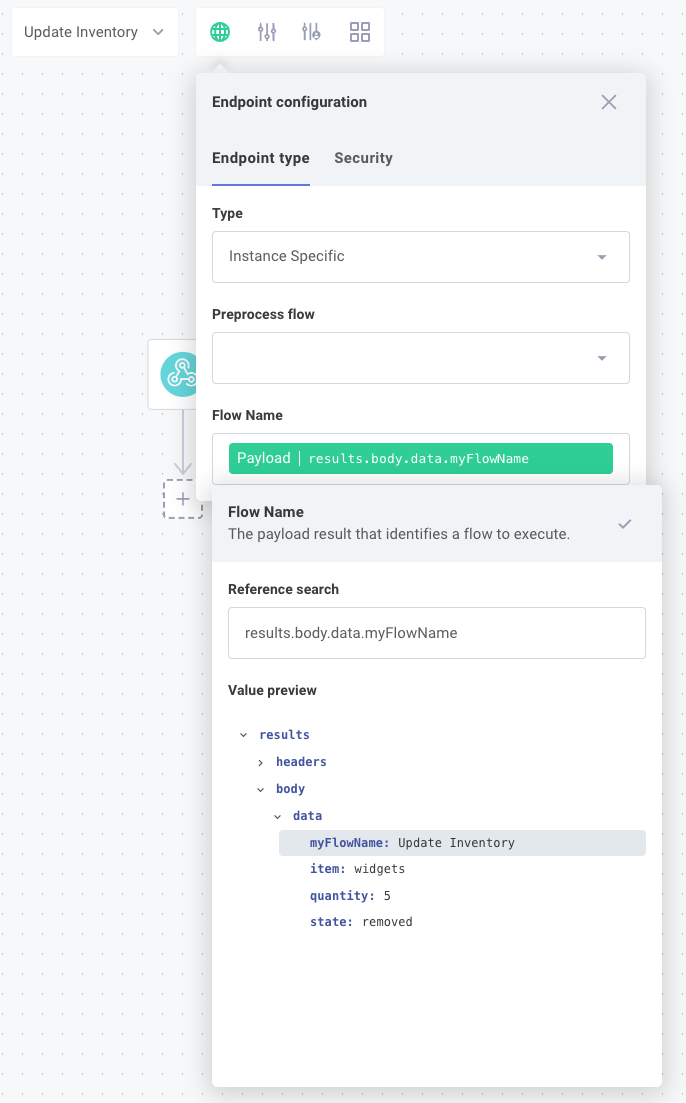
Given the curl invocation above, the Update Inventory flow would be run with the rest of the payload that was provided.
In order to populate the result picker in the screenshot above, click open the testing drawer's Test Configuration tab and then select Endpoint Payload. Enter a sample payload and click the globe icon to the right of the Run button.
Flow name from HTTP header
If you'd like to pass flow name as an HTTP header instead, a curl invocation could look like this:
curl https://hooks.prismatic.io/trigger/EXAMPLE== \
  --location \
  --header "Content-Type: application/json" \
  --header "myflowname: Update Inventory" \
  --data '{"item":"widgets","quantity":5,"state":"removed"}'
In that case, you would reference results.headers.myflowname to determine which flow to run:
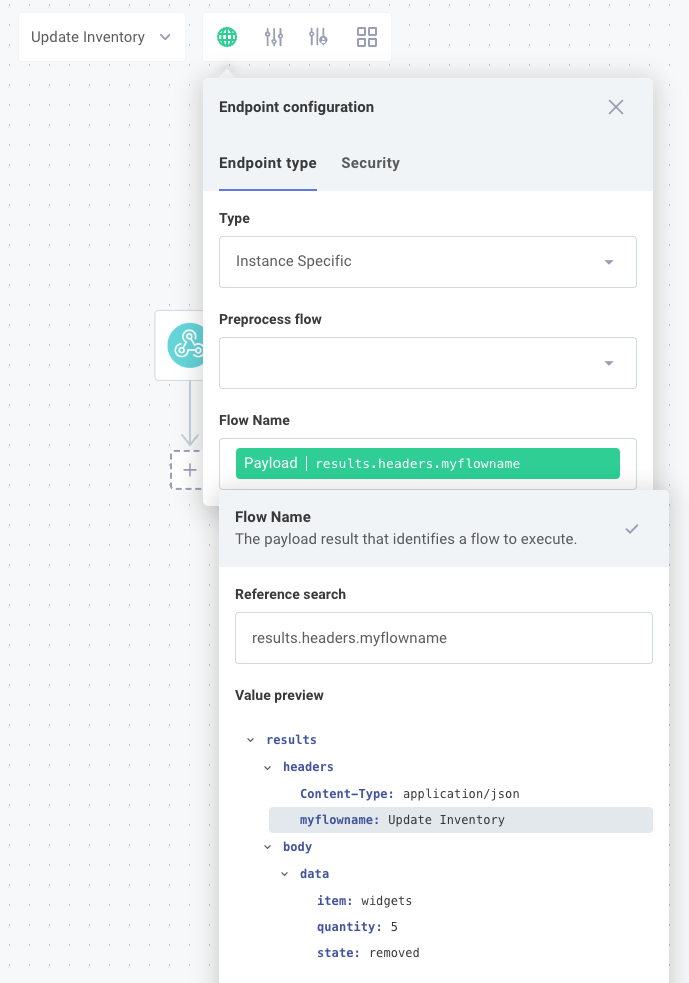
Per HTTP RFC 2616, HTTP headers should be case-insensitive. We've found HTTP clients to be inconsistent about their behavior and implementations, though. Postman, for example, will send camel-cased headers, while others will always lowercase header keys.
We recommend that you use lowercase HTTP header keys to avoid compatibility issues.
Instance-specific endpoint with a preprocess flow
If you need additional logic to determine which flow to run (for example, if you need to inspect an XML payload's shape to determine what kind of data was received), you can leverage a preprocess flow. This flow executes when data is sent to the instance's endpoint. It can be comprised of any number of steps, and the last step's results determine which sibling flow to execute.
To configure a preprocess flow, first build a flow that can inspect an incoming payload and verify that the last step returns the name of the flow that you'd like to run next. Then, open the Endpoint Configuration drawer, select your preprocess flow from the Preprocess Flow dropdown menu, and under Flow Name select the key representing the name of the flow that should run:
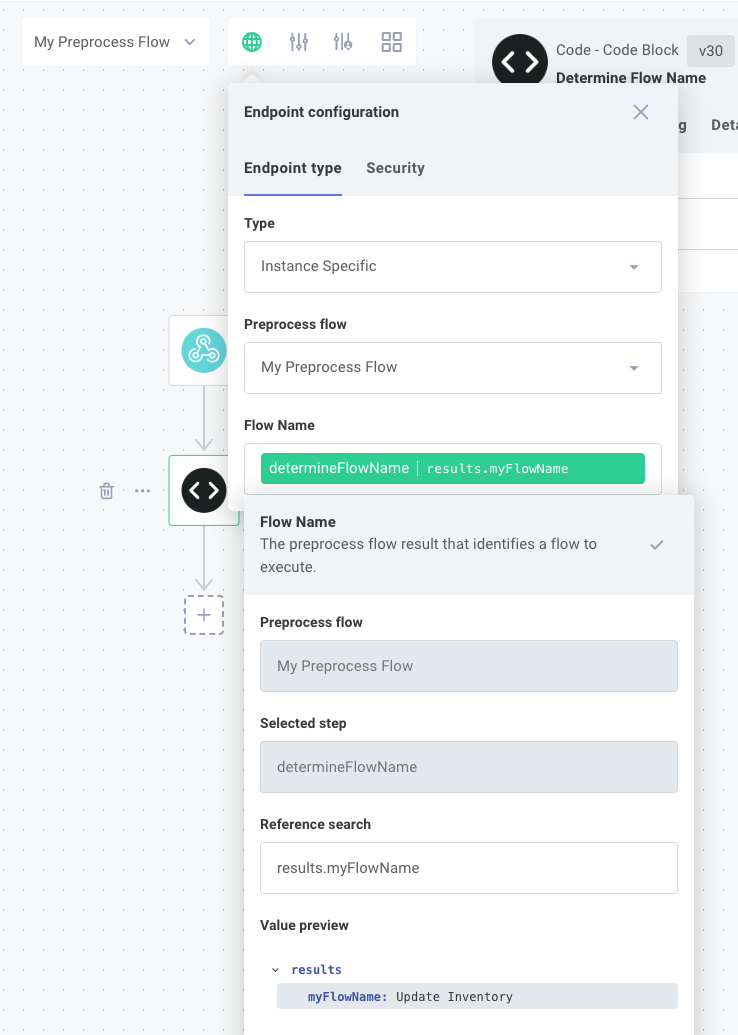
You may need to run a test of your preprocess flow in order to populate the result picker in the Endpoint Configuration drawer.
Shared endpoint configuration
All customers that have an instance of a particular integration deployed to them share a webhook endpoint, and data is routed to the proper customer and flow based on data contained in the HTTP request. Like Instance-Specific Endpoint Configuration, Shared Endpoint Configuration can be configured with or without a preprocess flow.
Shared endpoint without a preprocess flow
If you do not use a preprocess flow, the shared endpoint's webhook invocation must include an external customer ID and flow name either in the HTTP payload or as HTTP headers. You can mix-and-match if you'd like - provide one value as an HTTP header and the other in the HTTP payload.
For example, if "Customer A" had an external ID of abc-123 and you wanted to invoke their Update Inventory flow, you could send this curl request with the flow name represented as an HTTP header and customer ID represented in the HTTP payload:
curl https://hooks.prismatic.io/trigger/EXAMPLE== \
  --location \
  --header "Content-Type: application/json" \
  --header "myflowname: Update Inventory" \
  --data '{"myCustomerId":"abc-123","item":"widgets","quantity":5,"state":"removed"}'
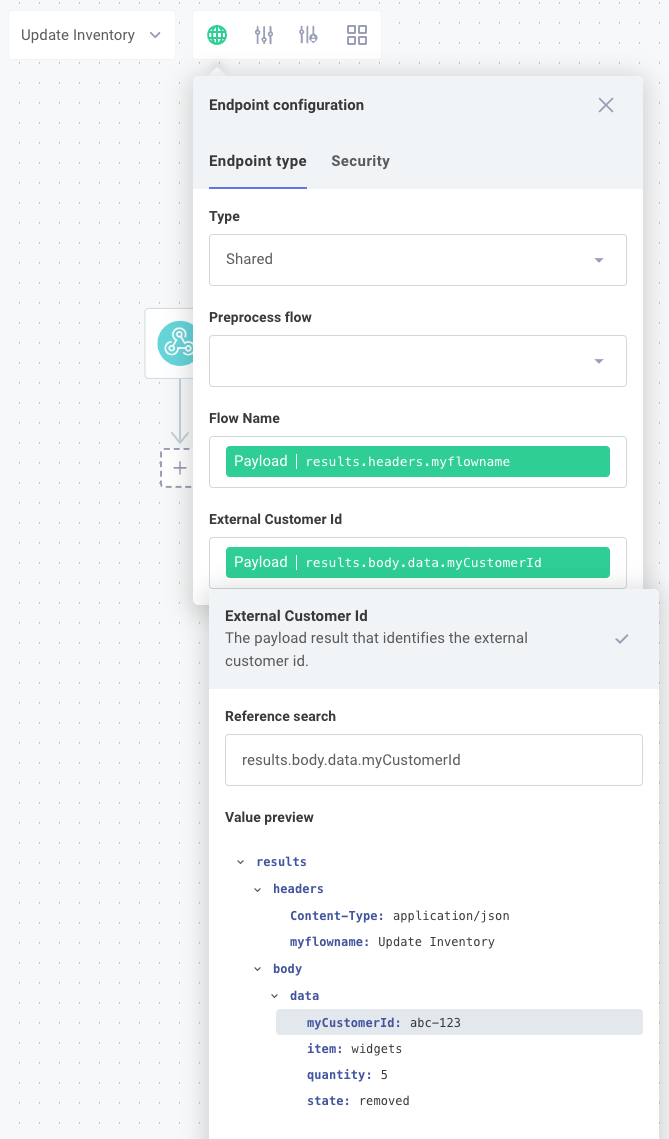
If your integration is comprised of just a single flow, then you only need to specify an external customer ID and not a flow name.
Shared endpoint with a preprocess flow
If you need additional logic to determine which flow to run or need to look up a customer's external ID, you should leverage a preprocess flow. This flow executes when data is sent to a shared endpoint. It can be comprised of any number of steps, and the last step's results determine which flow to execute for which customer. The final step must return an object containing both an external customer ID and a flow name.
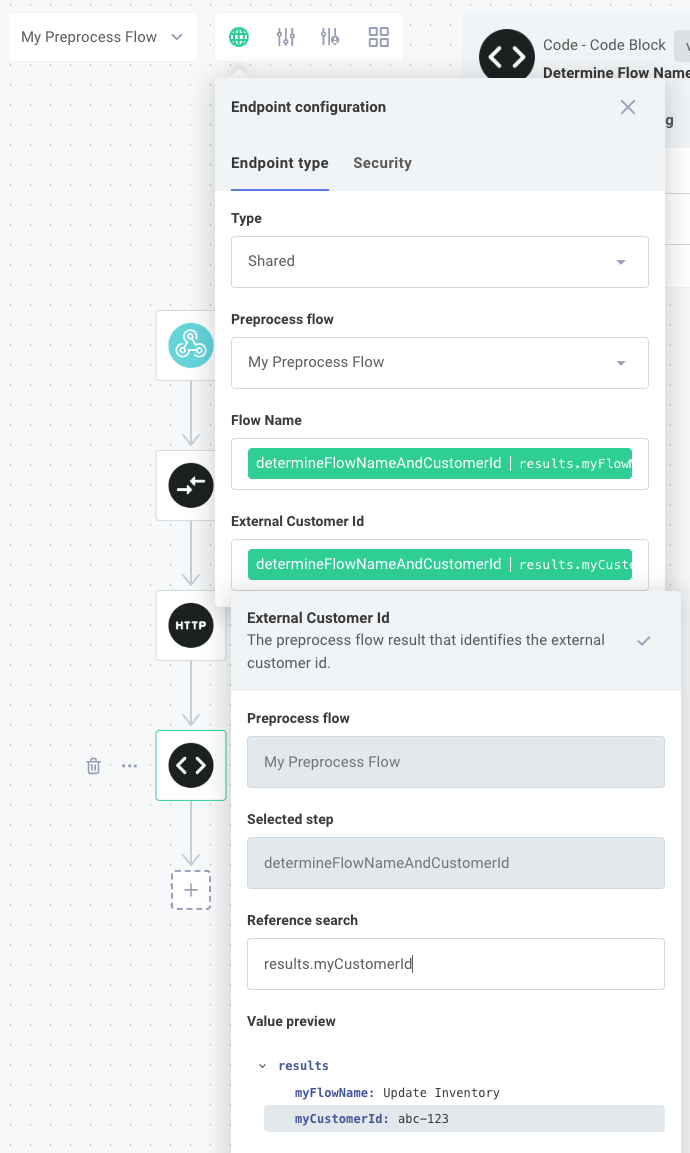
When you use a shared endpoint, the preprocess flow runs without knowing yet what customer the data is destined for. It runs as a "system" instance and is not bound to any particular customer.
Because of this, a preprocess flow cannot reference any customer-specific config variables or connections.
Shared endpoint config and versioning
An integration can have multiple versions, and customers' instances can be on different versions. The endpoint configuration can change between versions, but a shared endpoint exists outside of a specific instance.
So, which version's endpoint configuration is used? The answer is the latest version that is currently deployed to a customer.
If your integration currently has three available published versions: 4, 5 and 6, and some of your customers are on version 4 and some are on version 5, then the endpoint configuration on version 5 is used for the shared endpoint for all customers. If another instance is then deployed using version 6, then the endpoint configuration for version 6 is used for all customers. If that single instance of version 6 is removed, leaving just versions 4 and 5 deployed, the endpoint configuration for version 5 will be used for all customers.
Testing endpoint configuration
You can test each of your flows individually (including a preprocess flow, if applicable) by clicking the Run button on the bottom of the integration designer in the testing drawer. If you would like to test your endpoint configuration, click the globe icon to the right of Run.
To configure a test payload, open the testing drawer, select Test Configuration, and then select Endpoint payload. You can enter the payload and any headers that you would like to send to the shared endpoint.
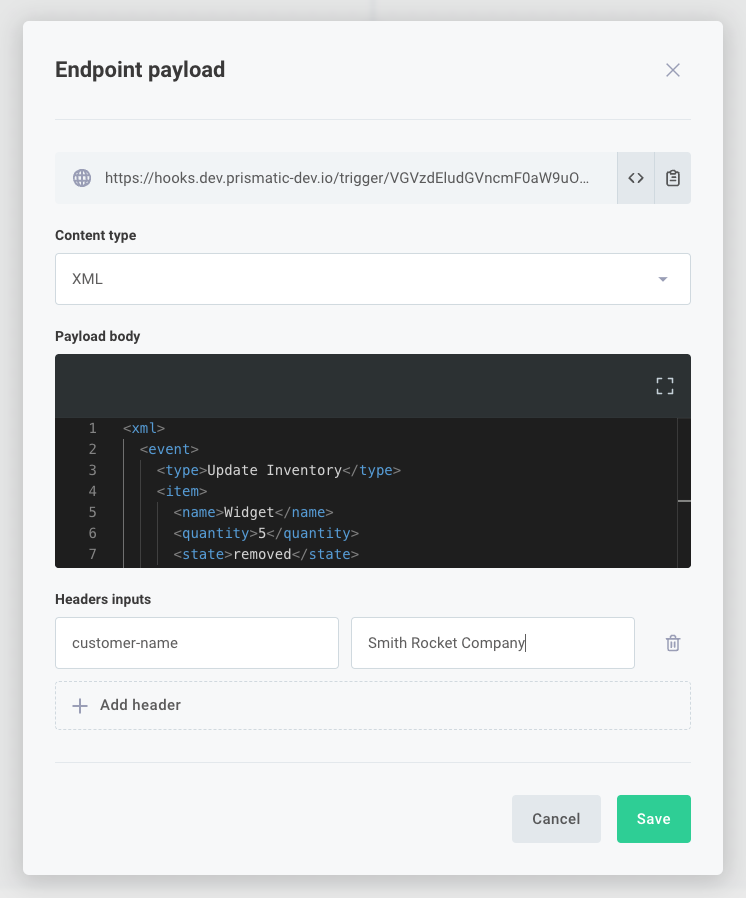
Within the Logs and Step Outputs tabs you will see logs and step results for both the preprocess flow (if you have one), and the flow that the request was routed to.
If an error is thrown (for example, the flow name that the preprocess flow generated was not found), that error will appear in the Logs tab.
The integration designer is a sandbox. No test invocations will go to your customers' instances.
Instead, if you use Shared Endpoint Configuration (where all customers' instances share an endpoint), the execution will always be dispatched to a "test customer" within the integration designer. So, you can reference any external customer ID and the endpoint configuration test will be routed to the "test customer."
Securing endpoints with API keys
Endpoints can be configured to only run when an API key is included with the webhook request as an HTTP header. You can elect to use API keys for all flows, or only for specific flows.
- Low-Code
- Code-Native
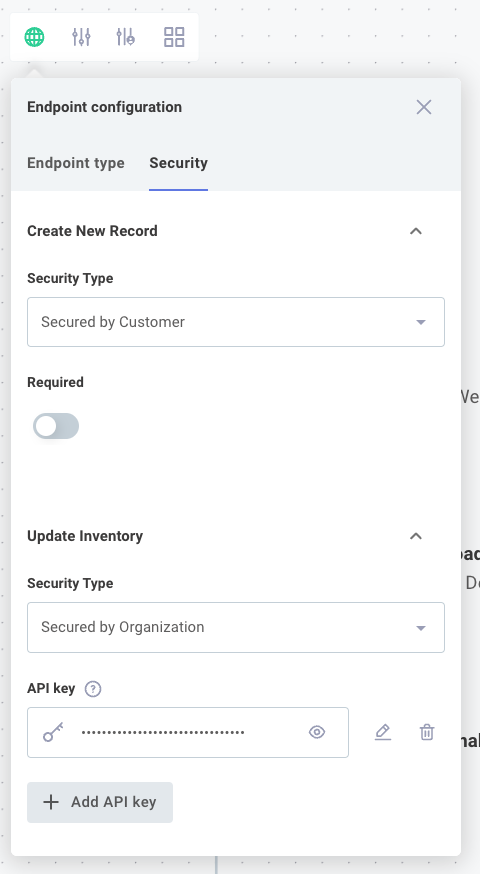
To configure instances of your integration to use API keys, open the Endpoint Configuration drawer in the integration designer, and select the Security Type for each of your flows. You have three options:
- No API Keys indicates that the flow can be invoked without an API key. This option is often paired with a trigger that handles security in another way (like with HMAC).
- Secured by Customer allows a customer to generate API keys for an endpoint when they deploy an instance of your integration. The API keys can either be generated automatically, or the customer can provide their own. If you select Required, your customer will be required to provide one or more API keys when they deploy an instance of your integration.
- Secured by Organization gives you the option to set an API key that will be used by all customers' instances for that endpoint.
To configure instances of your integration to use API keys, specify an endpointSecurityType.
You have four options:
unsecured- do not use API keys. Secure webhooks some other way (like with HMAC).customer_optional- customers can choose to secure endpoints with API keys when they deploy an instance of your integration.customer_required- customers are required to supply API keys.organization- you specify the API keys that will be used. If you specify"organization", also provide a string array of API keys for theorganizationApiKeysproperty.
export const flow1 = flow({
  name: "Flow 1",
  stableKey: "9499d1d8-dddd-4d9b-aaff-c054f59d02cc",
  description: "This is the first flow",
  isSynchronous: true,
  endpointSecurityType: "organization",
  organizationApiKeys: ["my-first-key", "p@s$W0Rd"],
  onExecution: async (context, params) => {
    return { data: null };
  },
});
Endpoint API keys in the config wizard
Endpoints marked Secured by Customer will appear on the first page of the config wizard when a customer deploys an instance of your integration.
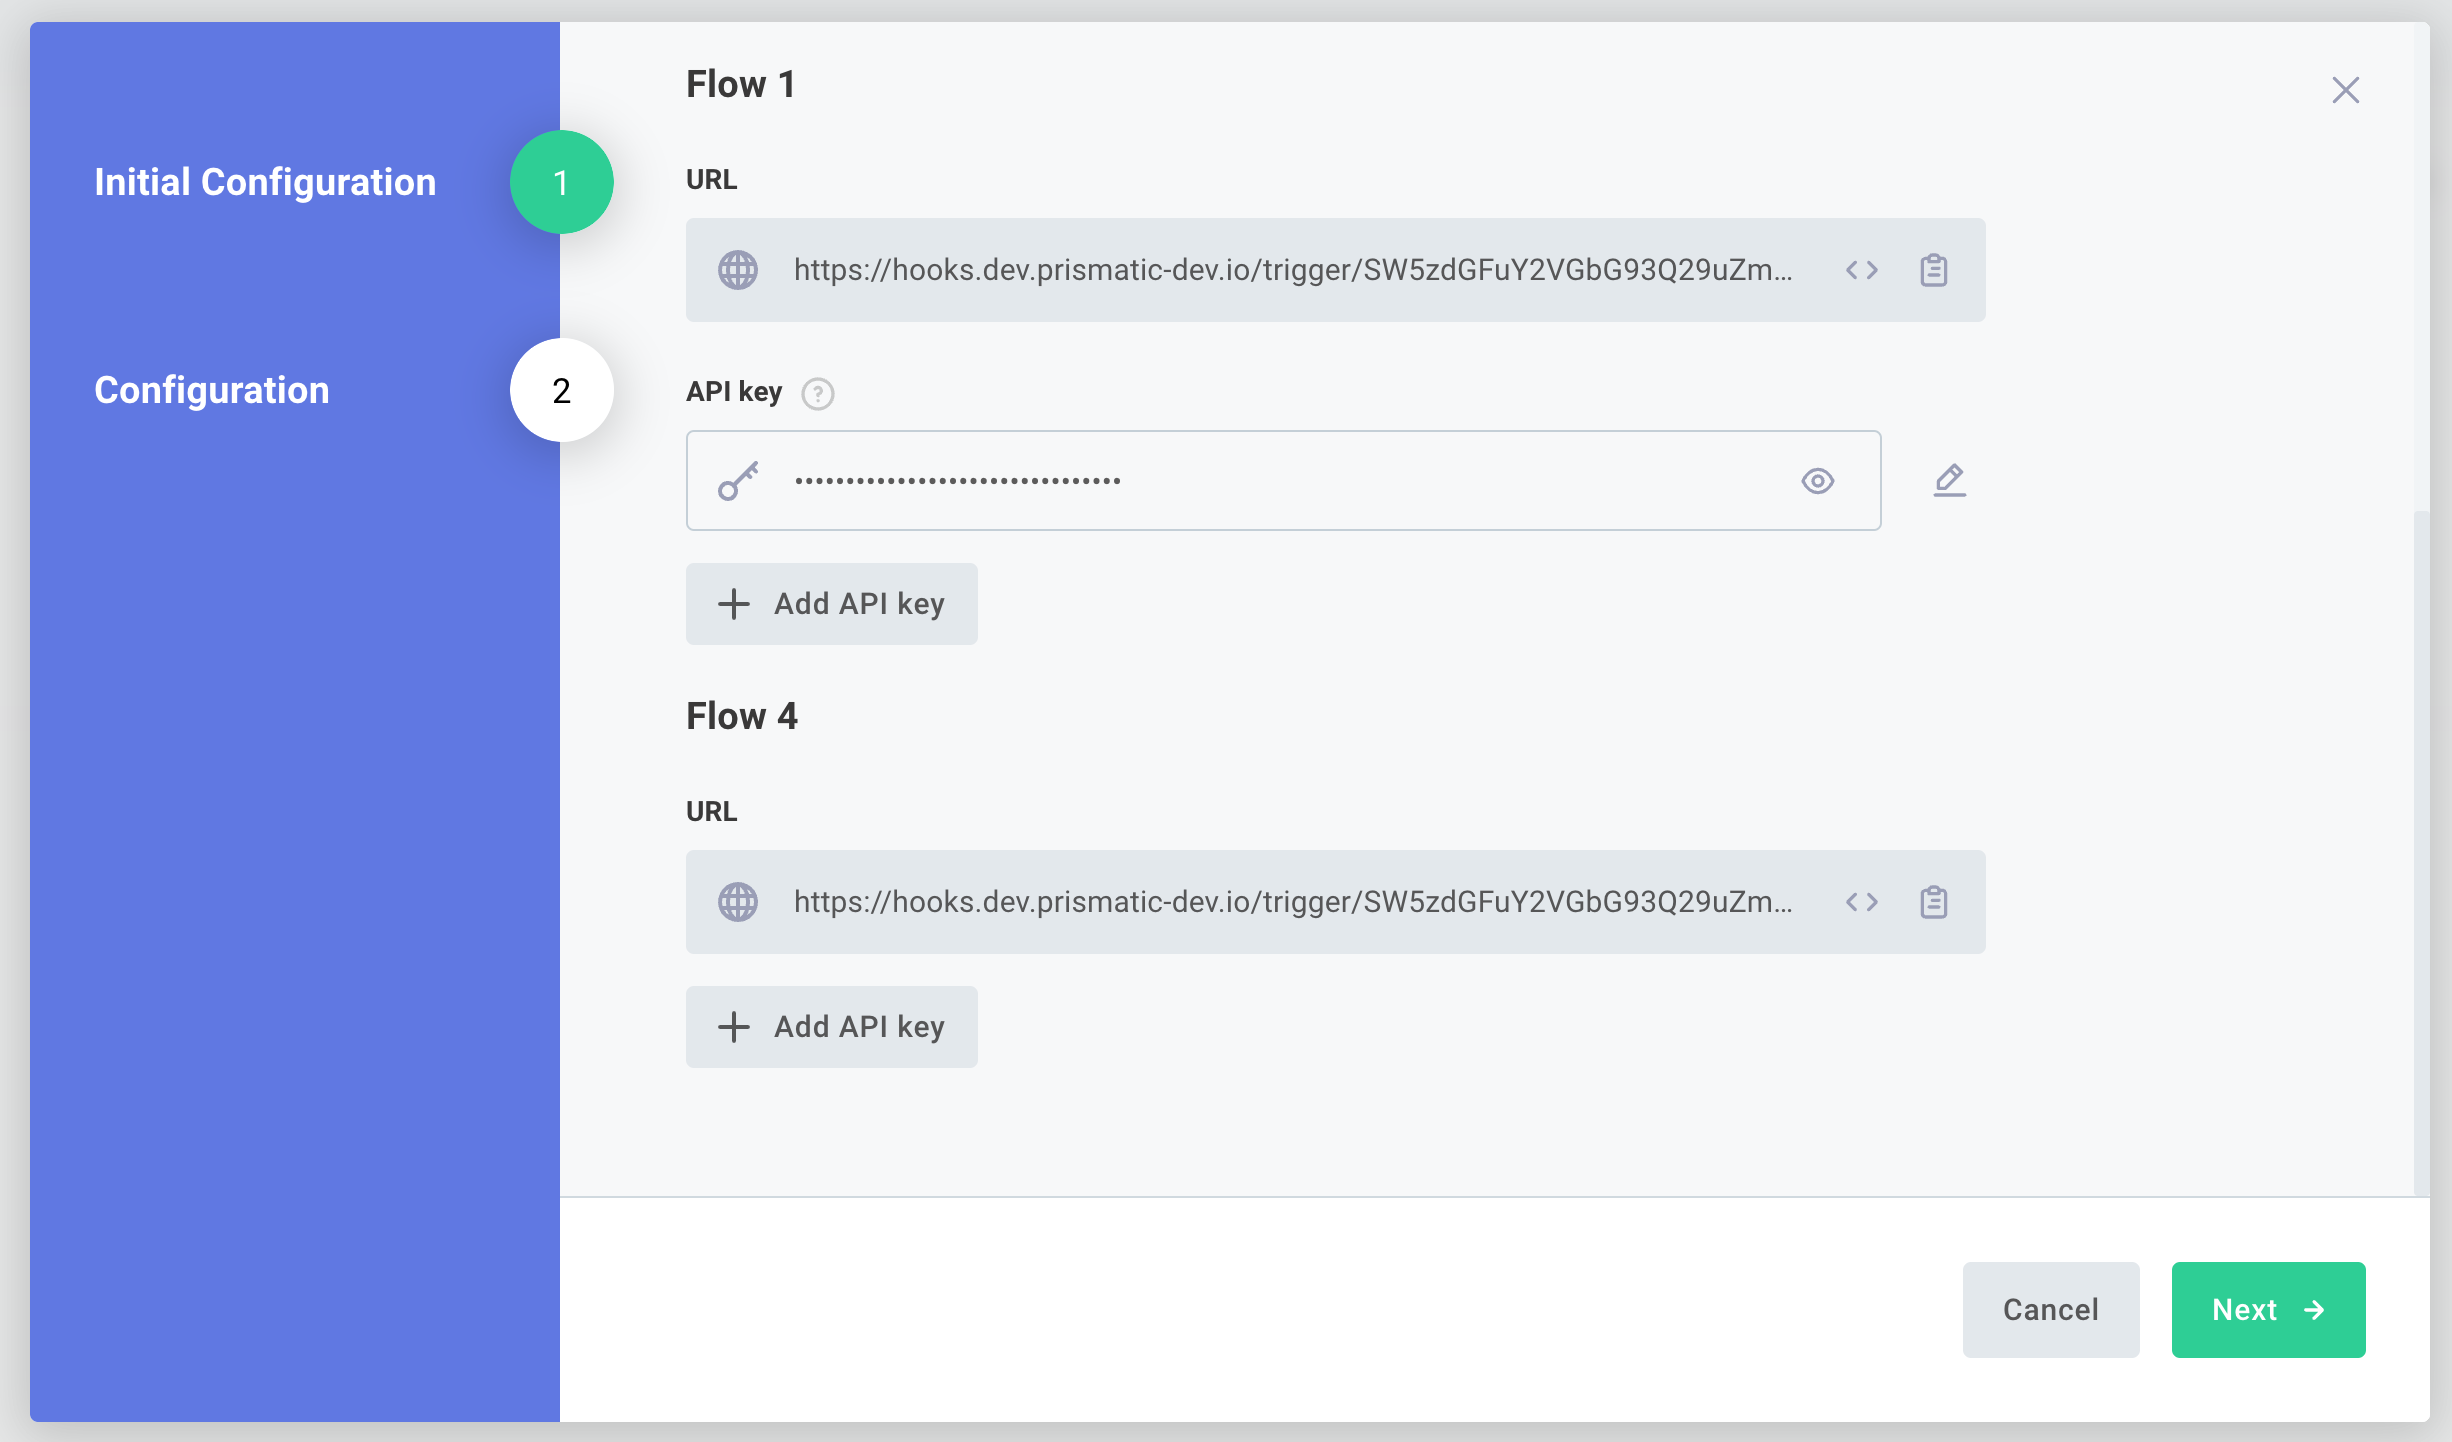
Your customers are required to provide API keys if you selected Required, and can optionally provide API keys if you didn't. An endpoint can have multiple API keys.
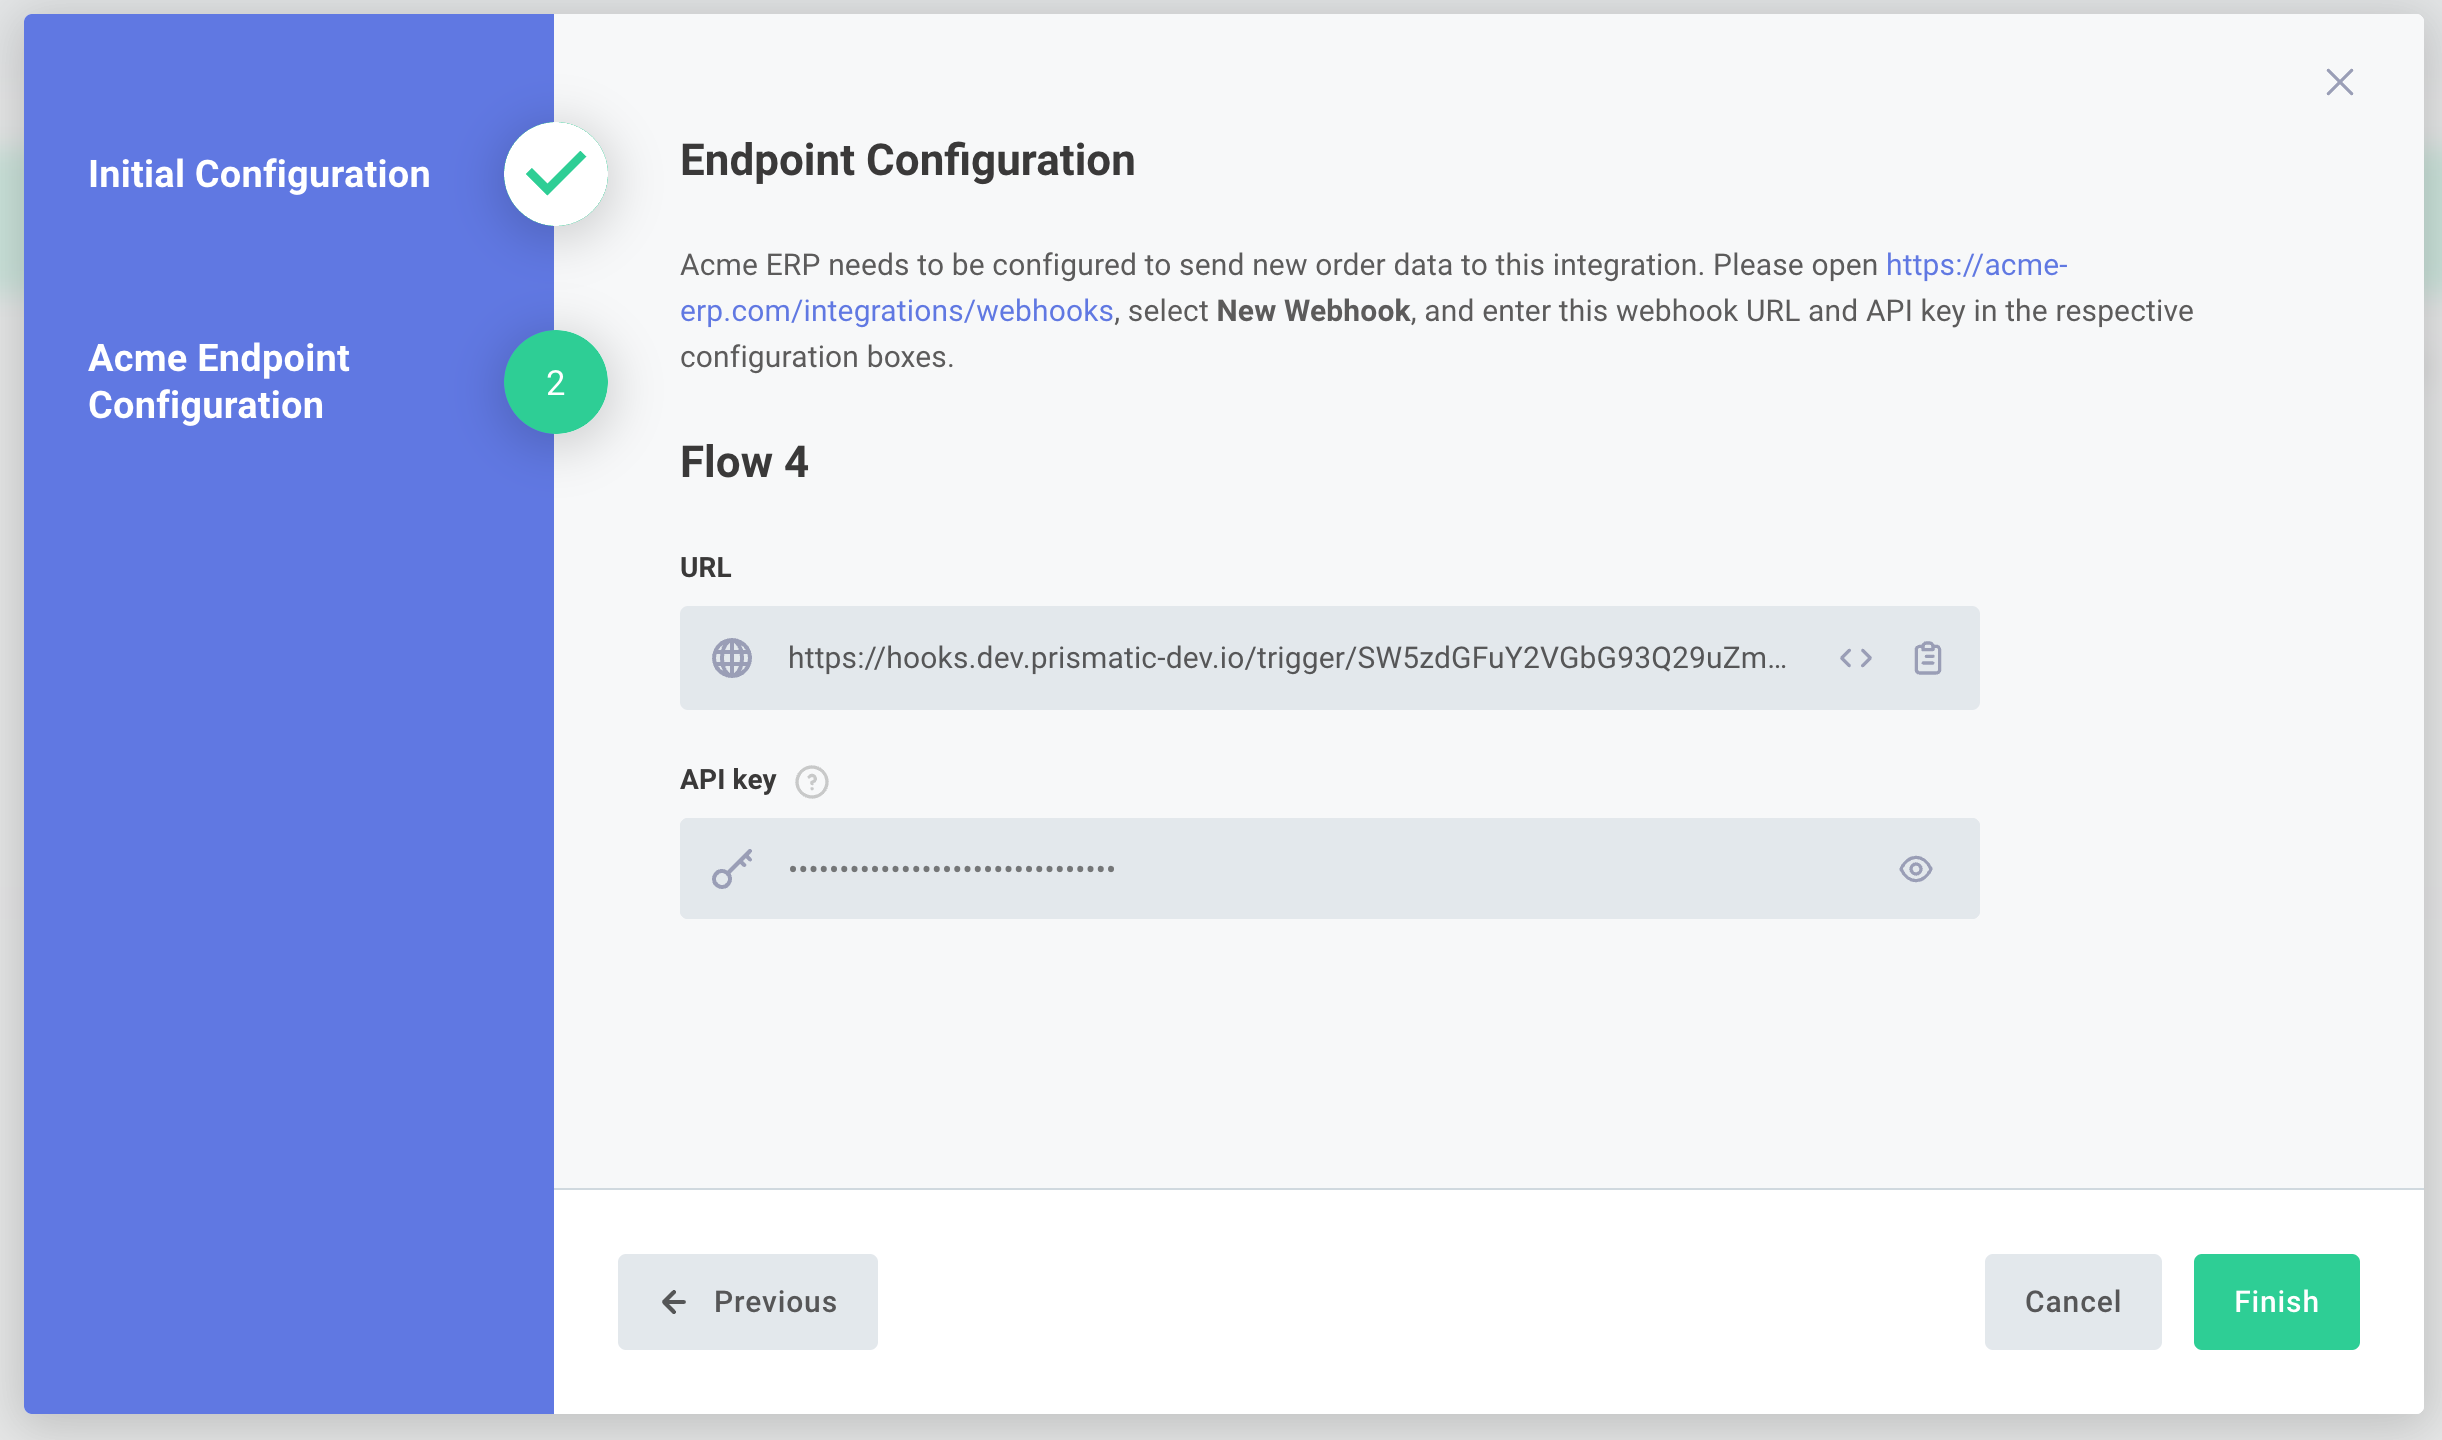
If part of your configuration experience involves showing the customer the endpoint URL and API key, you can add a Trigger Details section to your config wizard by clicking +Text/Image and then selecting Trigger Details.
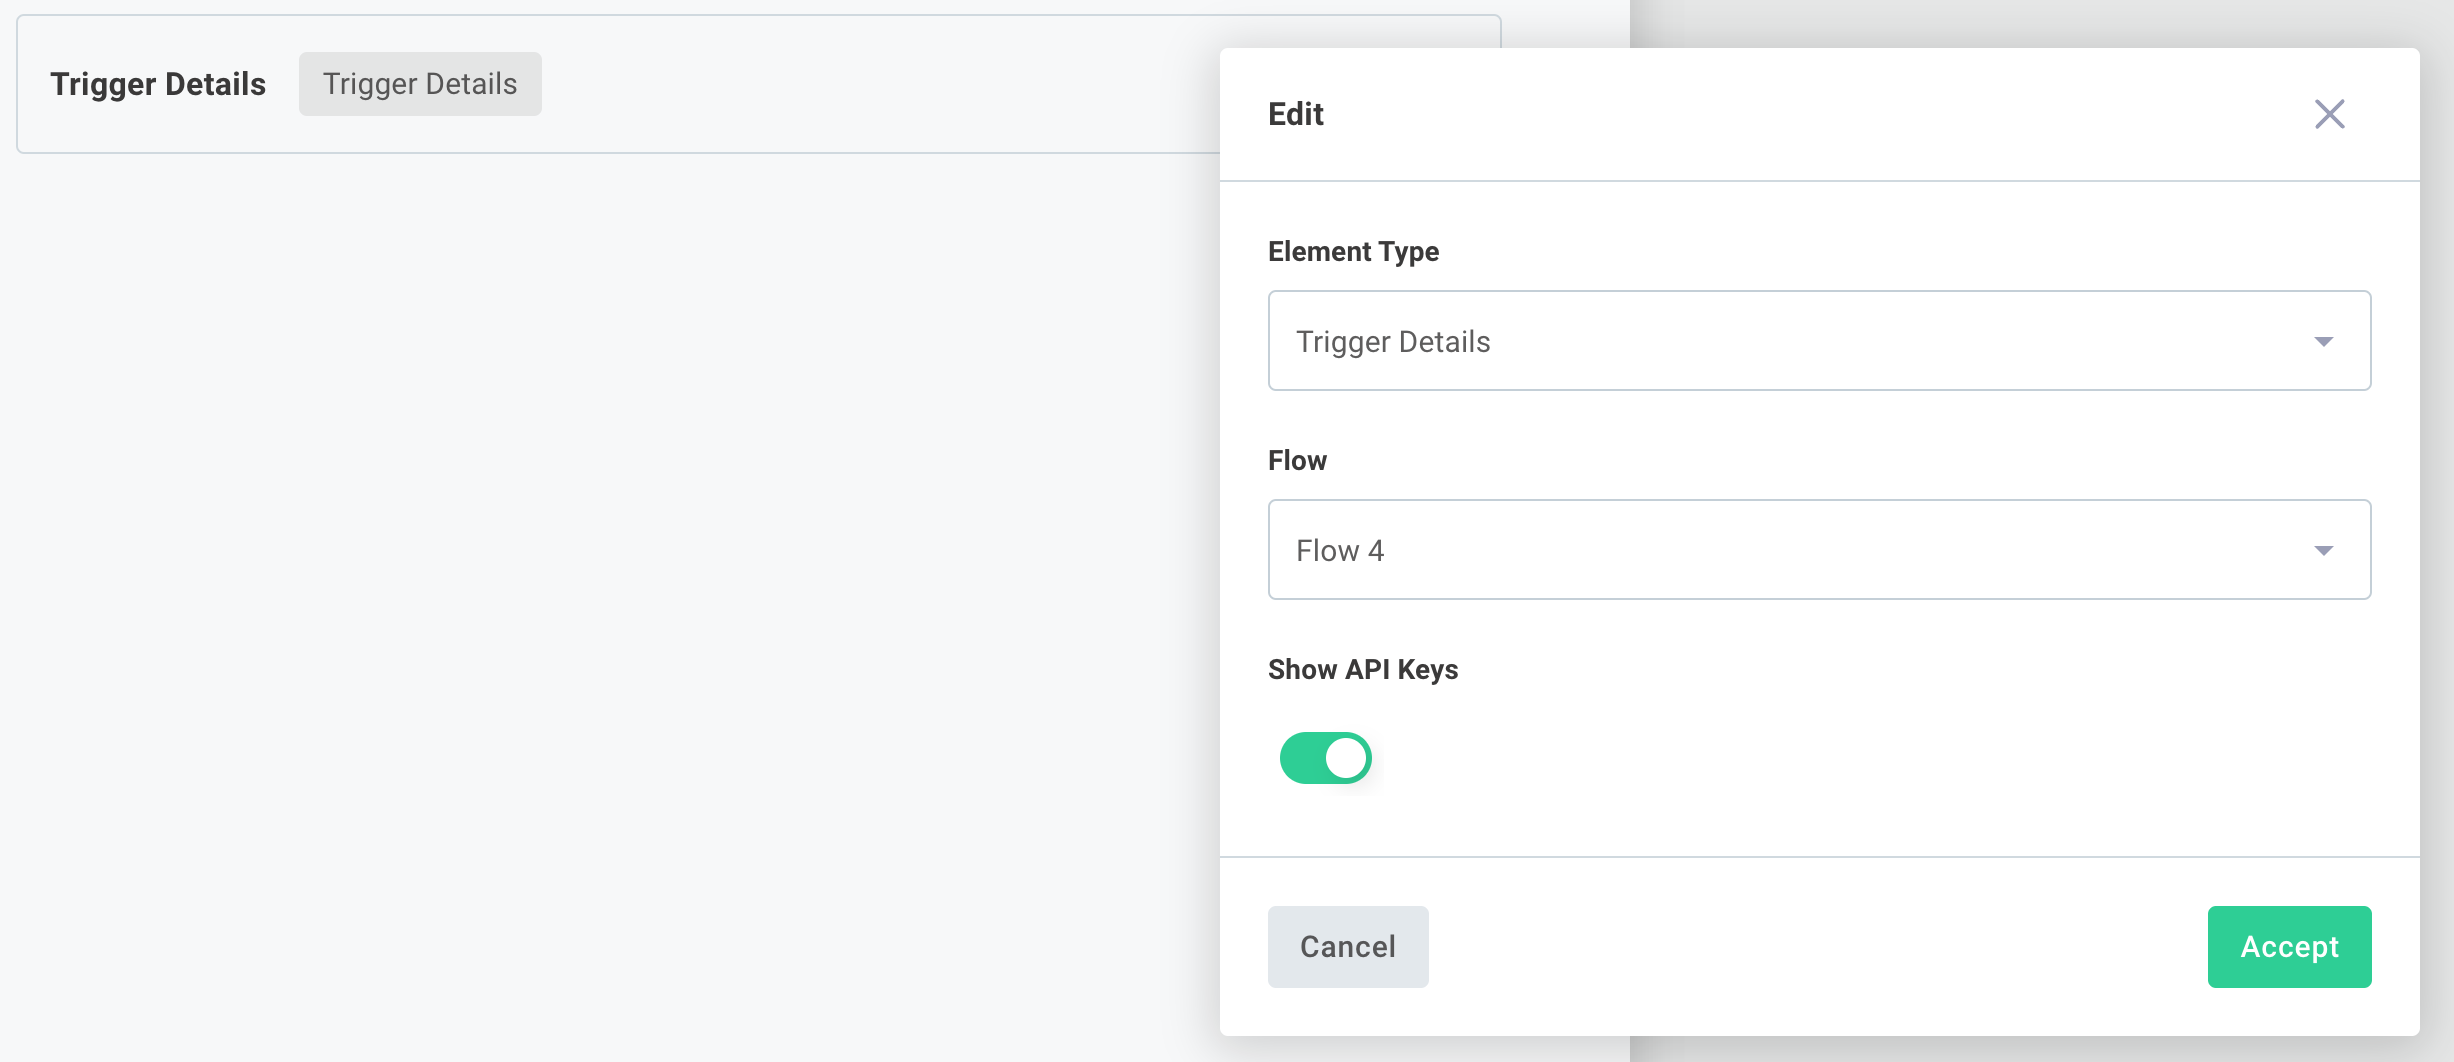
You can add additional headings, helper text, and images to assist your customers as they configure webhooks in third-party apps.
Sending requests to an endpoint secured with an API key
If your instance's flow has an API key, pass in an additional Api-Key header as part of your POST request:
curl 'https://hooks.prismatic.io/trigger/EXAMPLE==' \
  --location \
  --header "Content-Type: application/json" \
  --header "Api-Key: 5cc74e1546382c52a8e93dce6795a5d4" \
  --data '{"examplePayloadKey": "examplePayloadValue"}'
Troubleshooting shared endpoints in production
If you have an integration with Instance-Specific Endpoint Configuration, then all logs and execution records will appear in the instance's execution results page. Executions that that run through a preprocess flow that then trigger a sibling flow are packaged together as one execution in the executions page. If your instance's preprocess flow throws an error or yields the name of a flow that doesn't exist, you can see those errors and step results from that page.
If you have an integration with Shared Endpoint Configuration, then the preprocess flow runs before it knows what customer it will dispatch the work to and is not tied to a specific instance.