Raw Request Actions
Components contain actions that wrap a large number of API endpoints. But, some APIs are vast with thousands of endpoints (only some of which are relevant to integrations). Not every endpoint that an app offers is represented by an action in the component.
That's where an HTTP Raw Request action is useful. Raw request actions allow you to send a request to any endpoint that an API offers, using an HTTP client that is already authenticated with the third-party. Most built-in components include raw request actions, and depending on the API they may include an action for generic HTTP requests or an action for GraphQL requests. This document details how to use raw request actions in your integration.
Determining what endpoint to specify
You can determine the endpoint URL to use by looking at the API's documentation.
For example, the Asana API documentation lists all of the endpoints that they offer.
To Get audit log events from Asana, you need to send a GET request to https://app.asana.com/api/1.0/workspaces/{workspace_gid}/audit_log_events.
The Asana component helper text notes that it fills in the base URL https://app.asana.com/api/1.0 for you.
So, you would need to construct the remaining /workspaces/{workspace_gid}/audit_log_events portion of the URL.
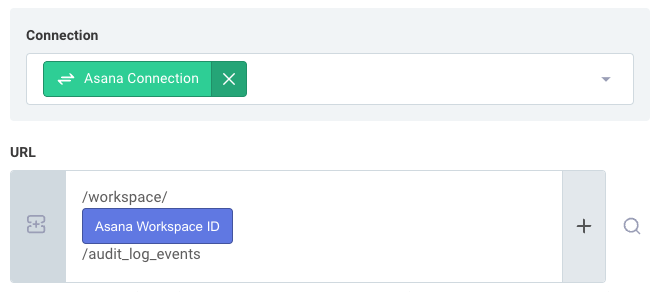
The comments and example you see when you first input the URL are provided by the component developer and let you know what the base URL is and what the rest of the path should look like.
You can override a raw request base URL by specifying a fully qualified URL in the URL input.
For example, if you wanted to send a request to https://my-api.example.com/some/endpoint from the Asana raw request component, you can specify that full URL in the URL input and the component's base URL will be ignored.
Sending JSON to an API using raw request
The majority of modern APIs expect JSON data in the request body.
You can send JSON data to an API using a raw request action by constructing a JSON string in the data input.
Most JSON-based APIs require that you specify a content-type header of application/json when sending JSON data.
Otherwise, you may see an error from the API that the request body is not valid JSON.
If you reference a JavaScript object in the data input, the component will automatically set the content-type header to application/json for you.
If you specify a JSON string, manually include the content-type header in the Headers input.
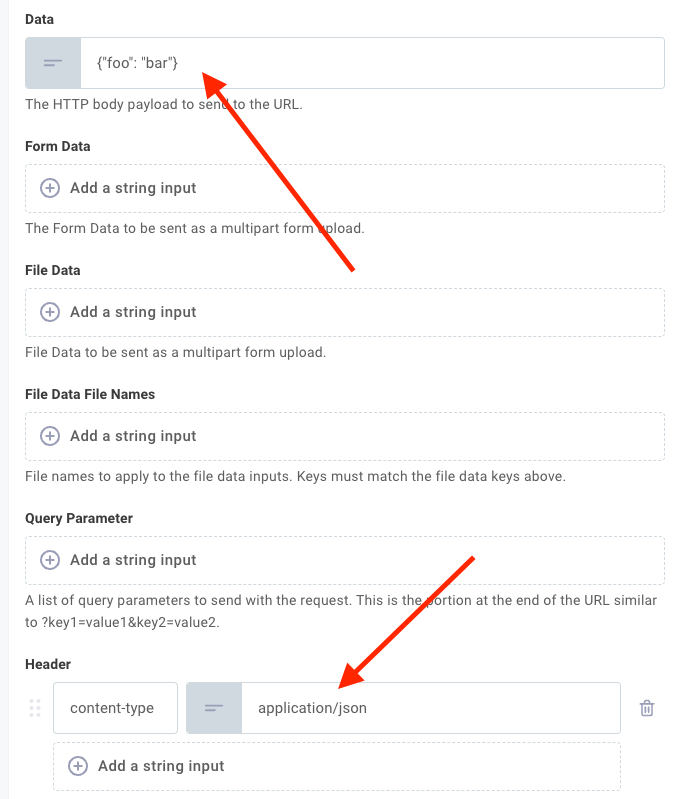
Additionally, you can reference a JavaScript object in the data input, and the component will automatically convert it to a JSON string for you.
This is useful if you have a code step that constructs a JavaScript object that you want to send to the API.
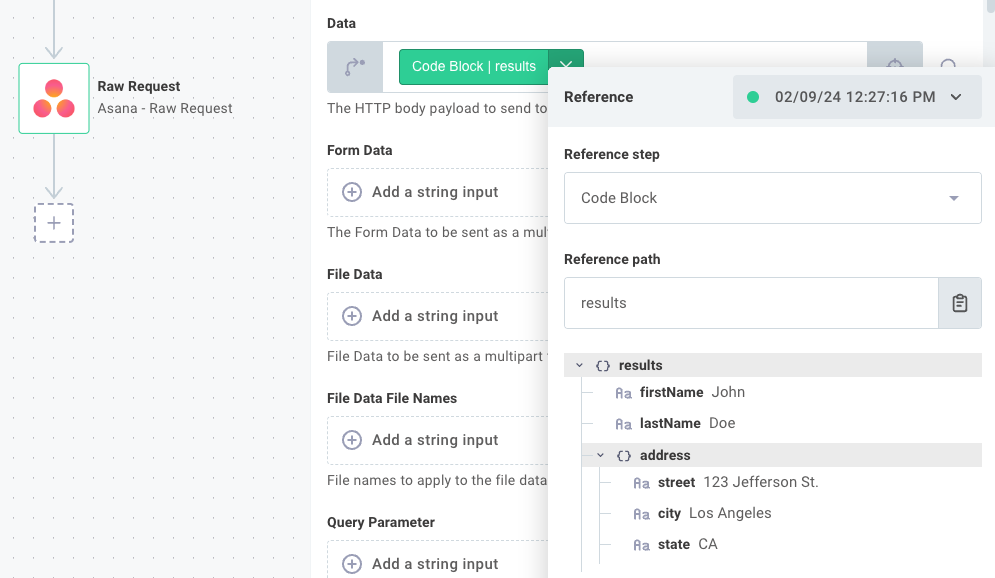
Sending non-JSON text to an API using raw request
For non-JSON text data, like XML, CSV, etc., you can use the Change Data Format component to serialize data into the appropriate format.
Like JSON data, ensure that you specify an appropriate content-type header (e.g. text/csv, application/xml, etc.).
Sending form data to an API using raw request
Form data inputs are useful for sending data to APIs that expect a content type application/x-www-form-urlencoded.
Form data is largely used when you need to send several types of data in a single request, such as a file along with some metadata.
To send form data, first ensure that you have cleared the data input - you can't send both data and form data together.
Then, specify form data key/value pairs.
In the below example, we send both a simple string userid and an XML payload person-xml.
We also send a file profile-picture by referencing a picture from a previous step, and we give the file a name using the File Data File Names input:
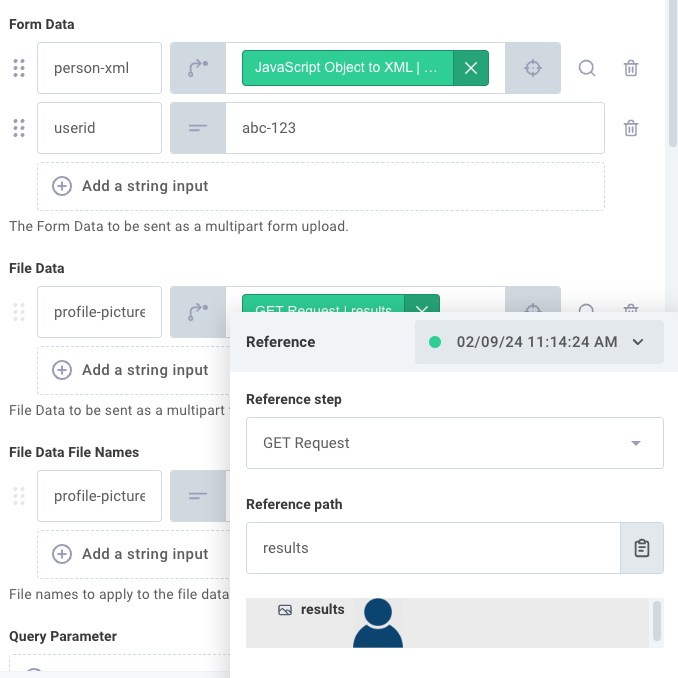
Unlike the data input, form data inputs cannot accept JavaScript objects.
Serialize the JavaScript object into a JSON string (or XML string, etc.) before referencing it.
Sending custom parameters and headers using raw request
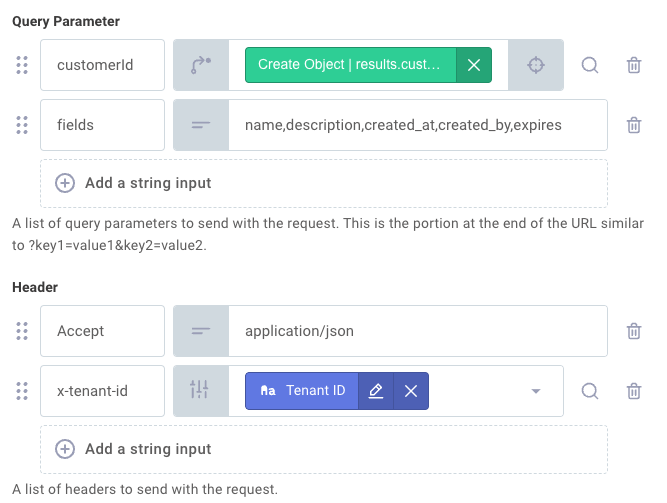
The Query Parameters input allows you to specify custom query parameters to send to the API (that's the ?key=value portion of the URL).
While you could specify query parameters in the URL input through a template input, string concatenation is prone to encoding issues.
The Query Parameters input ensures that your query parameters are properly URI-encoded.
The Headers input allows you to specify custom headers to send to the API.
In addition to the usual Content-Type header, you may need to specify other headers like Accept or a custom header like X-Tenant-ID.
Response data types for raw request actions
The Response Type input allows you to specify how you would like the response data to be formatted.
jsonis the default response type and will return the response data as a JavaScript object. This type assumes that the API returnsapplication/jsonresponse data.textwill return the response data as a string. This type assumes that the API returnstext/plain,text/html, or other text-based response data.arraybufferis used when you expect a binary file response. Use this if you expect a file, like a PDF, image, etc.
Debugging raw request actions
If you're having trouble with a raw request action, you can toggle the Debug input to see the full request and response data in logs (remember to toggle it back before deploying to production!).
This is useful for debugging issues with the request body, headers, etc.
It is also useful to use a tool like Postman Echo to echo back the request that you're sending.
To use Postman echo, set the URL to https://postman-echo.com/post and the HTTP Method to POST.
The raw request step's result will contain the full request data that you sent, which you can compare to the API's documentation to ensure that you're sending the correct data.
Another tool that is useful for debugging raw requests is the mendhak/http-https-echo Docker image. This Docker container will print and echo any request that it receives. To run the Docker container and expose its port, run the following command:
docker run -p 8080:8080 -p 8443:8443 --rm -t mendhak/http-https-echo:latest
In a separate terminal, run ngrok to expose the Docker container to the internet:
ngrok http 8080
ngrok will give you a public URL, like https://73ed-123-45-67-89.ngrok-free.app, which you can use as the URL in your raw request action.
When you run your integration, you can see the full request data in the Docker container's logs.
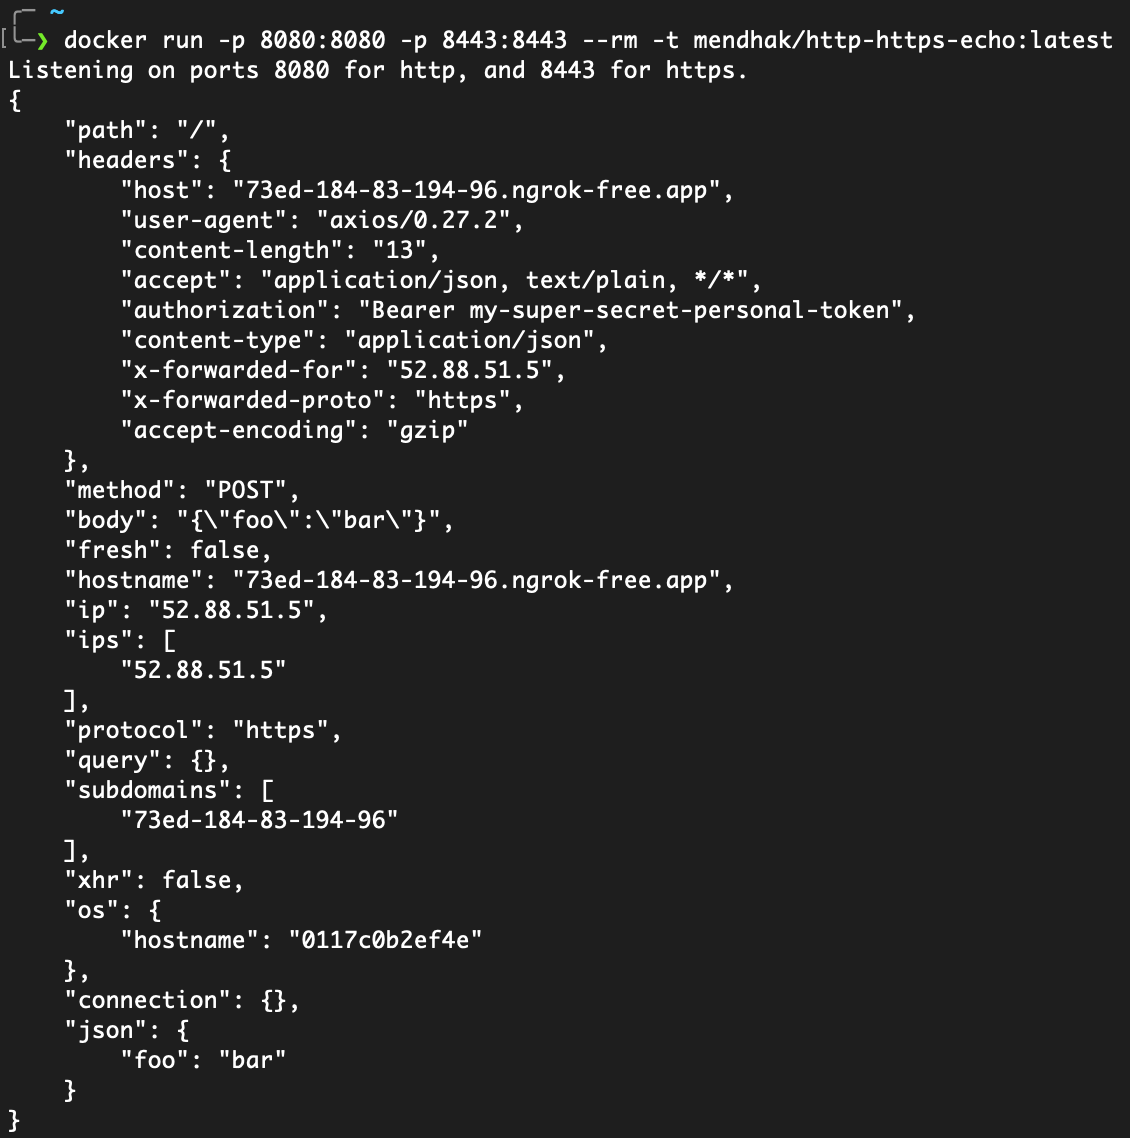
If you can get an HTTP request to work in a tool like curl or Postman but cannot get it to work in a raw request action, send both the raw request and Postman request to your ngrok / echo endpoint.
Comparing the two requests side-by-side can help you identify what is different between the two requests.
Building an HTTP raw request action in your custom component
You can build your own raw request actions for your custom components. That's useful if you have a large API but don't have the development resources to build out actions for every endpoint. A raw request action can be used by your integration builders to send requests to any endpoint that your API offers.
For an example raw request action, see our GitHub examples repo for the code that backs our Asana component's raw request action.
Prismatic components use standard inputs and a sendRawRequest function to build built-in raw request actions.
You can import the same inputs and function from the custom component SDK, @prismatic-io/spectral, so you don't need to write that code yourself.
import { action } from "@prismatic-io/spectral";
import {
  inputs as httpClientInputs,
  sendRawRequest,
} from "@prismatic-io/spectral/dist/clients/http";
import { connectionInput } from "../inputs";

const rawRequest = action({
  display: {
    label: "Raw Request",
    description: "Send a raw HTTP request to Asana API",
  },
  inputs: {
    connection: connectionInput,
    ...httpClientInputs,
    url: {
      // Optional; this adds component-specific instructions to the URL input
      ...httpClientInputs.url,
      comments:
        "Input the path only (/goals), The base URL is already included (https://app.asana.com/api/1.0). For example, to connect to https://app.asana.com/api/1.0/goals, only /goals is entered in this field.",
      example: "/goals",
    },
  },
  perform: async (context, { connection, ...httpClientInputs }) => {
    const asanaToken =
      connection?.token?.access_token || connection?.fields?.apiKey;
    const { data } = await sendRawRequest(
      "https://app.asana.com/api/1.0", // Change this to your API's base URL
      httpClientInputs,
      { Authorization: `Bearer ${asanaToken}` }, // Authorization methods vary by API
    );
    return { data };
  },
});

export default rawRequest;
You can likely copy and paste the above code, changing the helpful comments and example for the URL input and changing the base URL and authorization header to match your API.
Sending GraphQL requests using raw request
Some APIs, like Fluent Commerce, are GraphQL-based.
These built-in components generally have Generic GraphQL Request actions that you can use to send GraphQL requests.
The generic GraphQL request action has a Query or Mutation input, which is the GraphQL query or mutation that you want to send.
It's wise to parameterize queries and mutations using variables (to avoid QL-injection issues).
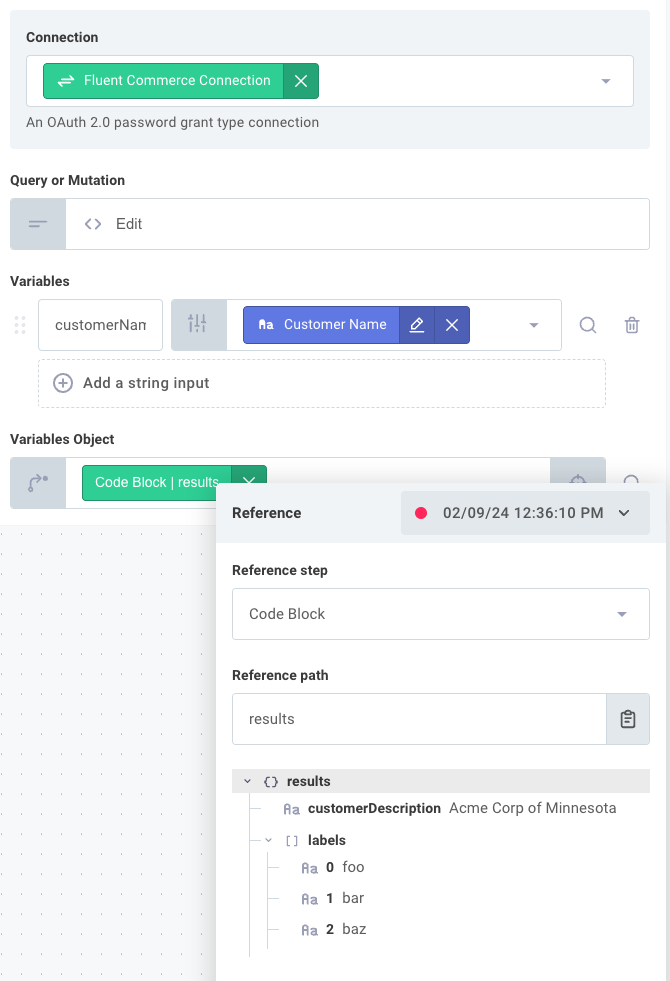
Most generic GraphQL request actions have a Variables input, which is a key/value input where you can specify variables and their values that your mutation uses.
It also generally includes a Variables Object input if you would like to provide a key/value object from a previous step.
Variables and Variables Object are merged together and can be used in tandem.
For example, suppose we want to send this mutation:
mutation myMutation(
  $customerName: String!
  $customerDescription: String!
  $labels: [String]
) {
  createCustomer(
    input: {
      name: $customerName
      description: $customerDescription
      labels: $labels
    }
  ) {
    id
  }
}
You could reference customerName from a previous step but also supply customerDescription or labels from a previous step using the Variables Object input:
GraphQL APIs often offer a web-based GraphQL explorer where you can construct queries and mutations.
We recommend using a GraphQL client tool to construct your query or mutation first and then copy/pasting it into the Query or Mutation input.
Building a GraphQL raw request action in a custom component
A generic GraphQL raw request action is similar to an HTTP raw request action, but instead of generic data inputs it has inputs for the query/mutation to run and the parameterized variables to use.
This example requires three additional dependencies:
npm install graphql graphql-request lodash.merge
In the below example, we use the graphql-request library to prepare and send the GraphQL request (including the query/mutation and parameterized variables).
lodash.merge is used to merge the Variables and Variables Object inputs together, as you may want to specify some variables in the UI and reference other variables as an object from a previous step.
The portions of code you will need to change are the GraphQL API URL, and any custom authorization headers that your API requires.
import { GraphQLClient } from "graphql-request";
import {
  Connection,
  action,
  component,
  connection,
  input,
  util,
} from "@prismatic-io/spectral";
import merge from "lodash.merge";

const createClient = (connection: Connection) =>
  new GraphQLClient(
    "https://app.prismatic.io/api", // Replace this URL with your API
    {
      headers: { Authorization: `Bearer ${connection.fields.apiKey}` }, // Authorization methods vary by API
    },
  );

const genericGraphQLQuery = action({
  display: {
    label: "Generic GraphQL Query",
    description: "Issue a query or mutation against the GraphQL API",
  },
  inputs: {
    connection: input({
      label: "Connection",
      type: "connection",
      required: true,
    }),
    query: input({
      label: "Query or Mutation",
      type: "code",
      required: true,
      language: "graphql",
      clean: util.types.toString,
    }),
    // Variables are presented in the UI as a key-value pair list, and are handy
    // if you know ahead of time how many variables your query includes
    variables: input({
      label: "Variables",
      type: "string",
      required: false,
      collection: "keyvaluelist",
      clean: (val: any) => util.types.keyValPairListToObject(val),
    }),
    // Variables Object is presented in the UI as a JSON editor, and is handy
    // if you don't know ahead of time how many variables your query includes,
    // or if you want to reference entire key/value objects from previous steps.
    variablesObject: input({
      label: "Variables Object",
      type: "code",
      language: "json",
      required: false,
      clean: (value) => (value ? util.types.toObject(value) : {}),
    }),
  },
  perform: async (context, params) => {
    const client = createClient(params.connection);
    const data = await client.request(
      params.query,
      merge(params.variables, params.variablesObject), // Merge the two variables inputs together
    );
    return { data };
  },
});