On-Prem Databases Requiring Client Libraries or Drivers
Prismatic's integration runner executes NodeJS code. Node.js is great for connecting to HTTP-based APIs (like REST, SOAP, or GraphQL APIs) or when connecting to databases when pure JavaScript clients are available. For example, connectors like MySQL, PostgreSQL, or Redis can rely on pure JavaScript libraries like mysql2, pg-promise, and redis respectively.
However, some on-prem databases like IBM DB2 do not have pure JavaScript libraries. They may offer NodeJS packages (like ibm_db), but those packages are wrappers around ODBC drivers or non-JavaScript libraries that require additional compilation or installation.
Connecting to databases like IBM DB2
When connecting to on-prem databases that lack pure JavaScript client libraries, install the required database libraries, drivers, or binaries on a Docker image that lives alongside the on-prem agent container. This database client container can translate HTTP requests from your integration into requests that the database understands and can return HTTP-based responses to your integration.
Creating an IBM DB2 client container
IBM offers a set of libraries that wrap their database client. In this example, we'll create a database client using Python and Flask (though you could do the same with NodeJS and Express, PHP, etc.).
FROM python:3
WORKDIR /app
# Download and decompress database driver
ADD https://public.dhe.ibm.com/ibmdl/export/pub/software/data/db2/drivers/odbc_cli/linuxx64_odbc_cli.tar.gz /tmp/linuxx64_odbc_cli.tar.gz
RUN mkdir /app/db2_driver
RUN tar -xzvf /tmp/linuxx64_odbc_cli.tar.gz -C /app/db2_driver
ENV IBM_DB_HOME=/app/db2_driver
ENV LD_LIBRARY_PATH="/app/db2_driver/lib:$LD_LIBRARY_PATH"
# Install Python Dependencies
RUN pip install --upgrade setuptools pip
RUN pip install flask
RUN pip install ibm_db
# Copy our app code and run a server on port 4000
COPY app.py .
EXPOSE 4000
CMD ["flask", "run", "--host=0.0.0.0", "--port=4000"]
In this Dockerfile, we generate a container from the python:3 image.
We download the DB2 driver from IBM and extract the driver, setting two required environment variables.
Then, we install two Python dependencies: flask, which is a webserver, and ibm_db, which relies on the IBM driver we downloaded.
Finally, we run our web server on port 4000.
The webserver is defined in app.py.
It's a short script that declares a single POST endpoint that takes a username, password, database, and SQL query from the POST request and issues that query against that database.
It returns the resulting records in an HTTP response as JSON.
import ibm_db
import os
from flask import Flask, request, jsonify, make_response

app = Flask(__name__)

# Handle SELECT statements and return results
@app.route("/select", methods=['POST'])
def query():
  data = request.get_json()

  username = data["username"]
  password = data["password"]
  database = data["database"]
  query = data["query"]

  hostname = os.environ["DB2_HOST"]
  port = os.environ["DB2_PORT"]

  conn = ibm_db.connect(f"DATABASE={database};HOSTNAME={hostname};PORT={port};PROTOCOL=TCPIP;UID={username};PWD={password};", "", "")

  stmt = ibm_db.exec_immediate(conn, query)

  response_data = []

  result = True
  while(result):
    result = ibm_db.fetch_assoc(stmt)
    if (result): response_data.append(result)

  return make_response(jsonify(response_data))
This short script only handles SELECT queries but could easily be extended to respond appropriately to CREATE, UPDATE, or DELETE SQL statements.
Running a client container alongside an on-prem agent
It is important that the database client container runs alongside the on-prem agent container, and you can do that by declaring the database client service in the same docker-compose.yml file as the on-prem agent service.
Here, we run three services:
db2is an IBM DB2 database that we run locally to simulate a database on our network. Your customer likely runs a full IBM DB2 database.db_clientruns our Python code above, translating HTTP requests to DB2 querieson-prem-agentis the Prismatic on-prem agent which establishes a connection between your integration in Prismatic's cloud and thedb_clientcontainer on your customer's network.
version: "3.1"

volumes:
  dbdata:
    name: db2-data

services:
  # This container runs an IBM DB2 database and simulates an on-prem database
  # After starting this container, wait up to 15 minutes for the database to
  # be initialized and ready for connections (it takes a while!).
  db2:
    platform: linux/x86_64
    image: ibmcom/db2
    privileged: true
    environment:
      LICENSE: accept
      DBNAME: testdb
      DB2INST1_PASSWORD: my-pass
    volumes:
      - dbdata:/database

  # This container takes HTTP requests and translates them into DB2 queries
  db_client:
    platform: linux/x86_64
    build: ./db-client
    environment:
      DB2_HOST: db2
      DB2_PORT: 50000

  # Prismatic on-prem agent which will proxy requests to the "client" container
  on-prem-agent:
    image: prismaticio/on-prem-agent:latest
    environment:
      PRISMATIC_URL: https://app.prismatic.io
      APP_PORT: 4000
      APP_HOST: db_client
      NAME: DB2 Client
      REGISTRATION_JWT: eyJ0e...
    restart: always # Use "always" to start this service when the Docker engine starts
Invoking the database client from an integration
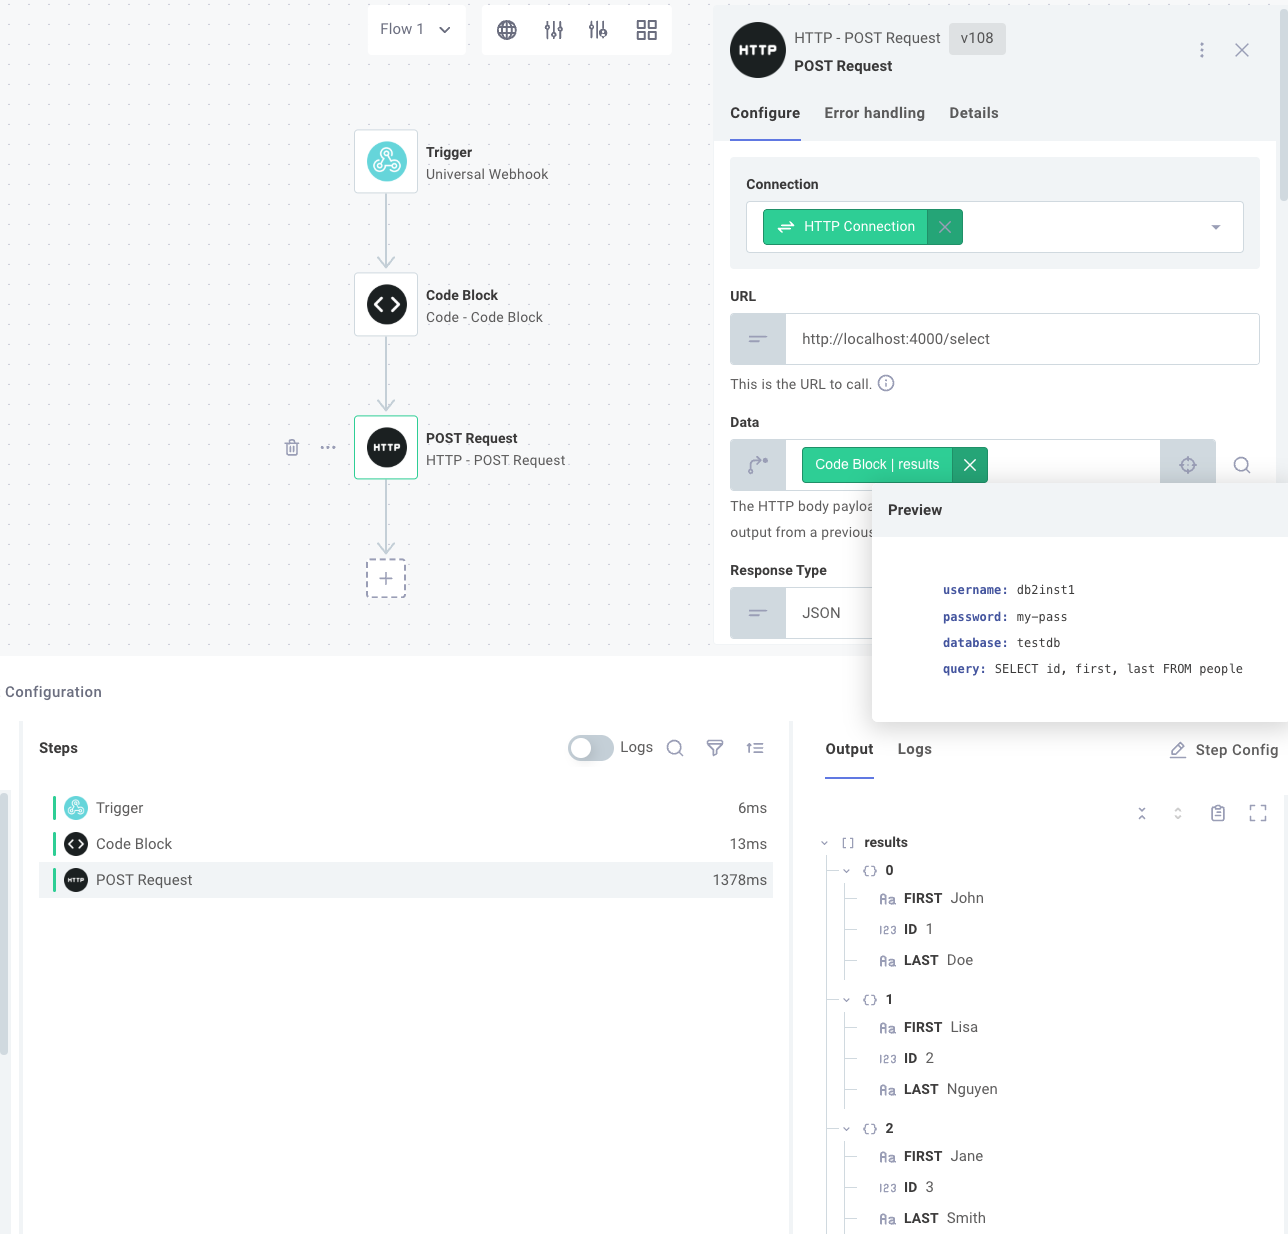
Now that an HTTP server is running alongside the on-prem agent, you can either use the built-in HTTP connector or build a custom connector to send requests to the database client.
Since our database client runs a web server on port 4000 and we're proxying requests through the on-prem agent to the database client, we can point an HTTP POST request to http://localhost:4000/select and send a query that we would like to run.
