Component Manifests
Component manifests are deprecated. Use npm component packages whenever the component you need is available on npm. They are the recommended way to use components in code-native integrations.
Component manifests remain supported for backward compatibility. Use this workflow only when maintaining code that already depends on manifests or when a component is not available as an npm package. For existing integrations, follow the migration steps to move to npm packages one component at a time.
A component manifest describes a component's connections, actions, triggers, and data sources and references their implementation in Prismatic. The instructions below cover maintaining these references and migrating away from them.
Migrate from component manifests
Existing manifests continue to work; you do not need to migrate an entire integration at once. For each component you move to an npm package:
- Install the package and the latest Spectral SDK.
- Replace manifest imports with the package's default import. Call actions as
component.actions.actionKey(inputs), using the package's input types. - Update connection and data source definitions to use the package's factories, and update any component triggers. Preserve your config variable names and stable keys when they still represent the same configuration.
- Remove that component's manifest registry entry once no code references it. Keep entries for other manifests still in use.
- Rebuild and import the integration, test the flows and configuration wizard, then publish and deploy the updated integration.
An npm component package includes executable code; an @component-manifests/* package contains references to code hosted in Prismatic.
Replacing one with the other requires updating the call sites and configuration definitions as well as the import path.
Testing integrations that use manifests
Manifest actions reference code hosted in Prismatic, which is not available in your local environment. To exercise those actions, test your integration in Prismatic or from the CLI.
Adding component manifests to your code-native project
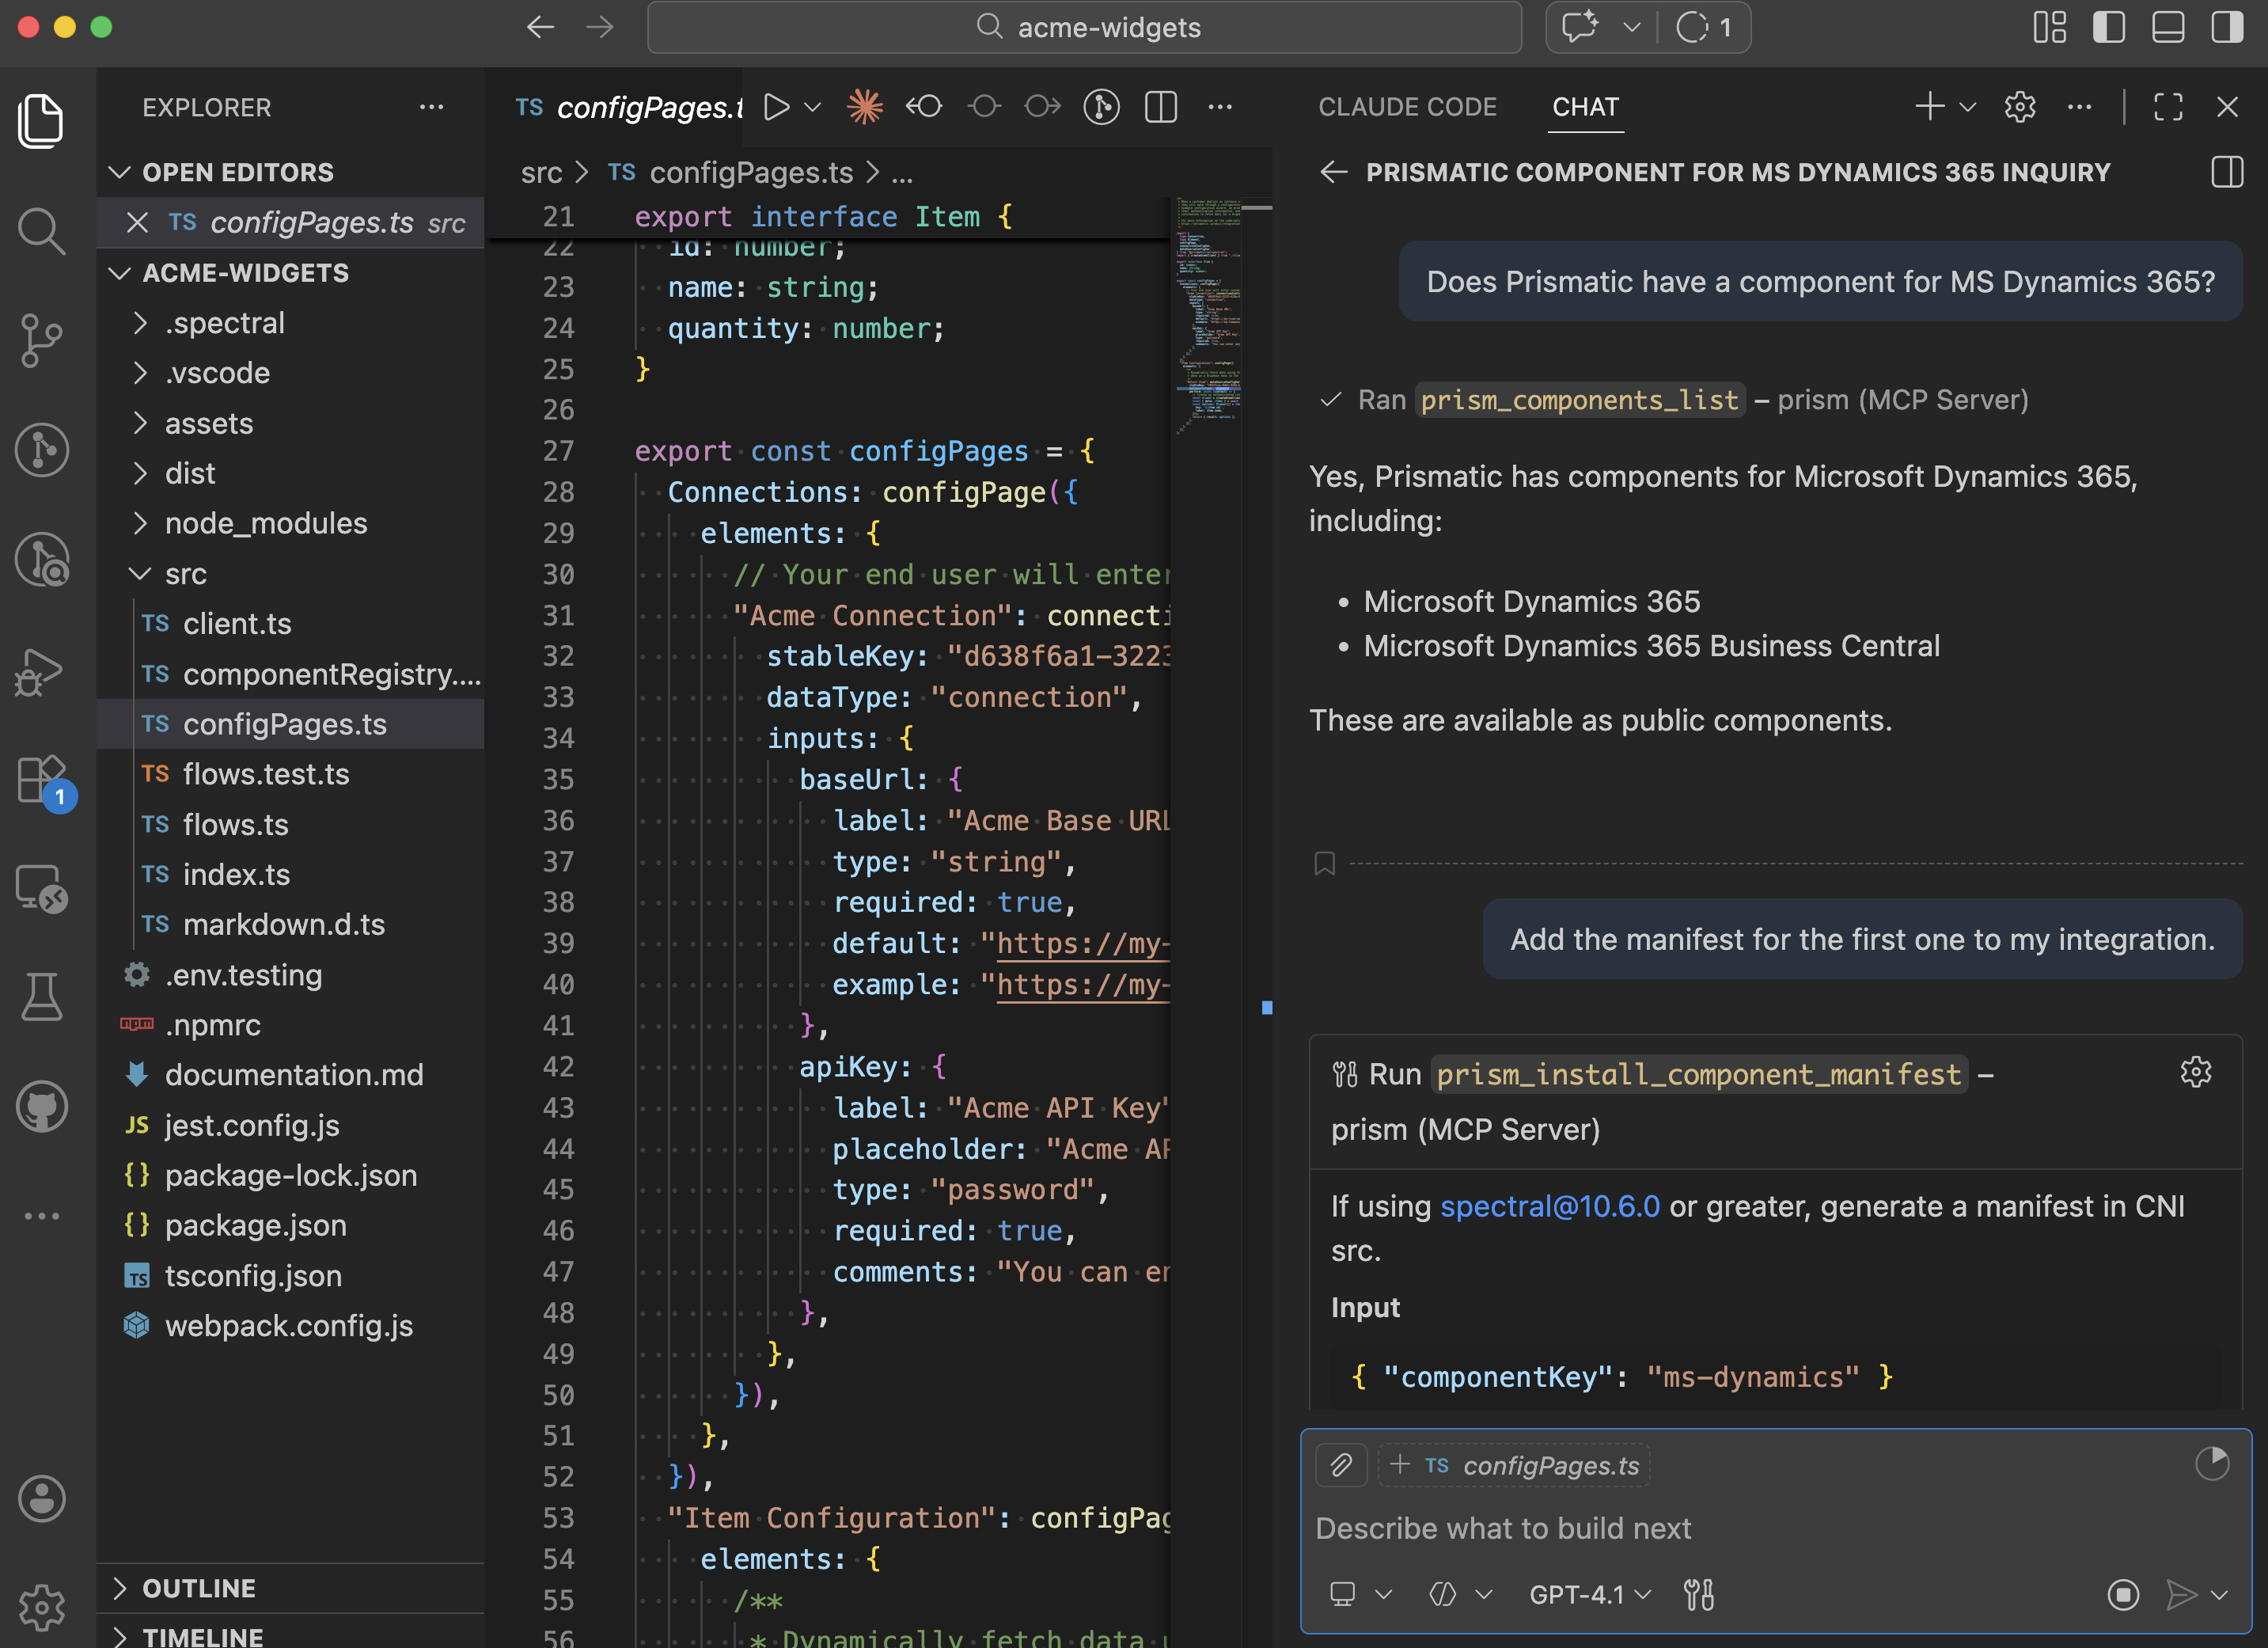
If you are using an AI coding agent like Cursor or GitHub Copilot, you can leverage prism-mcp to accelerate code-native integration development.
prism-mcp comes with tools that generate code snippets for referencing existing components.
To use an existing trigger, connection, data source, or action, you need to add the component's manifest (files that describe the component's connections, actions, triggers, and data sources) to your code-native project. This can be done in one of two ways:
-
Generate a component manifest from Prismatic's API. From a terminal in your code-native directory, run:
Generate a component manifest from Prismatic's API for Slacknpx cni-component-manifest slackThe component key (a unique identifier for the component) that you supply to the
cni-component-manifestcommand can be found at the top of a component's docs page.A private component manifest can be generated by adding the
--privateflag to the command:Generate a component manifest from a private componentnpx cni-component-manifest my-private-component --private -
Legacy Method: Manifests for Prismatic-provided public components are available through Prismatic's component manifests repository. When you initialized your code-native integration, Prismatic created an
.npmrcfile that read:.npmrc@component-manifests:registry=https://app.prismatic.io/packages/npmThat instructs your package manager to look for packages that begin with
@component-manifestsin the Prismatic repository.To add a component's manifest package to your code-native project, take note of the component's key and run:
Add the Slack component's manifest to a code-native projectnpm install @component-manifests/slackUpdate to new component reference syntaxIf you previously added a component manifest using the legacy method, see our historical Spectral 10.6 instructions for instructions on how to use new component reference syntax.
Including components in your component registry
Once the component manifest is installed, add it to componentRegistry.ts:
import { componentManifests } from "@prismatic-io/spectral";
import slack from "./manifests/slack";

// Or, if you installed the manifest as an npm dependency,
// import slack from "@component-manifests/slack";

export const componentRegistry = componentManifests({
  slack,
});
The component registry tells your code-native integration which component manifests are available for use.
Behind the scenes, .spectral/index.ts will inspect your code-native project's exported componentRegistry object and will provide type hinting to your TypeScript based on which components are included in your component registry.
Using existing connections in code-native
Typically, connections are created outside of the code-native project as reusable customer connections, organization (customer) connections, or organization (global) connections. For example, you can establish a reusable customer connection for Salesforce in the Prismatic web app, and then reference the connection in your code-native integration. Take note of the connection's Stable Key in the Prismatic web app and be sure to generate your component manifest after creating the connection so the manifest includes the connection's Stable Key.
You can either use the component manifest's *ReusableConnection wrapper function, which has some type hinting for available stable keys, or a customerActivatedConnection wrapper function - both do the same thing.
import {
  configPage,
  customerActivatedConnection,
} from "@prismatic-io/spectral";
import { slackReusableConnection } from "./manifests/slack/connections";

export const configPages = {
  Connections: configPage({
    elements: {
      "Slack Connection": slackReusableConnection("my-connection-stable-key"),
      // OR "Slack Connection": customerActivatedConnection({
      //   stableKey: "my-connection-stable-key",
      // }),
    },
  }),
};
If the connection is a user connection - one that each of your customers' users authorizes for themselves - use the *UserActivatedConnection wrapper instead, on a user level config page:
import { userLevelConfigPage } from "@prismatic-io/spectral";
import { slackUserActivatedConnection } from "./manifests/slack/connections";

export const userLevelConfigPages = {
  "Your Slack": userLevelConfigPage({
    elements: {
      "Slack Connection": slackUserActivatedConnection(
        "my-user-connection-stable-key",
      ),
    },
  }),
};
The two wrappers are not interchangeable: each produces a different kind of config variable, and a user connection is only accepted on a user level page.
If you'd prefer to create an integration-scoped connection, you can specify your connection information directly in your code-native project.
After adding an existing component's manifest to your code-native project, you can use a component's connection in your code-native integration's configPages definition.
The component manifest includes a connection definition wrapper function that you can reference.
import { configPage } from "@prismatic-io/spectral";
import { slackOauth2 } from "./manifests/slack/connections/oauth2";

export const configPages = {
  Connections: configPage({
    tagline: "Authenticate with Slack",
    elements: {
      "Slack OAuth Connection": slackOauth2("my-slack-connection", {
        clientId: {
          value: "REPLACE_ME_WITH_YOUR_CLIENT_ID",
          permissionAndVisibilityType: "organization",
          visibleToOrgDeployer: false,
        },
        clientSecret: {
          value: "REPLACE_ME_WITH_YOUR_CLIENT_SECRET",
          permissionAndVisibilityType: "organization",
          visibleToOrgDeployer: false,
        },
        signingSecret: {
          value: "REPLACE_ME_WITH_YOUR_SIGNING_SECRET",
          permissionAndVisibilityType: "organization",
          visibleToOrgDeployer: false,
        },
        scopes: {
          value: "chat:write chat:write.public channels:read",
          permissionAndVisibilityType: "organization",
          visibleToOrgDeployer: false,
        },
        authorizeUrl: {
          permissionAndVisibilityType: "organization",
          visibleToOrgDeployer: false,
        },
        isUser: {
          permissionAndVisibilityType: "organization",
          visibleToOrgDeployer: false,
        },
        tokenUrl: {
          permissionAndVisibilityType: "organization",
          visibleToOrgDeployer: false,
        },
        revokeUrl: {
          permissionAndVisibilityType: "organization",
          visibleToOrgDeployer: false,
        },
      }),
    },
  }),
};
Using existing data sources in code-native
After adding an existing component's manifest to your code-native project, you can use a component's data source in your code-native integration's configPages definition.
At the top of your config pages file, import your data source wrapper function from the component's manifest:
import { configPage } from "@prismatic-io/spectral";
import { slackSelectChannels } from "./manifests/slack/dataSources/selectChannels";

export const configPages = {
  // ...
  "Slack Config": configPage({
    tagline: "Select a Slack channel from a dropdown menu",
    elements: {
      "Select Slack Channel": slackSelectChannels("my-slack-channel-picklist", {
        connection: { configVar: "Slack OAuth Connection" },
        includePublicChannels: { value: true },
      }),
    },
  }),
};
If the data source requires a connection, you can pass a connection to the data source using the appropriate input value by specifying a configVar by name (connection: { configVar: "Slack OAuth Connection" } in the example above).
Using existing triggers in code-native
After adding an existing component's manifest to your code-native project, you can use a component's trigger in your code-native integration's flow definition.
At the top of your config pages file, import your trigger wrapper function from the component's manifest:
import { flow } from "@prismatic-io/spectral";
import { hashHmacWebhookTrigger } from "./manifests/hash/triggers/hmacWebhookTrigger";

export const existingComponentTriggerFlow = flow({
  name: "Existing Component Trigger Flow",
  stableKey: "6f58c32c-b29a-4f55-97e6-b86bf9e24551",
  description: "This flow uses an existing component trigger",
  onTrigger: hashHmacWebhookTrigger({
    hmacHeaderName: { value: "x-signature-256" },
    secretKey: { configVar: "My Secret Key Config Var" },
    hashFunction: { value: "sha256" },
    headers: { value: [] },
  }),
  onExecution: async (context, params) => {
    return Promise.resolve({ data: null });
  },
});

export default [existingComponentTriggerFlow];
If the trigger takes inputs, those inputs are passed to the trigger as values, and values can be either static string value or can reference config variables with configVar: "Config Variable Name".
If a trigger has a lifecycle function, it will be called automatically when the integration is deployed as an instance.
If your flow has onInstanceDeploy, onInstanceDelete, webhookLifecycleHandlers.create, or webhookLifecycleHandlers.delete functions, the trigger's function will run first, followed by the flow's lifecycle function.
Using existing actions in code-native
After importing an existing component's manifest and adding it to your component registry, you can call one of the component's actions from within your flow by importing the action from your component manifest.
For example,
import { flow, util } from "@prismatic-io/spectral";
import slackActions from "../manifests/slack/actions";

export const existingComponentTriggerFlow = flow({
  name: "Send a Slack Message",
  stableKey: "send-a-slack-message",
  description: "Send 'Hello World' to a Slack channel",
  onExecution: async (context, params) => {
    await slackActions.postMessage.perform({
      channelName: util.types.toString(
        context.configVars["Select Slack Channel"],
      ),
      connection: context.configVars["Slack OAuth Connection"],
      message: "Hello World",
    });

    return { data: null };
  },
});
Salesforce CNI example
In this example, we use the existing Salesforce component's OAuth 2.0 connection, Flow Outbound Message Webhook trigger, and Get Record action to create a flow that listens for Account notifications from Salesforce and fetches the full record for each notification.
- configPages.ts
- flows.ts
import { configPage } from "@prismatic-io/spectral";
import { salesforceOauth2 } from "./manifests/salesforce/connections/oauth2";

if (
  !process.env.SALESFORCE_CLIENT_ID ||
  !process.env.SALESFORCE_CLIENT_SECRET
) {
  throw new Error(
    "Missing Salesforce OAuth2 client ID or client secret. Please set the SALESFORCE_CLIENT_ID and SALESFORCE_CLIENT_SECRET environment variables.",
  );
}

export const configPages = {
  Connections: configPage({
    elements: {
      "Salesforce Connection": salesforceOauth2("salesforce-connection", {
        clientId: {
          value: process.env.SALESFORCE_CLIENT_ID,
          permissionAndVisibilityType: "organization",
        },
        clientSecret: {
          value: process.env.SALESFORCE_CLIENT_SECRET,
          permissionAndVisibilityType: "organization",
        },
      }),
    },
  }),
};
import { flow } from "@prismatic-io/spectral";
import { salesforceFlowOutboundMessageTrigger } from "./manifests/salesforce/triggers/flowOutboundMessageTrigger";
import salesforceActions from "./manifests/salesforce/actions";

interface SalesforceNotification {
  Id: string;
  Name: string;
  type: string;
}

export const salesforceAccountNotifications = flow({
  name: "Listen for Salesforce Account Notifications",
  stableKey: "salesforce-account-notifications",
  description:
    "This flow uses an existing component trigger to listen for Account notifications from Salesforce.",
  onTrigger: salesforceFlowOutboundMessageTrigger({
    connection: { configVar: "Salesforce Connection" },
    prefix: { value: "acme" },
    triggerObject: { value: "Account" },
    fields: { value: ["Id", "Name"] },
  }),
  onExecution: async (context, params) => {
    const notifications = params.onTrigger.results.body
      .data as SalesforceNotification[];
    for (const notification of notifications) {
      const record = await salesforceActions.getRecord.perform({
        connection: context.configVars["Salesforce Connection"],
        recordId: notification.Id,
        recordType: notification.type,
      });
      context.logger.info("Fetched record", { record });
    }
    return { data: null };
  },
});

export default [salesforceAccountNotifications];
Spectral 10.6 reference syntax
Maintaining integrations on Spectral 10.6
These historical instructions apply to existing projects using generated references. For current projects, follow the npm migration steps.
Spectral 10.6 introduces a new way for you to reference existing component actions, data sources and connections in a code-native integration. You can now use new action, data source, and connection reference functions to build code-native integrations more easily, with better type safety and autocompletion in your IDE.
Existing reference syntax will continue to work, but we recommend updating your code-native integrations to use the new reference functions.
Generating new component manifests
Previously, you had to install all component type manifests as npm dependencies.
Now, you can install component manifests into your src/manifests/ directory.
This lets you skip the step of generating manifests for your custom components and publishing them to npm - the manifest is generated from information in the Prismatic API.
You can now generate new manifests for both public and private components, which include new type wrappers.
To install a component manifest, run the following command:
# Public component
npx cni-component-manifest slack

# Private component
npx cni-component-manifest slack --private
Next, remove your component's npm dependency from package.json and run npm install or yarn install.
Finally, update your import statements to import from the manifest file instead of the npm package.
@@ -1,5 +1,5 @@
 import { componentManifests } from "@prismatic-io/spectral";
-import slack from "@component-manifests/slack";
+import slack from "./manifests/slack";

 export const componentRegistry = componentManifests({
   slack,
New component action functions
Actions can now be imported from a component manifest and invoked directly.
@@ -8,6 +8,7 @@

 import { flow, util } from "@prismatic-io/spectral";
 import axios from "axios";
+import slackActions from "../manifests/slack/actions";

 interface TodoItem {
   id: number;
@@ -34,7 +35,7 @@ export const todoAlertsFlow = flow({
       } else {
         logger.info(`Sending message for item ${item.id}`);
         try {
-          await context.components.slack.postMessage({
+          await slackActions.postMessage.perform({
             channelName: util.types.toString(
               configVars["Select Slack Channel"]
New component trigger functions
Similar to actions, triggers can be imported from a component manifest and invoked directly.
import { flow } from "@prismatic-io/spectral";
import { salesforceFlowOutboundMessageTrigger } from "./manifests/salesforce/triggers/flowOutboundMessageTrigger";

export const salesforceAccountNotifications = flow({
  name: "Listen for Salesforce Account Notifications",
  stableKey: "salesforce-account-notifications",
  description:
    "This flow uses an existing component trigger to listen for Account notifications from Salesforce.",
  onTrigger: salesforceFlowOutboundMessageTrigger({
    connection: { configVar: "Salesforce Connection" },
    prefix: { value: "acme" },
    triggerObject: { value: "Account" },
    fields: { value: ["Id", "Name"] },
  }),
  onExecution: async (context, params) => {
    // ...
  },
});
New component connection functions
Connections can be imported from a component manifest, and are named <componentKey><connectionKey>.
The first parameter of the connection function is the stable key of the connection config var.
@@ -1,9 +1,9 @@
 import {
   configPage,
   configVar,
-  connectionConfigVar,
   dataSourceConfigVar,
 } from "@prismatic-io/spectral";
+import { slackOauth2 } from "./manifests/slack/connections/oauth2";
 import {
   SLACK_CLIENT_ID,
   SLACK_CLIENT_SECRET,
@@ -14,34 +14,26 @@ export const configPages = {
   Connections: configPage({
     tagline: "Authenticate with Slack",
     elements: {
-      "Slack OAuth Connection": connectionConfigVar({
-        stableKey: "slack-oauth-connection",
-        dataType: "connection",
-        connection: {
-          component: "slack",
-          key: "oauth2",
-          values: {
-            clientId: {
-              value: SLACK_CLIENT_ID,
-              permissionAndVisibilityType: "organization",
-              visibleToOrgDeployer: false,
-            },
-            clientSecret: {
-              value: SLACK_CLIENT_SECRET,
-              permissionAndVisibilityType: "organization",
-              visibleToOrgDeployer: false,
-            },
-            signingSecret: {
-              value: SLACK_SIGNING_SECRET,
-              permissionAndVisibilityType: "organization",
-              visibleToOrgDeployer: false,
-            },
-            scopes: {
-              value: "chat:write chat:write.public channels:read",
-              permissionAndVisibilityType: "organization",
-              visibleToOrgDeployer: false,
-            },
-          },
+      "Slack OAuth Connection": slackOauth2("slack-oauth-connection", {
+        clientId: {
+          value: SLACK_CLIENT_ID,
+          permissionAndVisibilityType: "organization",
+          visibleToOrgDeployer: false,
+        },
+        clientSecret: {
+          value: SLACK_CLIENT_SECRET,
+          permissionAndVisibilityType: "organization",
+          visibleToOrgDeployer: false,
+        },
+        signingSecret: {
+          value: SLACK_SIGNING_SECRET,
+          permissionAndVisibilityType: "organization",
+          visibleToOrgDeployer: false,
+        },
+        scopes: {
+          value: "chat:write chat:write.public channels:read",
+          permissionAndVisibilityType: "organization",
+          visibleToOrgDeployer: false,
         },
       }),
     },
New component data source functions
Similar to connections, data sources can be imported from a component manifest, and are named <componentKey><dataSourceKey>.
The first parameter of the data source function is the stable key of the data source config var.
@@ -1,9 +1,6 @@
import {
  configPage,
  configVar,
-  dataSourceConfigVar,
} from "@prismatic-io/spectral";
 import { slackOauth2 } from "./manifests/slack/connections/oauth2";
+import { slackSelectChannels } from "./manifests/slack/dataSources/selectChannels";
 import {
   SLACK_CLIENT_ID,
   SLACK_CLIENT_SECRET,
@@ -61,16 +58,9 @@ export const configPages = {
   "Slack Config": configPage({
     tagline: "Select a Slack channel from a dropdown menu",
     elements: {
-      "Select Slack Channel": dataSourceConfigVar({
-        stableKey: "select-slack-channel",
-        dataSource: {
-          component: "slack",
-          key: "selectChannels",
-          values: {
-            connection: { configVar: "Slack OAuth Connection" },
-            includePublicChannels: { value: true },
-          },
-        },
+      "Select Slack Channel": slackSelectChannels("select-slack-channel", {
+        connection: { configVar: "Slack OAuth Connection" },
+        includePublicChannels: { value: true },
       }),
     },
   }),
Spectral 9 reference syntax
Maintaining integrations on Spectral 9
These historical instructions apply to the Spectral 8-to-9 upgrade. For current projects, follow the npm migration steps.
For code-native integrations, Spectral 9.x lets you reference existing components' actions within a code-native flow. To update your code-native integration to Spectral 9.x, we recommend re-initializing a new project and copying your flows and configuration page code into it. Alternatively, you can initialize a new project for reference and follow these steps:
- Copy
.spectral/index.tsfrom the new project into your current project - Copy
.npmrcfrom the new project into your current project - Update
@prismatic-io/spectralin yourpackage.jsonfile to the latest version
Several syntax changes were made between 8.x and 9.x:
- Flows no longer require
configPagegenerics to infer the shape of your configuration variables.flow<typeof configPages>()can be changed toflow(). - References to existing components' data sources and connections are now done by installing a component's manifest package into your project. See Using existing components in code-native integrations.
- References to existing components' triggers remain syntactically unchanged.
Visibility of inputs on connections can now be explicitly set. For example, a reference to an existing Slack OAuth connection can now read:
export const configPages = {
  Connections: configPage({
    tagline: "Authenticate with Slack",
    elements: {
      "Slack OAuth Connection": connectionConfigVar({
        stableKey: "slack-oauth-connection",
        dataType: "connection",
        connection: {
          component: "slack",
          key: "oauth2",
          values: {
            clientId: {
              value: SLACK_CLIENT_ID,
              permissionAndVisibilityType: "organization",
              visibleToOrgDeployer: false,
            },
            clientSecret: {
              value: SLACK_CLIENT_SECRET,
              permissionAndVisibilityType: "organization",
              visibleToOrgDeployer: false,
            },
            signingSecret: {
              value: SLACK_SIGNING_SECRET,
              permissionAndVisibilityType: "organization",
              visibleToOrgDeployer: false,
            },
            scopes: {
              value: "chat:write chat:write.public channels:read",
              permissionAndVisibilityType: "organization",
              visibleToOrgDeployer: false,
            },
          },
        },
      }),
    },
  }),
};
MCP compatibility tools
The Prism MCP dev server retains these tools for older projects. Prefer installing component packages from npm for new integrations.
- prism_install_component_manifest: Generate component manifest in CNI src directory (requires spectral@10.6.0 or greater)
- prism_install_legacy_component_manifest: Generate line to add to a CNI's devDependencies for legacy component manifest installation
- prism_components_generate_manifest: Generate the manifest for a Prismatic component
- prism_integrations_add_connection_config_var: Returns path to connection wrapper function if available, otherwise generates boilerplate code for a connection config variable
- prism_integrations_add_datasource_config_var: Returns path to datasource wrapper function if available, otherwise generates boilerplate code for a datasource config variable
Converted integrations and custom registries
The converter generates component manifests for the components it references. If your custom component manifests are hosted in a package registry, supply both the package prefix and registry URL:
prism integrations:convert SW50ExampleExampleExample \
  --registryPrefix "@acme-connectors" \
  --registryUrl "https://packages.example.com/npm"
After conversion, you can migrate individual components to npm packages as they become available.
CRM lead enrichment
Legacy code-native example
This legacy flow excerpt accompanies the AI data enrichment guide. Use the example project for its configuration pages, component registry, payload types, and helper functions. The excerpt uses component references supplied by the registry; it is not a standalone integration.
import { flow } from "@prismatic-io/spectral";

/**
 * Enrich Incoming Lead Flow
 *
 * Researches incoming leads using web search, enriches them with company data,
 * and creates them in Salesforce.
 */
export const enrichIncomingLead = flow({
  name: "Enrich Incoming Lead",
  description: "Research and enrich leads before creating them in Salesforce",
  onExecution: async (context, params) => {
    const { configVars } = context;
    const triggerPayload = params.onTrigger.results.body as TriggerPayload;

    // Step 1: Set up web search tool
    const setupWebResearchTool =
      await context.components.openai.createWebSearchTool<CreateToolResult>({
        name: "Web Search",
        searchContextSize: "high",
      });

    // Step 2: Create lead research agent
    const createLeadResearchAgent =
      await context.components.openai.createAgent<CreateAgentResult>({
        instructions: `When provided a new lead, attempt to research them based on their domain.
          Look for their industry, employee count, and the problem the company solves`,
        modelName: "gpt-4o-mini",
        name: "Lead Researcher",
        outputSchema: {
          type: "object",
          properties: {
            company: {
              type: "string",
            },
            employeeCount: {
              type: "number",
            },
            vertical: {
              type: "string",
            },
            companyDescription: {
              type: "string",
            },
          },
          required: ["employeeCount", "vertical", "companyDescription"],
          additionalProperties: false,
        },
        outputSchemaName: "output",
        outputSchemaStrict: false,
        tools: [setupWebResearchTool.data],
      });

    // Step 3: Research and enrich the lead
    const researchAndEnrichLead =
      await context.components.openai.runAgent<AgentExecutionResult>({
        agentConfig: createLeadResearchAgent.data,
        maxTurns: "10",
        openaiConnection: configVars["OpenAI Connection"],
        userInput: `Research this lead on the web:
          Company: ${triggerPayload.data.company}
          Email: ${triggerPayload.data.email}
          Name: ${triggerPayload.data.firstName} ${triggerPayload.data.lastName}`,
      });

    const enrichedData = researchAndEnrichLead.data.finalOutput;

    // Step 4: Create lead in Salesforce
    const createLead = await context.components.salesforce.createLead({
      company: triggerPayload.data.company,
      connection: configVars["Salesforce Connection"],
      description: enrichedData.companyDescription,
      email: triggerPayload.data.email,
      employeeCount: enrichedData.employeeCount.toString(),
      firstName: triggerPayload.data.firstName,
      lastName: triggerPayload.data.lastName,
      leadStatus: "Open",
      version: "63.0",
    });

    return { data: createLead };
  },
});
Duplicate record detection
Legacy code-native example
This legacy flow excerpt accompanies the AI data enrichment guide. Use the example project for its configuration pages, component registry, payload types, and helper functions. The excerpt uses component references supplied by the registry; it is not a standalone integration.
import { flow } from "@prismatic-io/spectral";

/**
 * Check for Duplicates Flow
 *
 * Analyzes incoming leads against existing Salesforce accounts to identify and prevent
 * duplicate entries. Uses AI classification to determine similarity with high confidence.
 */
export const checkForDuplicates = flow({
  name: "Check for Duplicates",
  description:
    "Prevent duplicate lead creation by checking against existing Salesforce accounts",
  onExecution: async (context, params) => {
    const { configVars } = context;
    const incomingLead = params.onTrigger.results.body.data as IncomingLeadData;

    // Step 1: Query Salesforce for potential duplicate accounts
    const findAccounts =
      await context.components.salesforce.query<SalesforceQueryResult>({
        connection: configVars["Salesforce Connection"],
        queryString: `SELECT Id, Name, Website FROM Account
                    WHERE Name like '${incomingLead.company}%'`,
        version: "63.0",
      });

    // Step 2: Use AI to classify if the lead is a duplicate
    const classification =
      await context.components.openai.classifyAndBranch<ClassificationResult>({
        openaiConnection: configVars["OpenAI Connection"],
        model: "gpt-4o-mini",
        branches: {
          Duplicate:
            "The name, domain, or firmographics suggest it is a duplicate",
          "Not a Duplicate":
            "The account appears to be unique based on the provided information.",
          Else: "You are unable to determine if it is a duplicate.",
        },
        classificationInstructions: `Analyze the account and possible duplicates.
          Use all available information to determine if this is a duplicate account.`,
        inputText: `New Account: ${JSON.stringify(incomingLead)}
          Possible Duplicates: ${JSON.stringify(findAccounts.data.records)}`,
      });

    // Step 3: Route based on classification result
    if (classification.data.selectedBranch === "Not a Duplicate") {
      // Create new lead in Salesforce
      const createLead =
        await context.components.salesforce.createLead<CreateLeadResult>({
          connection: configVars["Salesforce Connection"],
          company: incomingLead.company,
          email: incomingLead.email,
          firstName: incomingLead.firstName,
          lastName: incomingLead.lastName,
          leadStatus: "Open",
          version: "63.0",
        });

      return { data: createLead };
    }
    return { data: null };
  },
});
Error logs to Jira issues
Legacy code-native example
This legacy flow excerpt accompanies the AI data enrichment guide. Use the example project for its configuration pages, component registry, payload types, and helper functions. The excerpt uses component references supplied by the registry; it is not a standalone integration.
import { flow } from "@prismatic-io/spectral";

/**
 * Create Jira Issue for Error Logs Flow
 *
 * This flow automatically analyzes system error logs and creates Jira issues
 * for significant errors that require attention. It uses AI to intelligently
 * classify errors, determine their severity, and generate appropriate ticket
 * descriptions.
 */
export const createJiraIssueForErrorLogs = flow({
  name: "Create Jira Issue for Error Logs",
  description:
    "Automatically analyze error logs and create Jira issues for critical errors using AI",
  onExecution: async (context, params) => {
    const { configVars } = context;

    const logData = params.onTrigger.results.body.data as TriggerPayload;

    // Step 1: Create AI agent for log analysis
    const createLogAnalyzer =
      await context.components.openai.createAgent<AgentCreationResult>({
        instructions: `You are a log analyzer that creates Jira issues from system errors.
          ## Your Task
          1. Identify the main error in the logs
          2. Extract the details necessary to create a Jira issue

          ## Priority Rules
          - CRITICAL logs or customer-facing errors → High
          - ERROR logs → Medium
          - WARN logs → Low

          ## Severity Scale
          1. **Minimal** - Cosmetic issue, no functional impact
          2. **Minor** - Small feature affected, easy workaround exists
          3. **Moderate** - Feature degraded, some users impacted
          4. **Major** - Feature broken, many users affected
          5. **Critical** - System down, data loss, or security issue

          ## Confidence Score
          Rate 0.0 to 1.0 based on:
          - Clear error with stack trace → 0.8-1.0
          - Timeout or connection issue → 0.6-0.8
          - Warning that might be transient → 0.3-0.5
          - Unclear if action needed → 0.0-0.3

          ## Important Guidelines
          - Keep the title clear and actionable`,
        mcpServers: [],
        modelName: "gpt-4o-mini",
        name: "Log Analysis Expert",
        outputSchema: JSON.stringify(JIRA_ISSUE_SCHEMA),
        outputSchemaName: "jira_issue_output",
        outputSchemaStrict: false,
        tools: [],
      });

    // Step 2: Analyze logs and extract Jira issue data
    const extractJiraIssueInputs =
      await context.components.openai.runAgent<AgentExecutionResult>({
        agentConfig: createLogAnalyzer.data,
        maxTurns: "10",
        openaiConnection: configVars["OpenAI Connection"],
        previousResponseId: "",
        userInput: `Analyze the following logs and attempt to extract the necessary fields to create a Jira issue:\n\n${JSON.stringify(
          logData,
        )}`,
      });

    const issueData = extractJiraIssueInputs.data.finalOutput;

    // Step 3: Check confidence threshold before creating issue
    if (issueData.confidence < 0.3) {
      return {
        data: {
          message: "No significant errors requiring Jira ticket",
          confidence: issueData.confidence,
          analysis: issueData,
          success: true,
        },
      };
    }

    // Step 4: Create Jira issue
    const createIssue =
      await context.components.atlassianJira.createIssue<JiraIssueCreationResult>(
        {
          issueTypeId: configVars["Issue Type"],
          projectId: configVars["Project"],
          summary: issueData.title,
          description: issueData.description,
          jiraConnection: configVars["Jira Connection"],
        },
      );

    // Step 5: Return comprehensive result
    return {
      data: {
        jiraIssue: createIssue.data,
        analysis: {
          title: issueData.title,
          priority: issueData.priority,
          severity: issueData.severity,
          confidence: issueData.confidence,
        },
        success: true,
      },
    };
  },
});

/**
 * Jira issue output schema for structured data extraction
 */
const JIRA_ISSUE_SCHEMA = {
  $schema: "http://json-schema.org/draft-07/schema#",
  title: "JiraIssueOutput",
  type: "object",
  required: [
    "title",
    "description",
    "priority",
    "issue_type",
    "severity",
    "confidence",
  ],
  properties: {
    title: {
      type: "string",
      maxLength: 100,
      description: "Brief description of the error",
    },
    description: {
      type: "string",
      description:
        "Detailed description including what happened, when, and error details",
    },
    priority: {
      type: "string",
      enum: ["High", "Medium", "Low"],
      description: "Issue priority level",
    },
    issue_type: {
      type: "string",
      enum: ["Bug"],
      description: "Type of Jira issue. Always capitalized",
    },
    severity: {
      type: "integer",
      minimum: 1,
      maximum: 5,
      description: "Impact severity (1=minimal, 5=critical)",
    },
    confidence: {
      type: "number",
      minimum: 0.0,
      maximum: 1.0,
      description: "Confidence score that this needs a Jira ticket",
    },
  },
  additionalProperties: false,
};
Extract invoices from PDFs in Dropbox
Legacy code-native example
This legacy flow excerpt accompanies the AI data enrichment guide. Use the example project for its configuration pages, component registry, payload types, and helper functions. The excerpt uses component references supplied by the registry; it is not a standalone integration.
import { flow } from "@prismatic-io/spectral";

/* Import Receipts from PDFs Flow
This flow automatically processes PDF files from a Dropbox folder,
identifies receipts/invoices using AI classification, and extracts
structured data from valid documents.
The flow runs every 5 minutes and performs the following steps:
1. Lists all files in the configured Dropbox import folder
2. Downloads each PDF file
3. Uploads files to OpenAI for processing
4. Classifies documents to identify receipts/invoices
5. Extracts structured data from valid receipts
@returns Extracted receipt data or empty object if no valid receipts found
*/
export const importReceiptsFromPdFs = flow({
  name: "Import Receipts from PDFs",
  description:
    "Automatically process PDF receipts from Dropbox, classify documents, and extract structured receipt data using AI",
  onExecution: async (context) => {
    const { configVars } = context;
    const processedReceipts: ExtractedReceipt[] = [];

    const listImportFolder =
      await context.components.dropbox.listFolder<ListImportFolderResult>({
        dropboxConnection: configVars["Dropbox Connection"],
        path: configVars["Import Folder"],
      });

    // Step 1: Process each file
    for (const file of listImportFolder.data.result.entries) {
      // Step 2: Download the file from Dropbox
      const downloadFile = await context.components.dropbox.downloadFile({
        dropboxConnection: configVars["Dropbox Connection"],
        path: file.path_lower,
      });

      // Step 3: Upload file to OpenAI for processing
      const uploadFile =
        await context.components.openai.uploadFile<OpenAIFileUploadResult>({
          connection: configVars["OpenAI Connection"],
          file: downloadFile.data as any,
          filename: file.name,
          purpose: "assistants",
          timeout: 10000,
        });

      // Step 4: Classify the document to determine if it's a receipt/invoice
      const agentClassifyAndBranch =
        await context.components.openai.classifyAndBranch<ClassificationResult>(
          {
            agentMcpServers: [],
            agentTools: [],
            branches: {
              "Needs Processing":
                "The analyzed file is an invoice or receipt that contains transaction data.",
            },
            classificationInstructions: `Analyze the provided file carefully. Determine if it is an invoice or receipt that should be processed.
              A document should be classified as "Needs Processing" if it contains:

              - Transaction details (items, prices, totals)
              - Vendor/store information
              - Date of transaction
              - Receipt or invoice number

              If the document doesn't contain these elements or you cannot determine its type, return the "Else" branch.
              Always return the required output schema with confidence and reasoning.`,
            fileIds: [uploadFile.data.id],
            inputText: `Analyze this PDF file and determine if it's a receipt or invoice that contains extractable transaction data.`,
            model: "gpt-4o",
            openaiConnection: configVars["OpenAI Connection"],
          },
        );

      // Step 5: Extract structured data from the receipt/invoice
      if (agentClassifyAndBranch.branch === "Needs Processing") {
        // Create pdf extraction ai agent
        const pdfExtractionAgent = await context.components.openai.createAgent({
          instructions: `You are an expert at analyzing PDFs and extracting receipt and invoice information.
              Your task is to:
              1. Carefully read and analyze the entire document
              2. Extract all transaction details including items, prices, and totals
              3. Identify store/vendor information
              4. Extract dates in ISO format
              5. Ensure all numeric values are accurate
              6. If a receipt ID is not visible, generate one based on the store name and date
              Be thorough and accurate in your extraction.`,
          mcpServers: [],
          modelName: "gpt-4o-mini",
          name: "PDF Receipt Data Extractor",
          outputSchema: JSON.stringify(RECEIPT_SCHEMA),
          outputSchemaName: "receipt_data",
          outputSchemaStrict: false,
          tools: [],
        });

        // Run the extraction agent against the uploaded pdf
        const extractedReceipt = await context.components.openai.runAgent<{
          data: { finalOutput: ExtractedReceipt };
        }>({
          agentConfig: pdfExtractionAgent.data,
          maxTurns: "10",
          openaiConnection: configVars["OpenAI Connection"],
          fileIds: [uploadFile.data.id],
          userInput: `Please analyze this PDF document and extract all receipt/invoice information according to the provided schema.
              Be thorough in identifying all line items, calculating totals, and extracting vendor information.`,
        });
        processedReceipts.push(extractedReceipt.data.finalOutput);
      }
    }

    // Return summary of processed receipts
    return {
      data: {
        processedReceipts,
        summary: {
          totalProcessed: processedReceipts.length,
          totalFiles: listImportFolder.data.result.entries.length,
          success: true,
        },
      },
    };
  },
});
Incident monitoring Slackbot
Legacy code-native example
This legacy flow excerpt accompanies the AI data enrichment guide. Use the example project for its configuration pages, component registry, payload types, and helper functions. The excerpt uses component references supplied by the registry; it is not a standalone integration.
import { flow } from "@prismatic-io/spectral";

/*
Flow for processing new incident alerts with AI agent assistance.
This flow:
1.  Creates tools for the AI agent (get on-call staff, create incident)
2.  Configures an AI agent with incident response capabilities
3.  Runs the agent to process the alert
4.  If approval is needed, posts an interactive message to Slack
5.  Stores agent state for resumption when approval is received */
export const newIncidentAlert = flow({
  name: "New Incident Alert",
  description: "Create a new incident from an incoming alert",
  onExecution: async (context, params) => {
    const { configVars } = context;
    // Setup tools for the agent
    const agentCreateIncidentTool =
      await context.components.openai.createFlowTool<FlowToolResult>({
        flowName: "Create Incident",
        requiresApproval: true,
        strictMode: false,
        toolDescription: "Create a new incident using the provided description",
      });

    const agentGetOnCallStaffTool =
      await context.components.openai.createFlowTool<FlowToolResult>({
        flowName: "Get On Call Staff",
        requiresApproval: false,
        strictMode: false,
        toolDescription: "Get On Call Staff",
      });

    // Create the AI agent with our configuration
    const agentCreateAssistantAgent =
      await context.components.openai.createAgent<AgentConfig>({
        instructions: AGENT_INSTRUCTIONS,
        mcpServers: [],
        modelName: "gpt-4o",
        name: "Acme SaaS Assistant",
        outputSchema: JSON.stringify(INCIDENT_RESPONSE_SCHEMA),
        outputSchemaName: "output",
        outputSchemaStrict: false,
        tools: [agentCreateIncidentTool.data, agentGetOnCallStaffTool.data],
      });

    // Prepare the alert input for the agent
    const setupAlertInputPrompt = `You must create a new incident from the provided alert for the on-call user. First, use a tool to get the on call staff, second create an incident using the create incident tool from the following alert. \nAlert Detected: ${JSON.stringify(
      params.onTrigger.results.body.data,
    )}`;

    // Run the agent to process the alert
    const runAgentCreateIncident =
      await context.components.openai.runAgent<AgentRunResult>({
        agentConfig: agentCreateAssistantAgent.data,
        fileIds: [],
        handoffs: [],
        history: "",
        maxTurns: "10",
        openaiConnection: configVars["OpenAI Connection"],
        previousResponseId: "",
        userInput: setupAlertInputPrompt,
      });

    // Handle approval interruptions
    if (runAgentCreateIncident.data.hasInterruptions) {
      const approvalRequest =
        runAgentCreateIncident.data.pendingApprovals?.[0].approvalRequest;

      const approvalArgs = {
        ...JSON.parse(
          runAgentCreateIncident.data.pendingApprovals[0].arguments,
        ),
        approvalRequest,
      };

      // Build approval message blocks
      const createApprovalBlocks = buildApprovalMessage(approvalArgs);

      // Post approval request to Slack
      await context.components.slack.postBlockMessage({
        channelName: configVars["Alert Channel"],
        connection: configVars["slackConnection"],
        blocks: createApprovalBlocks as any,
        message: "An approval is required to create a new incident",
      });

      // Store agent state for resumption after approval
      const crossFlowState = context.crossFlowState;
      crossFlowState[approvalArgs.anomaly_id] = {
        ...runAgentCreateIncident.data,
        agentConfig: agentCreateAssistantAgent.data,
      };
      return {
        data: { interrupted: true },
        crossFlowState,
      };
    }
  },
});