Custom Connector Basics
A custom connector is a reusable component that wraps an API and can be used in multiple workflows.
In this tutorial we introduce the concept of a custom connector, and walk through the steps to build one. We cover how to set up your development environment, create a new connector project, and implement basic functionality. We build the connection line-by-line by hand to give you a deeper understanding of how custom connectors work, but if you want to see how our Claude Skills can accelerate custom connector development, skip ahead to Build a Custom Connector with AI.
- Install a recent version of Node.js
- Install Prismatic's CLI tool and authenticate it against your Prismatic tenant
prism components:init my-first-connector
This will create a new directory called my-first-connector which contains your connector project.
Open this directory in your code editor, and then install the project's dependencies:
npm install
Finally, delete all of the files in src/ except for src/index.ts and src/actions.ts.
Replace the contents of src/index.ts with the following boilerplate code:
import { component } from "@prismatic-io/spectral";
import actions from "./actions";

export default component({
  key: "my-first-connector",
  public: false,
  display: {
    label: "My First Connector",
    description: "This is my first custom connector",
    iconPath: "icon.png",
  },
  actions,
});
Next, let's add an action to our connector that fetches data from a public API.
Replace src/actions.ts with the following code:
import axios from "axios"; // Popular HTTP client
import { action } from "@prismatic-io/spectral";

const listItems = action({
  display: {
    label: "List Items",
    description: "List all items in the system",
  },
  inputs: {}, // No inputs for this action
  perform: async (context, inputs) => {
    const response = await axios.get(
      "https://my-json-server.typicode.com/prismatic-io/placeholder-data/items",
    );
    return { data: response.data }; // Return the list of items
  },
});

export default { listItems };
Now let's test our action to make sure it works as expected. First, build the connector:
npm run build
Then, publish the connector to your Prismatic tenant:
prism components:publish
Finally, navigate to the Prismatic UI and create a new flow that uses your connector's "List Items" action to fetch and display the list of items.
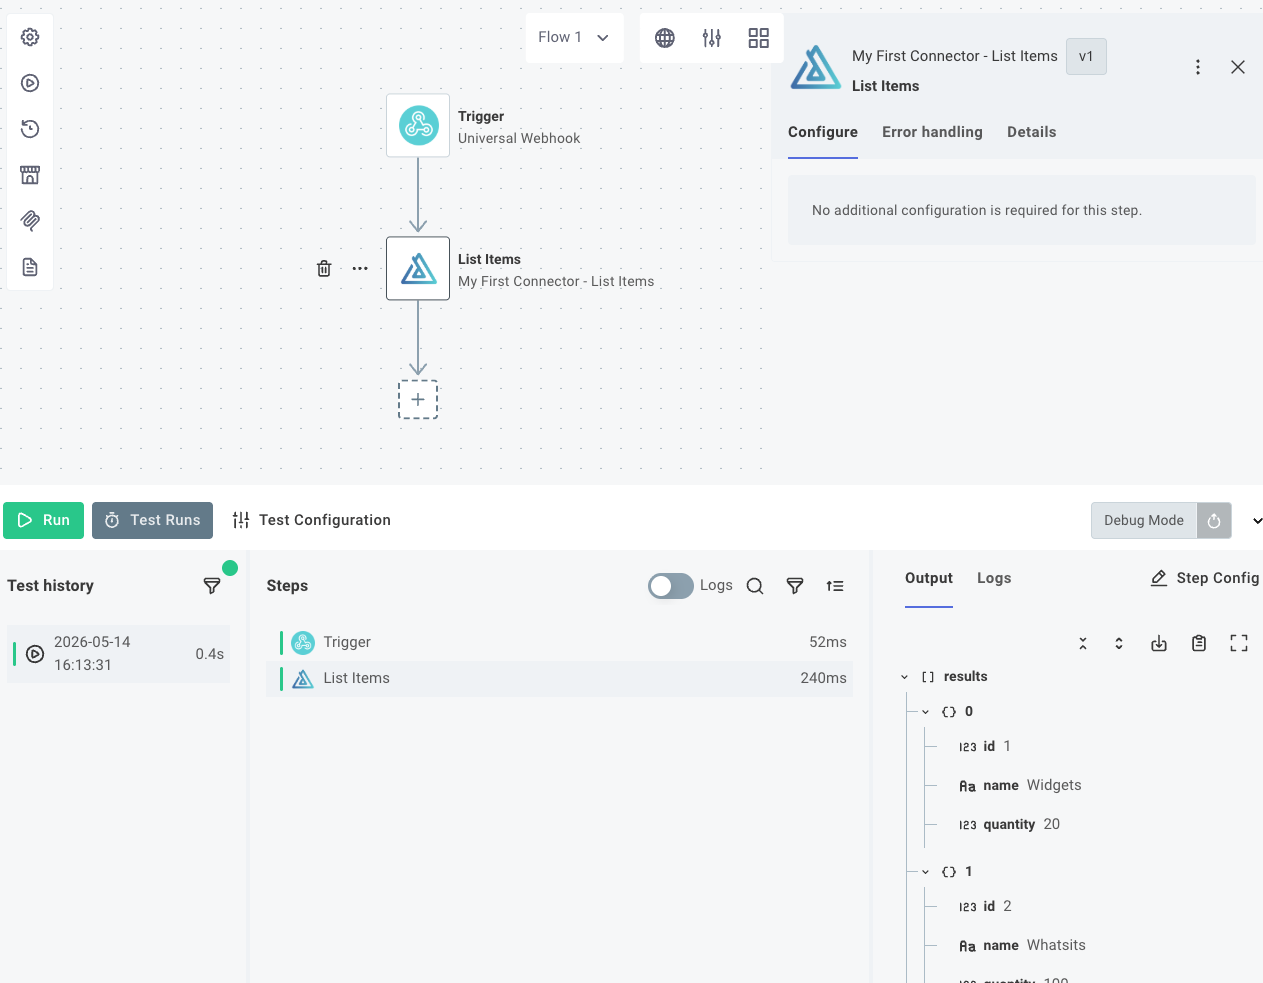
Our first action took no inputs. Let's add two more actions that take inputs.
import axios from "axios"; // Popular HTTP client
import { action, input, util } from "@prismatic-io/spectral";

const listItems = action({
  display: {
    label: "List Items",
    description: "List all items in the system",
  },
  inputs: {}, // No inputs for this action
  perform: async (context, inputs) => {
    const response = await axios.get(
      "https://my-json-server.typicode.com/prismatic-io/placeholder-data/items",
    );
    return { data: response.data }; // Return the list of items
  },
});

const getItemById = action({
  display: {
    label: "Get Item By ID",
    description: "Get a specific item by its ID",
  },
  inputs: {
    itemId: input({
      label: "Item ID",
      type: "string",
      required: true,
    }),
  },
  perform: async (context, inputs) => {
    const response = await axios.get(
      `https://my-json-server.typicode.com/prismatic-io/placeholder-data/items/${inputs.itemId}`,
    );
    return { data: response.data }; // Return the specific item
  },
});

const createItem = action({
  display: {
    label: "Create Item",
    description: "Create a new item in the system",
  },
  inputs: {
    name: input({
      label: "Item Name",
      type: "string",
      required: true,
    }),
    quantity: input({
      label: "Quantity",
      type: "string",
      clean: (value) => util.types.toNumber(value), // Convert input to a number
      required: true,
    }),
  },
  perform: async (context, inputs) => {
    const response = await axios.post(
      "https://my-json-server.typicode.com/prismatic-io/placeholder-data/items",
      {
        name: inputs.name,
        quantity: inputs.quantity,
      },
    );
    return { data: response.data }; // Return the created item
  },
});

export default { listItems, getItemById, createItem };
Re-run the build and publish commands, and test the new actions that have inputs:
npm run build
prism components:publish
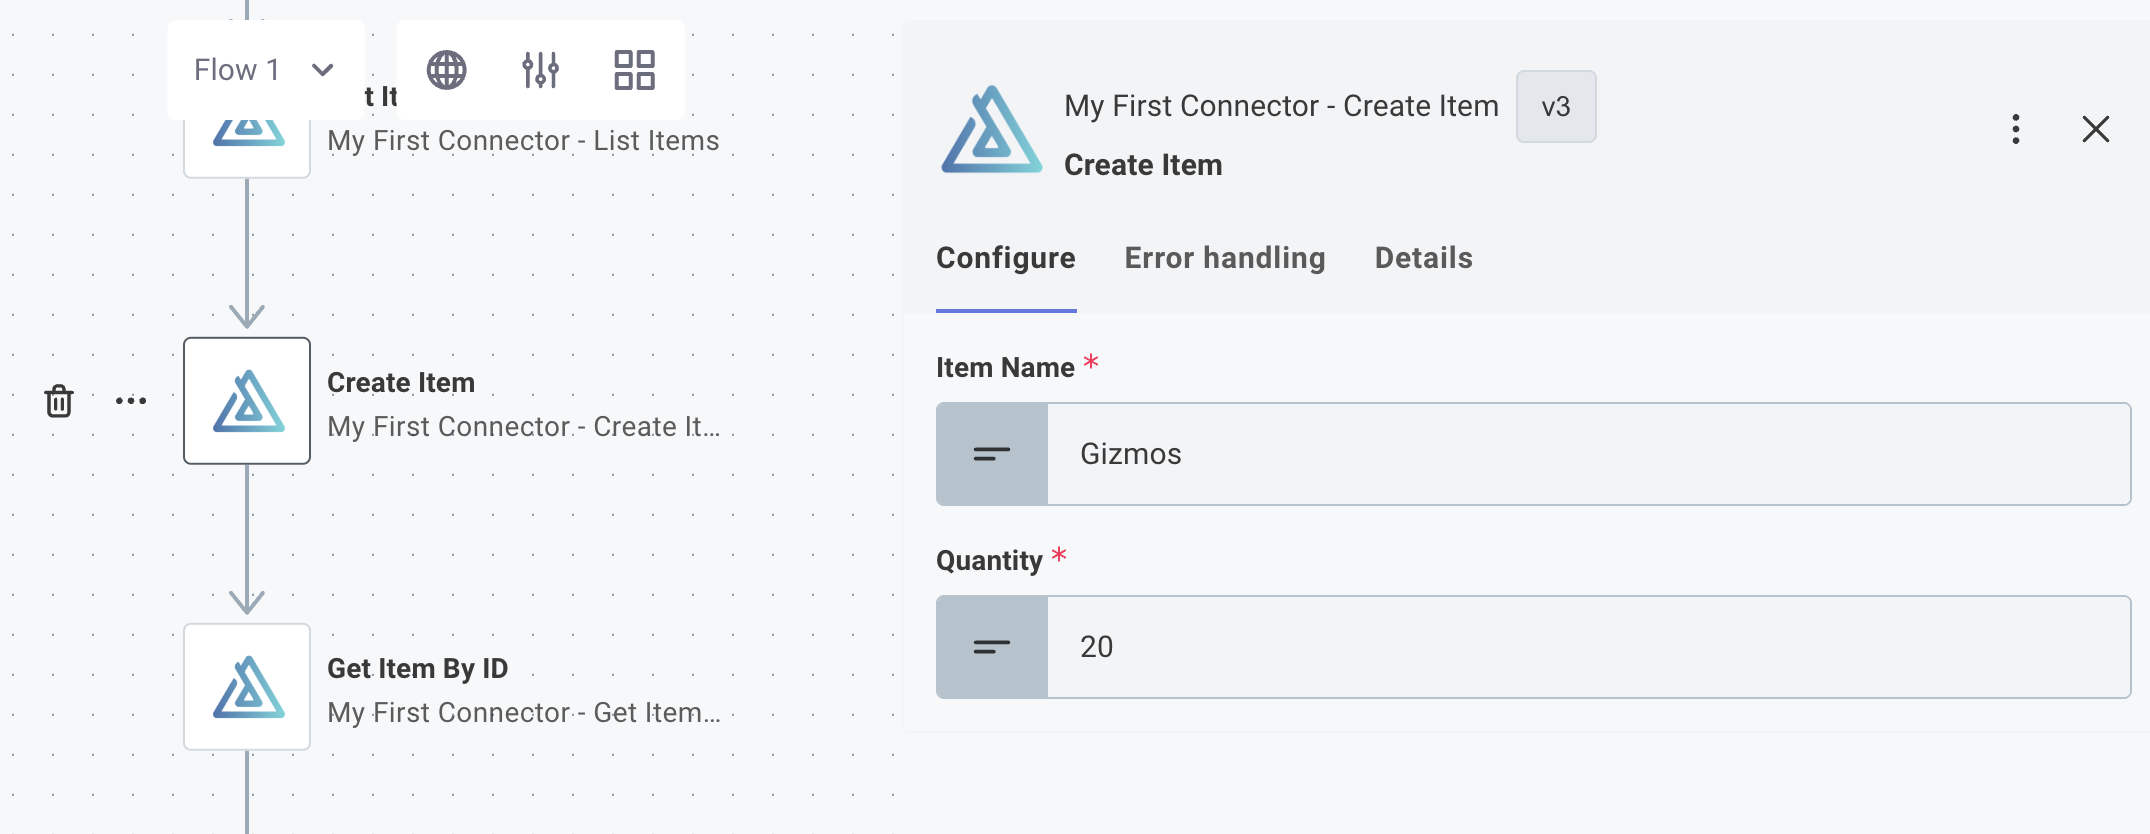
While our dummy API doesn't require authentication, most real APIs do. Let's add support for an API key and use that API key as a bearer token in the Authorization header of our HTTP requests. We'll also refactor our code to use a reusable HTTP client that automatically includes the API key in each request.
import { connection, input } from "@prismatic-io/spectral";

const acmeApiKey = connection({
  key: "acmeApiKey",
  display: {
    label: "Acme API Key",
    description: "API key for authenticating with the Acme API",
  },
  inputs: {
    baseUrl: input({
      label: "Base URL",
      type: "string",
      required: true,
      default:
        "https://my-json-server.typicode.com/prismatic-io/placeholder-data",
    }),
    apiKey: input({
      label: "API Key",
      comments:
        "Generate an API key from your Acme account (settings tab) and enter it here",
      type: "password",
      required: true,
    }),
  },
});

// Connections are represented as an array in a component definition
export default [acmeApiKey];
Update src/index.ts to import the connection and include it in the component definition:
diff --git a/src/index.ts b/src/index.ts
index 4589d73..29fdb7b 100644
--- a/src/index.ts
+++ b/src/index.ts
@@ -1,5 +1,6 @@
 import { component } from "@prismatic-io/spectral";
 import actions from "./actions";
+import connections from "./connections";

 export default component({
   key: "my-first-connector",
@@ -10,4 +11,5 @@ export default component({
     iconPath: "icon.png",
   },
   actions,
+  connections,
 });
Now, add a reusable HTTP client that uses the connection's base URL and API key:
import { createClient } from "@prismatic-io/spectral/dist/clients/http";
import { Connection, util } from "@prismatic-io/spectral";

export const acmeClient = (connection: Connection) => {
  return createClient({
    baseUrl: util.types.toString(connection.fields.baseUrl),
    headers: {
      Authorization: `Bearer ${connection.fields.apiKey}`,
    },
    // Enable debug mode to log request and response details
    // Disable before deploying to production
    debug: true,
  });
};
Finally, update src/actions.ts to use the reusable HTTP client, and add a connection input to each step:
diff --git a/src/actions.ts b/src/actions.ts
index f8828b9..425ab73 100644
--- a/src/actions.ts
+++ b/src/actions.ts
@@ -1,16 +1,21 @@
-import axios from "axios"; // Popular HTTP client
+import { acmeClient } from "./client";
 import { action, input, util } from "@prismatic-io/spectral";

+const connectionInput = input({
+  label: "Acme Connection",
+  type: "connection",
+  required: true,
+});
+
 const listItems = action({
   display: {
     label: "List Items",
     description: "List all items in the system",
   },
-  inputs: {}, // No inputs for this action
+  inputs: { connection: connectionInput },
   perform: async (context, inputs) => {
-    const response = await axios.get(
-      "https://my-json-server.typicode.com/prismatic-io/placeholder-data/items",
-    );
+    const client = acmeClient(inputs.connection);
+    const response = await client.get("/items");
     return { data: response.data }; // Return the list of items
   },
 });
@@ -21,6 +26,7 @@ const getItemById = action({
     description: "Get a specific item by its ID",
   },
   inputs: {
+    connection: connectionInput,
     itemId: input({
       label: "Item ID",
       type: "string",
@@ -28,9 +34,8 @@ const getItemById = action({
     }),
   },
   perform: async (context, inputs) => {
-    const response = await axios.get(
-      `https://my-json-server.typicode.com/prismatic-io/placeholder-data/items/${inputs.itemId}`,
-    );
+    const client = acmeClient(inputs.connection);
+    const response = await client.get(`/items/${inputs.itemId}`);
     return { data: response.data }; // Return the specific item
   },
 });
@@ -41,6 +46,7 @@ const createItem = action({
     description: "Create a new item in the system",
   },
   inputs: {
+    connection: connectionInput,
     name: input({
       label: "Item Name",
       type: "string",
@@ -54,13 +60,11 @@ const createItem = action({
     }),
   },
   perform: async (context, inputs) => {
-    const response = await axios.post(
-      "https://my-json-server.typicode.com/prismatic-io/placeholder-data/items",
-      {
-        name: inputs.name,
-        quantity: inputs.quantity,
-      },
-    );
+    const client = acmeClient(inputs.connection);
+    const response = await client.post("/items", {
+      name: inputs.name,
+      quantity: inputs.quantity,
+    });
     return { data: response.data }; // Return the created item
   },
 });
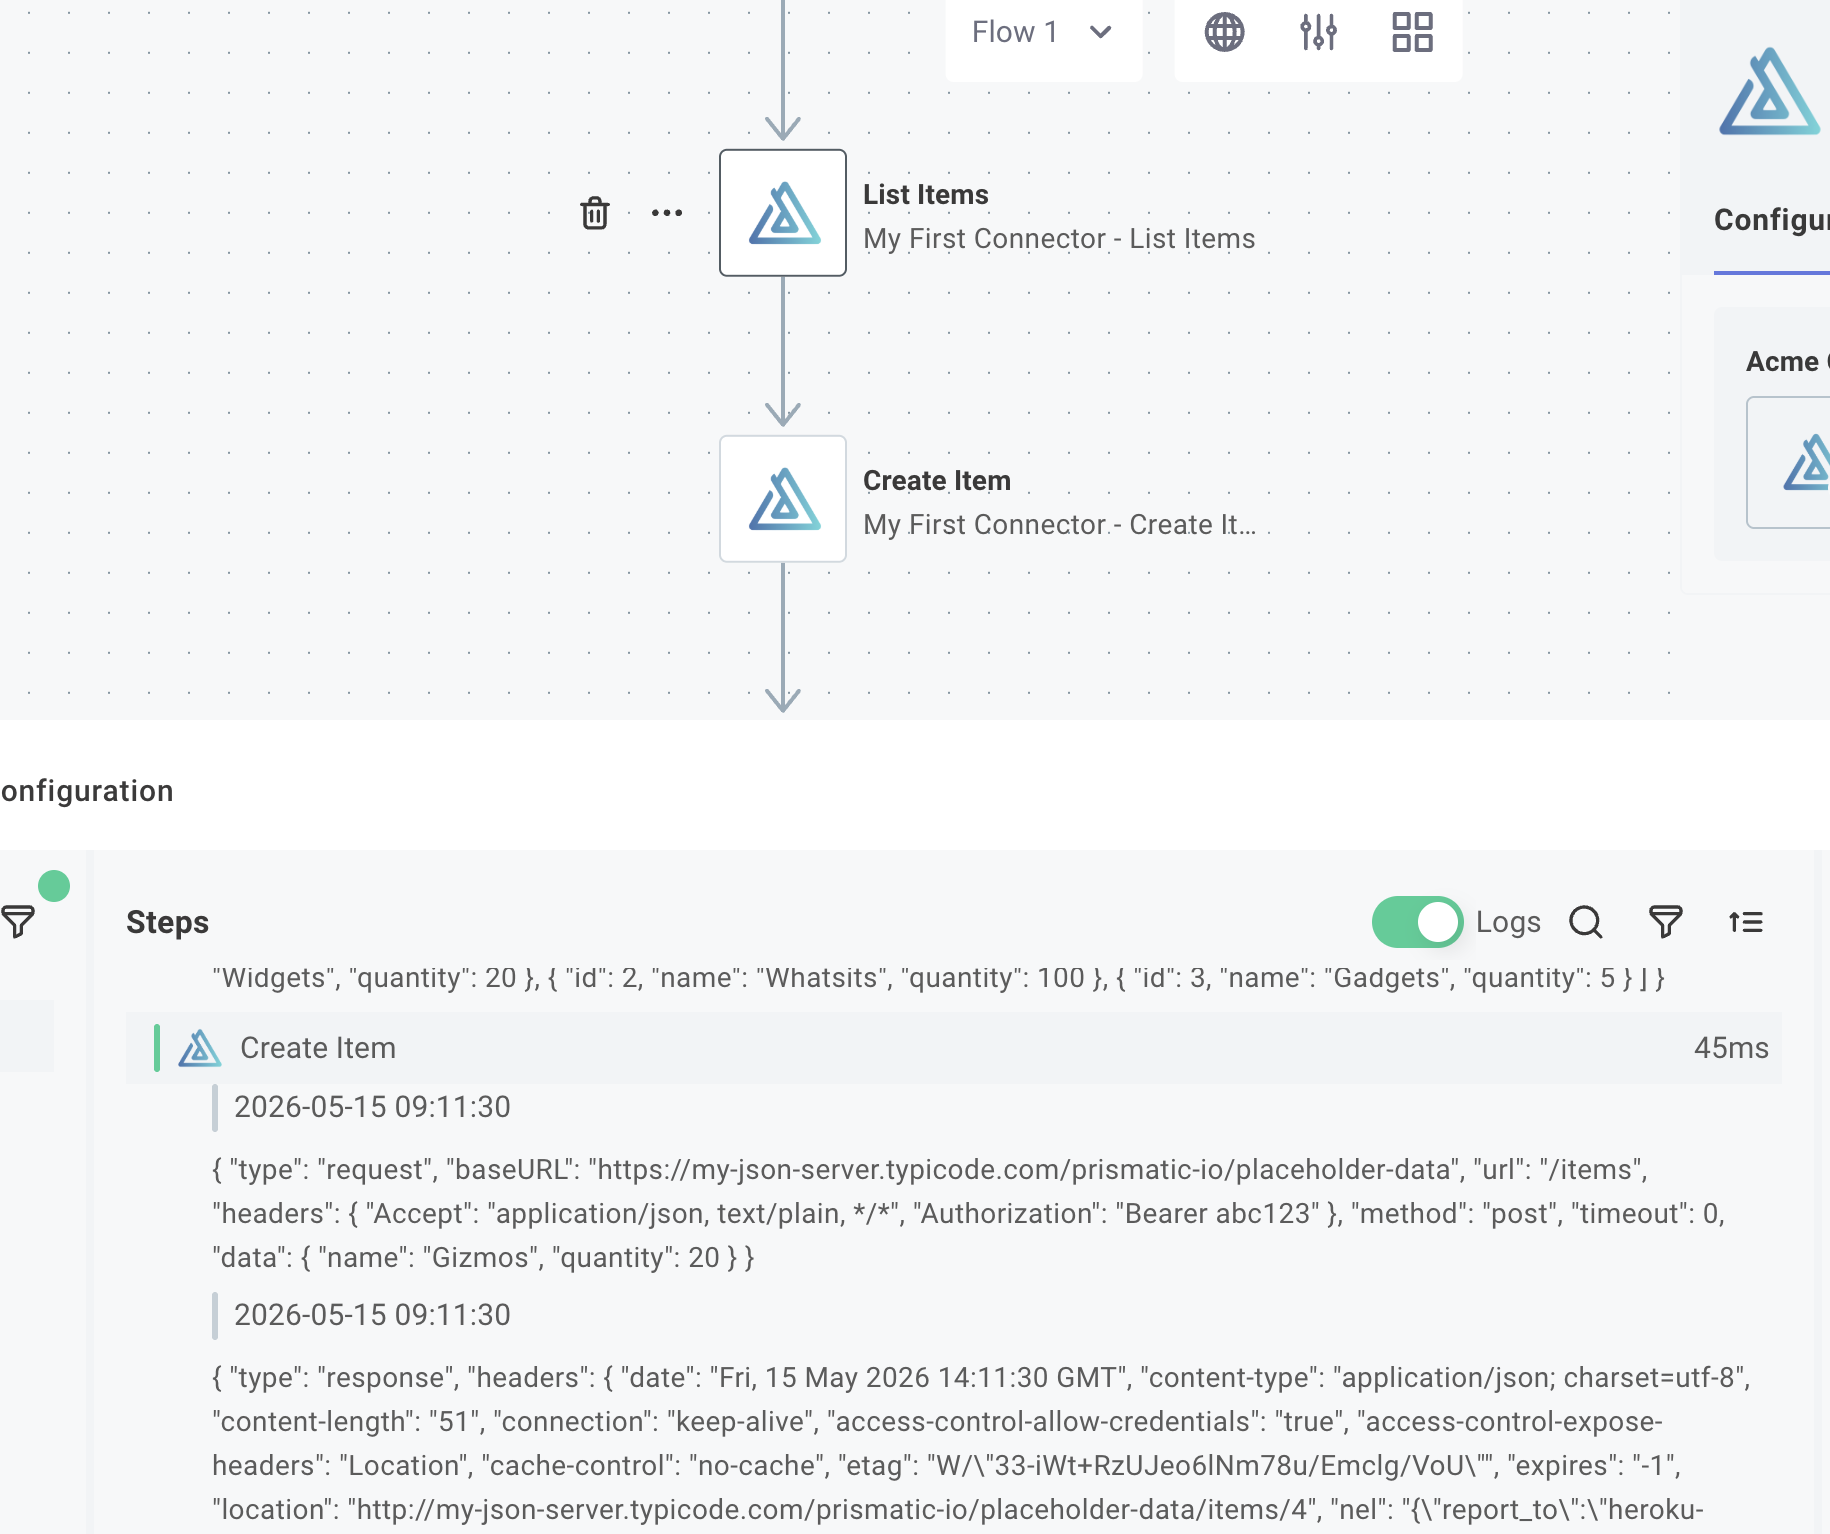
Build and publish once more. You'll notice that an integration-specific connection is automatically created for your steps, and that you'll need to go through the config wizard to set up the connection before you can test the steps.
Tip: Enable logs in the step result drawer to see the details of the HTTP requests being made by your connector's actions, which can be helpful for debugging.
Next steps: