Workflow Contexts
Workflow contexts let you pre-configure parts of a workflow - the trigger, its inputs, and the set of components and actions that are available - so your customers can start from a focused, guided experience instead of a blank canvas.
A context is defined once at the organization level and referenced from your application by a stable key. When your customer creates a workflow through the embedded SDK, you pass that key (along with any context-specific data) and Prismatic configures the new workflow accordingly.
When to use workflow contexts
Use workflow contexts when you want to:
- Offer automation entry points from inside your product. For example, a "Create automation rule" button on a ticket detail page can create a workflow that is already wired to your "Ticket updated" trigger, scoped to that ticket's project.
- Limit complexity for non-technical users. A context can restrict the components and actions that are available in the workflow builder, so customers see only the steps that are relevant to the task at hand.
- Inject data from your application into the workflow. Values from the page the customer is on - a project ID, a record type, a customer ID - can be passed as
contextDataand used to pre-configure trigger inputs.
Workflow contexts complement workflow templates. Templates give customers a full pre-built workflow that they can copy and customize. Contexts give customers a pre-configured trigger and a curated palette of steps, and let your application inject runtime data when the workflow is created.
What a context defines
Each workflow context is configured by an organization user and includes:
- A stable key.
A string identifier (for example,
ticket-automation) that your application passes to the embedded SDK. The key is stable across context edits, so your application code does not need to change when the context is updated. - A trigger and pre-configured inputs. The context pins a specific trigger and sets values for its inputs. Inputs can optionally be marked read-only or hidden, preventing an end user from changing or even seeing them in the workflow builder.
- A curated set of available actions. The context controls which components and actions appear in the workflow builder's step palette - either by exposing the full library and hiding specific items, or by starting from an empty palette and explicitly enabling each one.
Creating a new workflow context
Navigate to your organization's settings in the Prismatic web app and open the Workflow Contexts tab.
Select + New Context and give your context a name (for example, "Acme Epic") and a stable key (for example, acme-epic).
The context editor has two tabs: Trigger, where you configure which trigger the workflow starts with and how its inputs are populated, and Actions, where you control which components and actions are available to your customers.
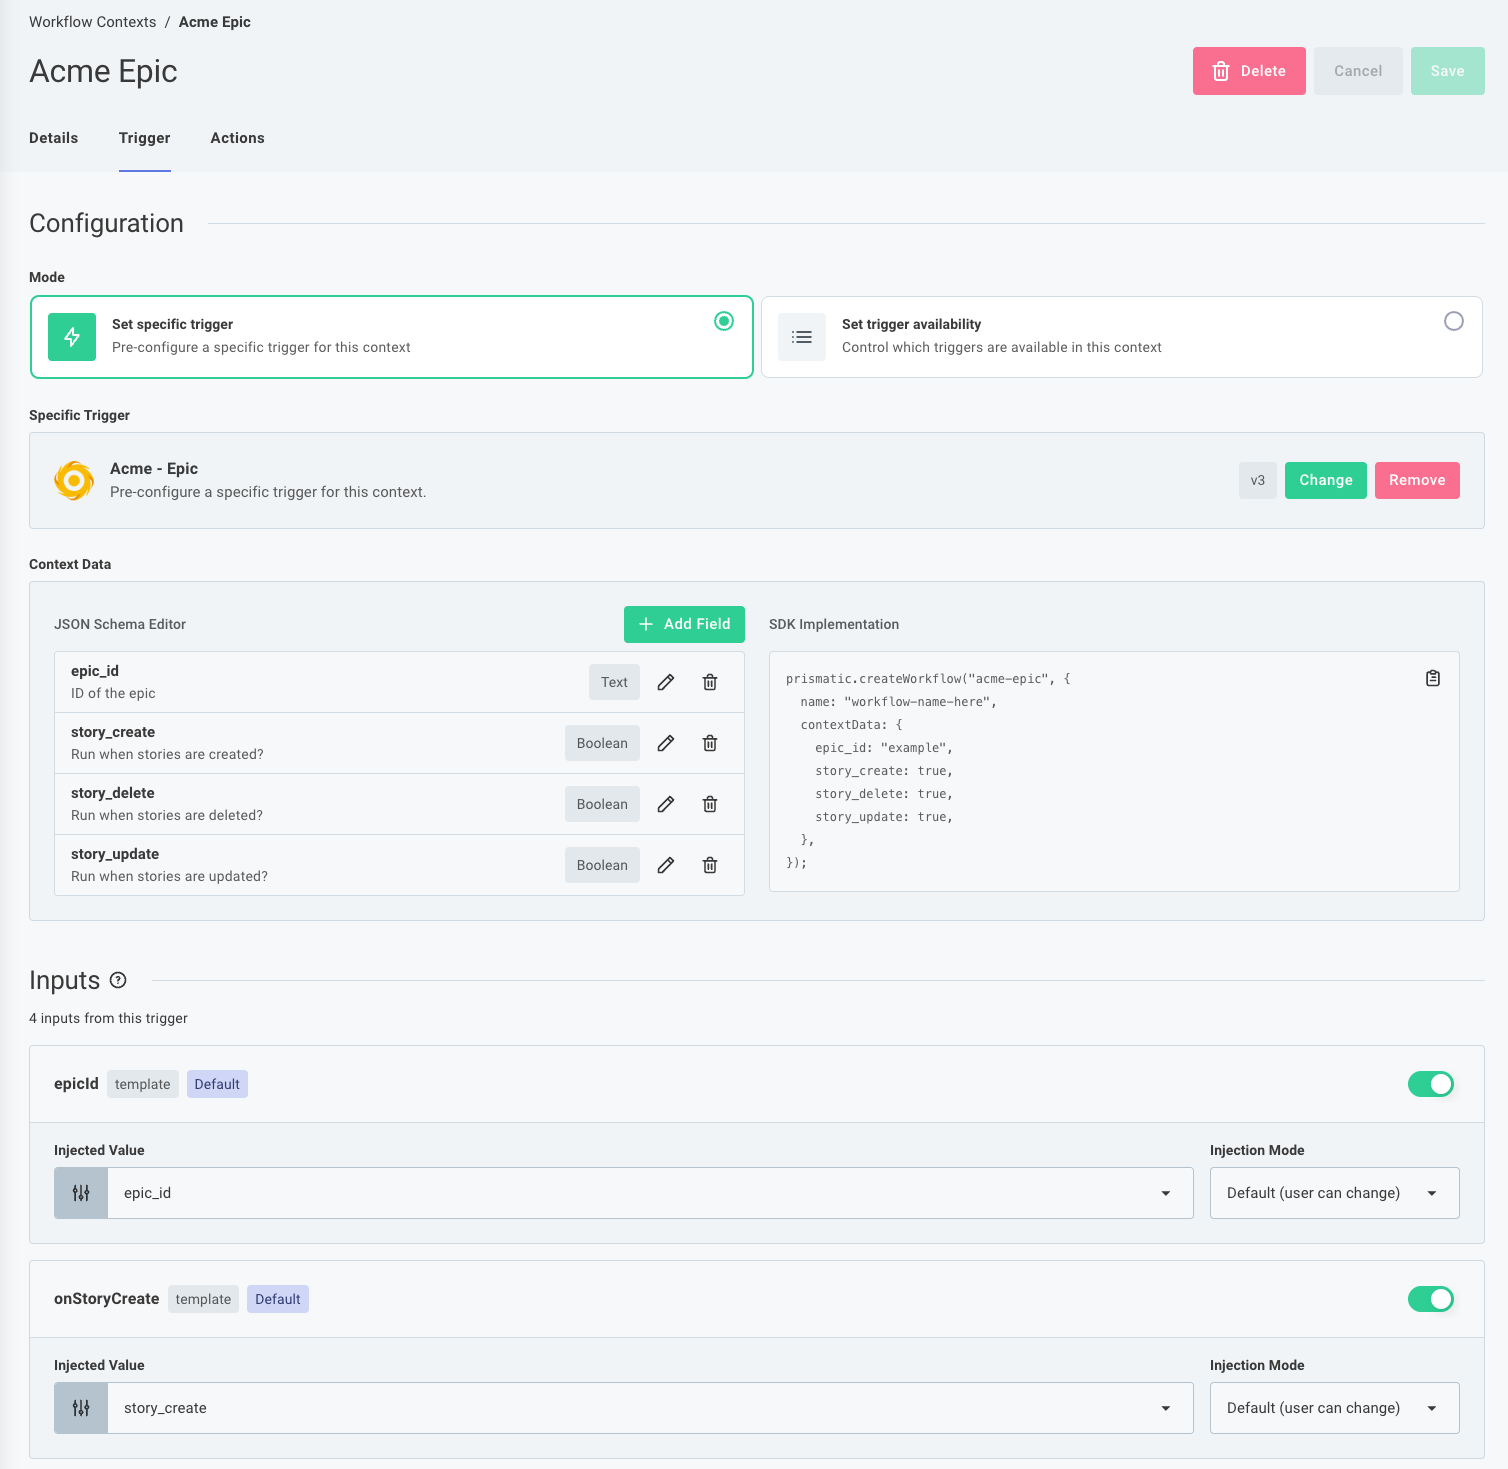
Trigger
Under Mode you have two options:
- Set specific trigger - choose a trigger and configure how your context maps to its inputs. When selecting this option, your context is tied to a specific version of the trigger you select. This is the recommended option for most contexts, as it provides a more guided experience for customers.
- Set trigger availability - give your customer user a list of triggers they can use. This option is more flexible but requires more decisions from the customer when they create a workflow.
Next, provide schema for your context's contextData - the data your application will pass in when creating a workflow from this context.
Finally, configure how your context properties are mapped to trigger inputs.
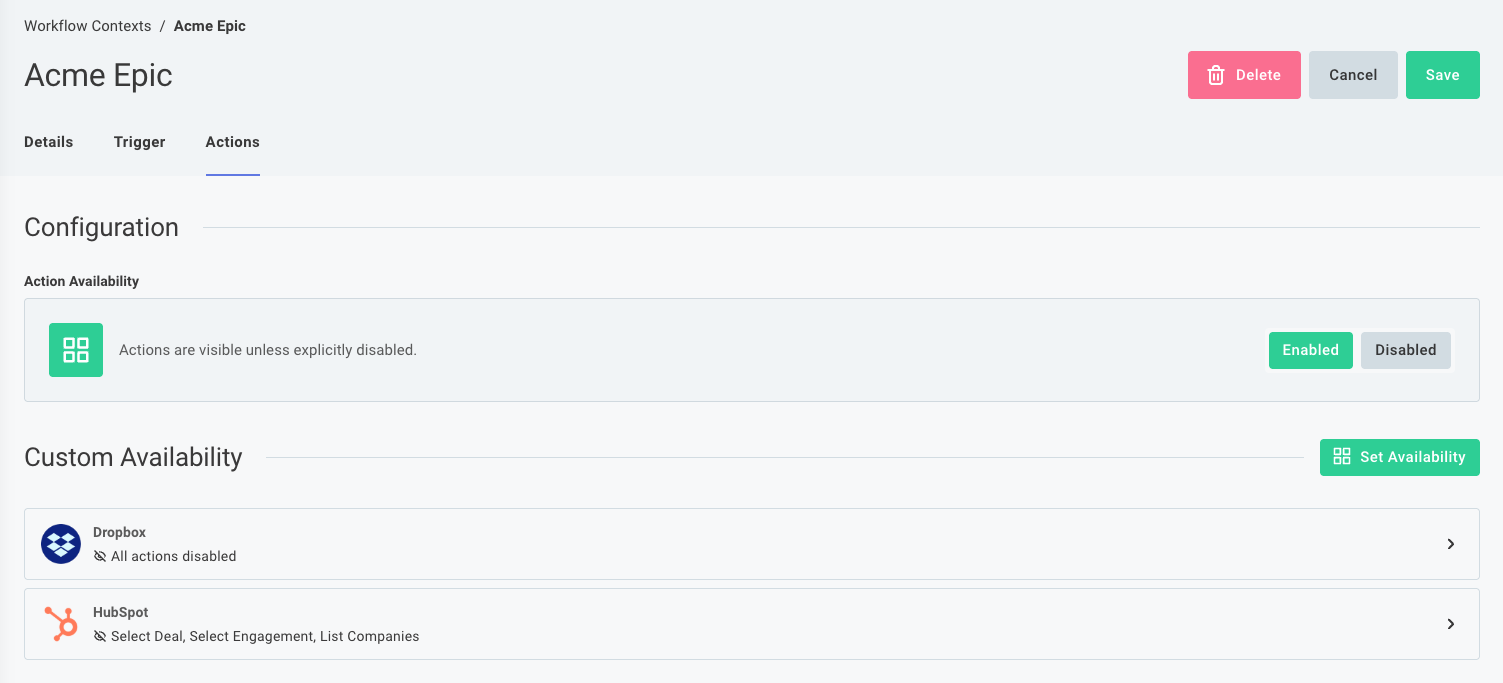
Actions
Open the Actions tab to control which component actions your customers can use in workflows created from this context. Set Action Availability to one of:
- Enabled - all component actions are available by default. Remove specific components or specific actions to hide them from the workflow builder.
- Disabled - no component actions are available by default. Explicitly enable specific components or specific actions to make them visible in the workflow builder.
Use Enabled when you want to expose most of your component library and only hide a few sensitive or irrelevant actions. Use Disabled when you want to present a tightly scoped palette - for example, a context that only exposes a Slack "Send Message" action and a Salesforce "Create Record" action.
Creating a workflow from a context in your app
Use prismatic.createWorkflow to create a new workflow for the authenticated customer user from a configured context.
Pass the context's stable key as the first argument, along with a name for the new workflow and a contextData object whose shape is defined by the context.
import prismatic from "@prismatic-io/embedded";

await prismatic.createWorkflow("ticket-automation", {
  name: "Notify on high-priority tickets",
  contextData: {
    projectId: "proj_abc123",
    priority: "high",
  },
});
createWorkflow accepts the following arguments:
| Argument | Type | Description |
|---|---|---|
contextStableKey | string | The stable key of a workflow context configured in your organization. |
args.name | string | The name to give the new workflow. |
args.contextData | object | Data passed into the context's trigger inputs. The shape is defined by the context. |
args.externalId | string | Optional. An identifier from your system that you can use later to look the workflow up. For example, the ID of the record the workflow was created from. |
After createWorkflow returns, the workflow exists and can be opened in the embedded workflow builder using prismatic.showWorkflow.
Typing contextData
@prismatic-io/embedded exposes a WorkflowContexts interface that you can extend through module augmentation so that each of your contexts gets a typed contextData payload.
Generating types from your organization
The recommended way to type contextData is to generate a declaration file from the contexts configured in your organization.
@prismatic-io/embedded ships with a generate-types CLI that fetches your organization's workflow contexts and emits a prismatic.d.ts file that augments WorkflowContexts for you.
The CLI uses the Prism CLI for authentication, so make sure you have prism installed globally and have run prism login before generating types.
npx @prismatic-io/embedded generate-types
Pass --output (or -o) to write the file somewhere other than ./prismatic.d.ts:
npx @prismatic-io/embedded generate-types --output src/types/prismatic.d.ts
Include the generated file in your project's tsconfig.json so the module augmentation is picked up:
{
  "include": ["prismatic.d.ts"]
}
Re-run generate-types whenever you add, remove, or edit a context in your organization, and commit the regenerated file alongside the code that depends on it.
Declaring types manually
If you would rather not run the generator - for example, if you want to keep context types colocated with your application code - you can declare the WorkflowContexts interface yourself:
declare module "@prismatic-io/embedded" {
  interface WorkflowContexts {
    "ticket-automation": {
      projectId: string;
      priority: "low" | "medium" | "high";
    };
    "deal-automation": {
      dealId: string;
    };
  }
}
With the augmentation in place, TypeScript enforces that the contextData you pass matches the context you named:
// OK
await prismatic.createWorkflow("ticket-automation", {
  name: "Notify on high-priority tickets",
  contextData: { projectId: "proj_abc123", priority: "high" },
});

// Type error - "urgency" is not a property of the ticket-automation context
await prismatic.createWorkflow("ticket-automation", {
  name: "Notify on urgent tickets",
  contextData: { projectId: "proj_abc123", urgency: "high" },
});
If you call createWorkflow with a key that is not declared on WorkflowContexts, contextData falls back to Record<string, unknown>.
Listing workflows by context
Use prismatic.queryWorkflows to fetch the authenticated customer user's workflows, optionally filtered by the context they were created from or the externalId you supplied when they were created.
This is useful when you want to show the workflows associated with a specific record in your product - for example, "the workflows attached to this ticket."
import prismatic from "@prismatic-io/embedded";

const response = await prismatic.queryWorkflows({
  contextStableKey: "ticket-automation",
  externalId: "ticket_1234",
});

const workflows = response.data.workflows.nodes;
queryWorkflows accepts the following optional arguments:
| Argument | Type | Description |
|---|---|---|
searchTerm | string | Case-insensitive substring match on the workflow name. |
descriptionSearch | string | Case-insensitive substring match on the workflow description. |
categorySearch | string | Exact match on the workflow category. |
labelSearch | string | Case-insensitive substring match on the workflow labels. |
contextStableKey | string | Return only workflows created from this context. |
externalId | string | Return only workflows created with this externalId. |
sortBy | string[] | Sort order. See the API docs for options. |
first | number | Page size. |
cursor | string | Pagination cursor from a previous response's pageInfo.endCursor. |
Each node in the response contains the workflow's id, name, description, versionNumber, timestamps, category, labels, the owning customer, and the current instance and deployedVersion.
Use the id to open the workflow with prismatic.showWorkflow.
Putting it together
A common pattern is to offer a "Create automation" button on a record in your application that creates a context-driven workflow and then opens it in the embedded workflow builder:
import prismatic from "@prismatic-io/embedded";

async function createTicketAutomation(ticket: {
  id: string;
  projectId: string;
}) {
  const response = await prismatic.createWorkflow("ticket-automation", {
    name: `Automation for ticket ${ticket.id}`,
    contextData: {
      projectId: ticket.projectId,
      priority: "high",
    },
    externalId: ticket.id,
  });

  const workflowId = response.data.importWorkflow.workflow.id;

  prismatic.showWorkflow({
    workflowId,
    selector: "#embedded-workflow-div",
  });
}
Pair this with queryWorkflows({ externalId: ticket.id }) to list the workflows that already exist for that record and let the customer jump back into them.