Embedding Integration Designer
The embedded integration designer allows you to embed Prismatic's low-code integration designer in your app, enabling your customers to create and manage integrations directly within your application using the same low-code designer that your team uses.
If your goal is to let customers quickly build simple, one-off workflows in your app, use the embedded workflow builder instead.
Embedded workflow builder vs embedded designer
The embedded workflow builder and the embedded designer are both low-code editors, but they serve different purposes and have different user experiences.
Number of flows:
- The embedded workflow builder is designed for your customers to build single-flow workflows.
- The embedded designer is intended for building reusable integrations that can be deployed multiple times, and can contain multiple flows.
The embedded workflow builder is ideal for customers who need to create simple, one-off workflows that connect their systems, while the embedded designer is better suited for customers who want to build complex integrations that contain multiple workflows.
Configuration:
- With the embedded workflow builder, all configuration is done inline, making it easier for technical non-developers to build workflows without needing a separate configuration wizard. Users complete connections and select data source inputs (like a dropdown menu containing their Slack channels) as they build the workflow. No separate configuration wizard is needed.
- The embedded designer leverages the same low-code config wizard that your team uses, allowing for more complex configuration options.
The embedded workflow builder is designed to be more user-friendly and accessible for non-technical users, while the embedded designer provides more advanced configuration options for users who need them.
Deployment:
- Deployment is streamlined in the embedded workflow builder. After testing, a customer user clicks the Enable button in the workflow builder to activate their workflow.
- In the embedded designer, customer users publish their integration and add it to the marketplace. Then, either they or other users within their customer group follow the configuration wizard to deploy one or more instances of their integration.
The embedded workflow builder has a simpler deployment process, making it easier for customer users to get their workflows up and running quickly, while the embedded designer provides more advanced deployment options and allows for multiple instances of the same integration.
Listing integrations
The prismatic.showIntegrations function displays all integrations owned by the customer user's customer.
Customers can create their own integrations or have integrations assigned to them.
import prismatic from "@prismatic-io/embedded";
import { useEffect } from "react";

const id = "integration-list-div";

function IntegrationList() {
  useEffect(() => {
    prismatic.showIntegrations({ selector: `#${id}` });
  }, []);

  return <div id={id}>Loading...</div>;
}

export default IntegrationList;
From the showIntegrations screen, customer users can open existing integrations or create new integrations by clicking the +Add integration button (similar to how your team members do).
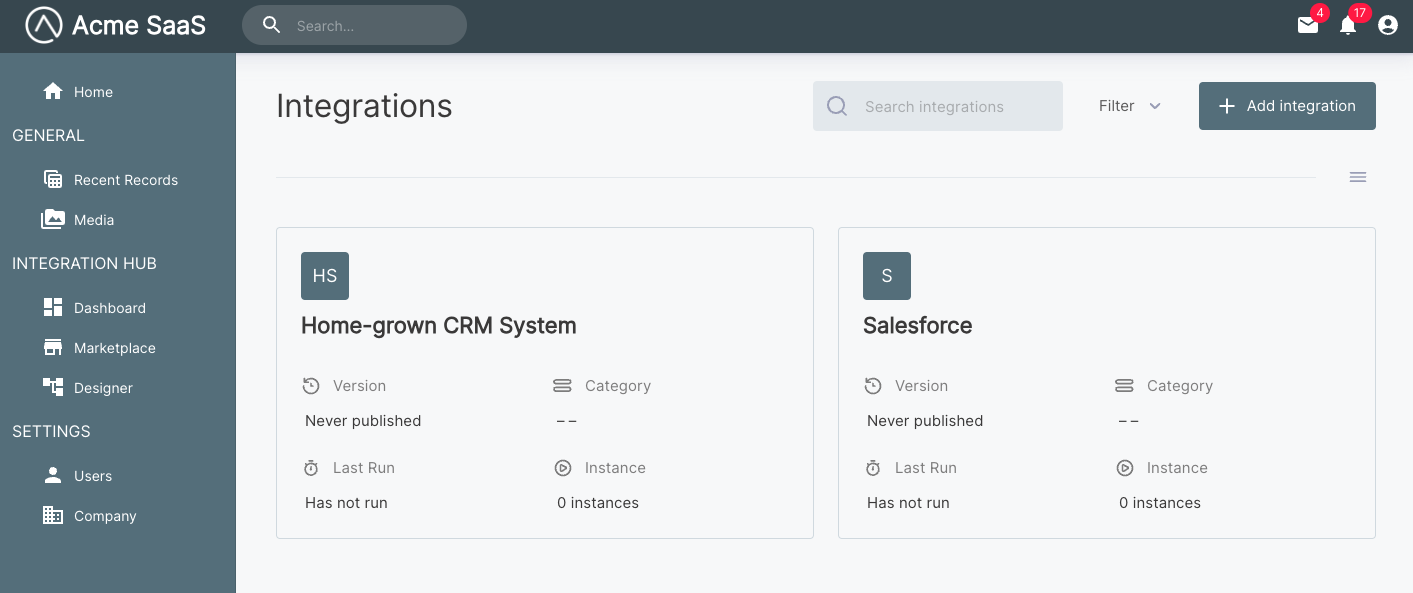
Integrations are scoped to a customer. If a customer creates a new integration or you share an integration with a customer, only customer users for that customer can view that integration.
Assigning an integration to a customer
You can build an integration and transfer ownership to a customer. To do this, open the integration and select the Details tab at the top of the screen. Then select the customer who should own the integration from the Customer dropdown menu.

Opening the integration designer directly
If you know the ID of an integration, you can open it directly using prismatic.showDesigner.
You will need to get the integration ID using the prismatic.graphqlRequest function:
import prismatic from "@prismatic-io/embedded";
import { useEffect } from "react";

const id = "my-embedded-builder-div";

/**
 * Get an integration's ID given its name
 */
async function getIntegrationId(integrationName: string) {
  const query = `query getMyIntegration($integrationName: String!) {
  integrations(name: $integrationName) {
    nodes {
      id
      name
    }
  }
}`;
  const variables = { integrationName };
  const result = await prismatic.graphqlRequest({ query, variables });
  return result.data.integrations.nodes?.[0].id;
}

function EmbeddedDesigner() {
  useEffect(() => {
    const showDesigner = async () => {
      const integrationId = await getIntegrationId("Acme Inc");
      prismatic.showDesigner({
        selector: `#${id}`,
        integrationId,
        theme: "LIGHT",
      });
    };
    showDesigner();
  }, []);
  return <div id={id}>Loading...</div>;
}

export default EmbeddedDesigner;
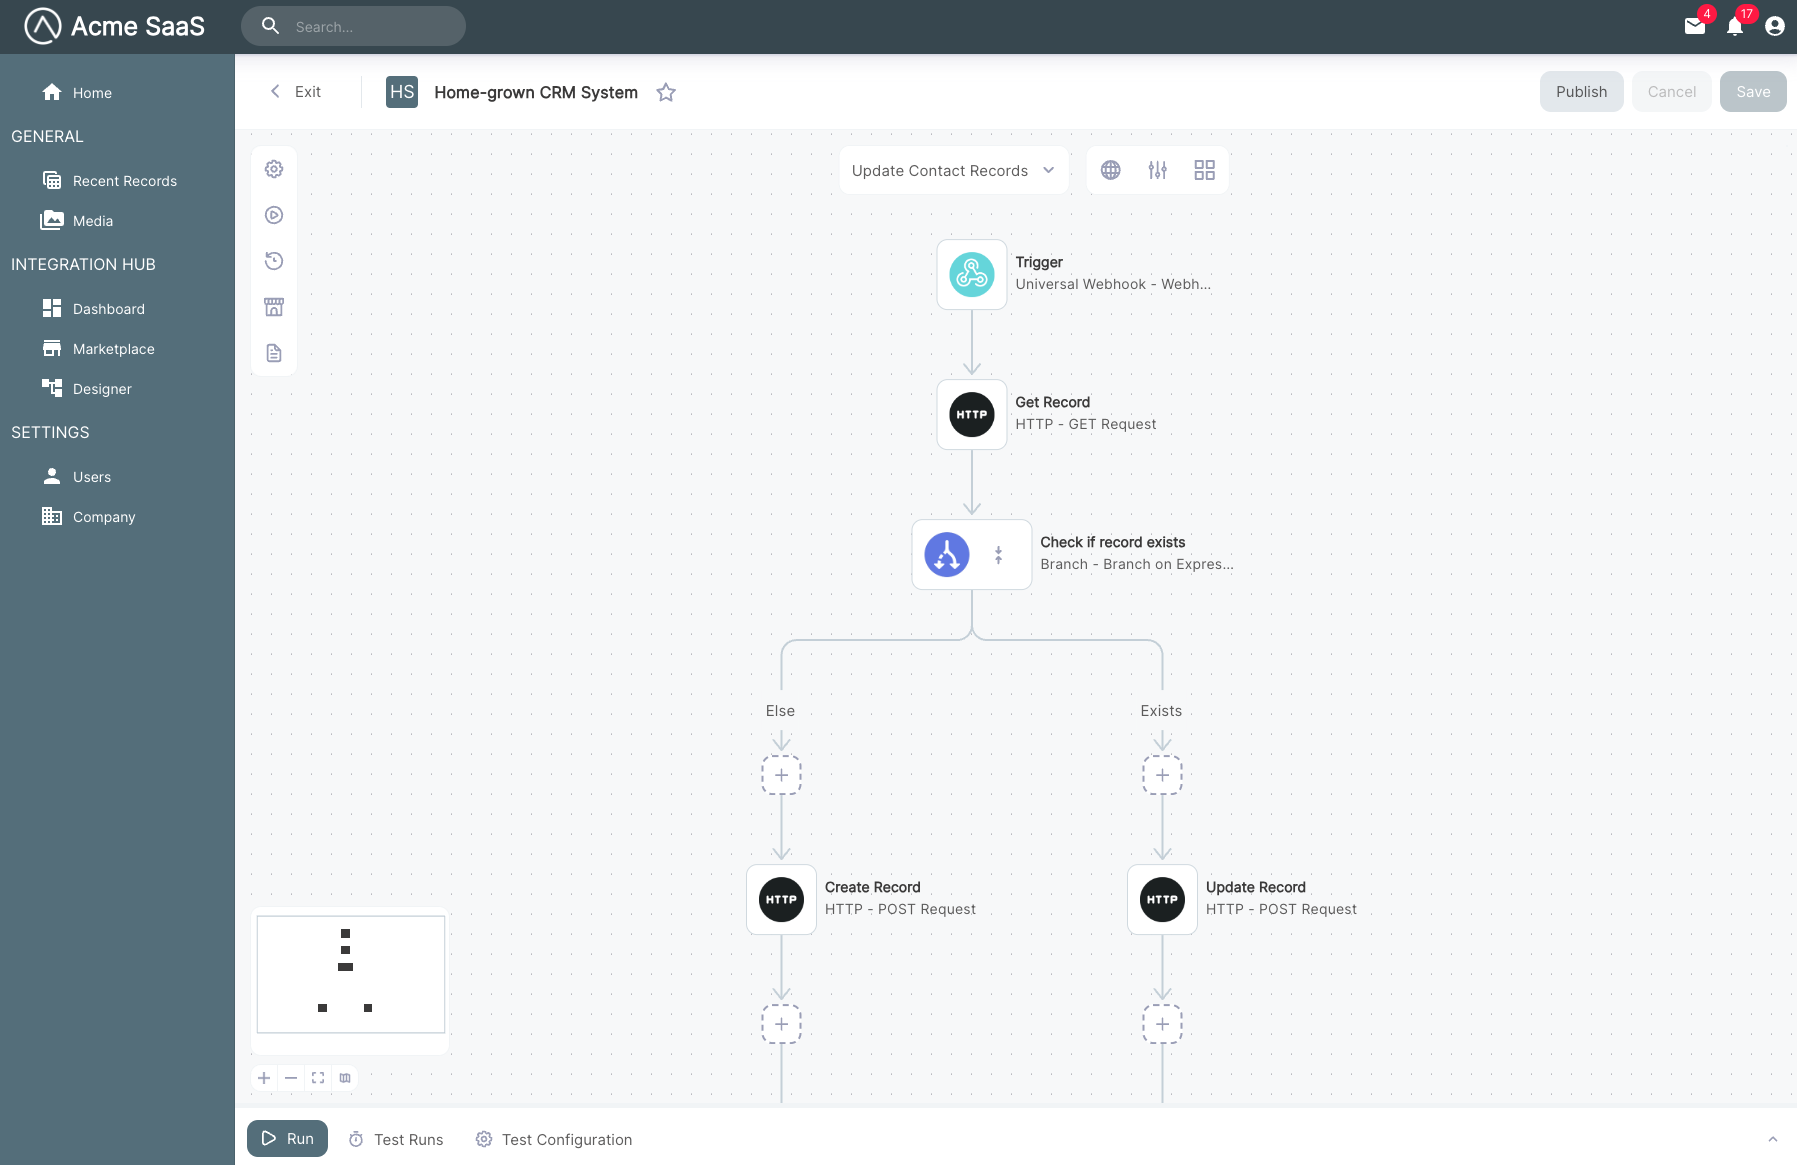
Hiding UI elements in the designer
You can hide specific UI elements in the embedded designer using screenConfiguration.designer:
prismatic.showIntegrations({
  selector: `#${id}`,
  screenConfiguration: {
    designer: {
      hideRemoveIntegration: true,
    },
  },
});
designer.hideRemoveIntegration: Hides the Remove Integration button in the integration details panel. This is useful when your application manages integration deletion through its own UI (defaults tofalse).designer.hideInstances: Hides the Instances navigation item in the designer.designer.hideMarketplace: Hides the Marketplace navigation item in the designer.
These settings can also be configured globally in prismatic.init():
prismatic.init({
  screenConfiguration: {
    designer: {
      hideRemoveIntegration: true,
    },
  },
});
Filtering components
To limit the components that a customer user can use in the embedded workflow builder, specify a filters.components.filterQuery object when calling prismatic.showIntegrations or prismatic.showDesigner.
You can filter using a component's key, whether it's a public component, and component category.
In this example, we list several file-related components, a private version of the Slack component, and all components in the "Logic" category (such as Branch, Loop, etc.):
import prismatic, {
  BooleanOperator,
  TermOperator,
} from "@prismatic-io/embedded";

prismatic.showIntegrations({
  selector: `#my-integrations-div`,
  filters: {
    components: {
      filterQuery: [
        BooleanOperator.or,
        [TermOperator.equal, "key", "aws-s3"],
        [TermOperator.equal, "key", "dropbox"],
        [TermOperator.equal, "key", "google-drive"],
        [
          BooleanOperator.and,
          [TermOperator.equal, "key", "slack"],
          [TermOperator.equal, "public", false],
        ],
        [TermOperator.equal, "category", "Logic"],
      ],
    },
  },
});

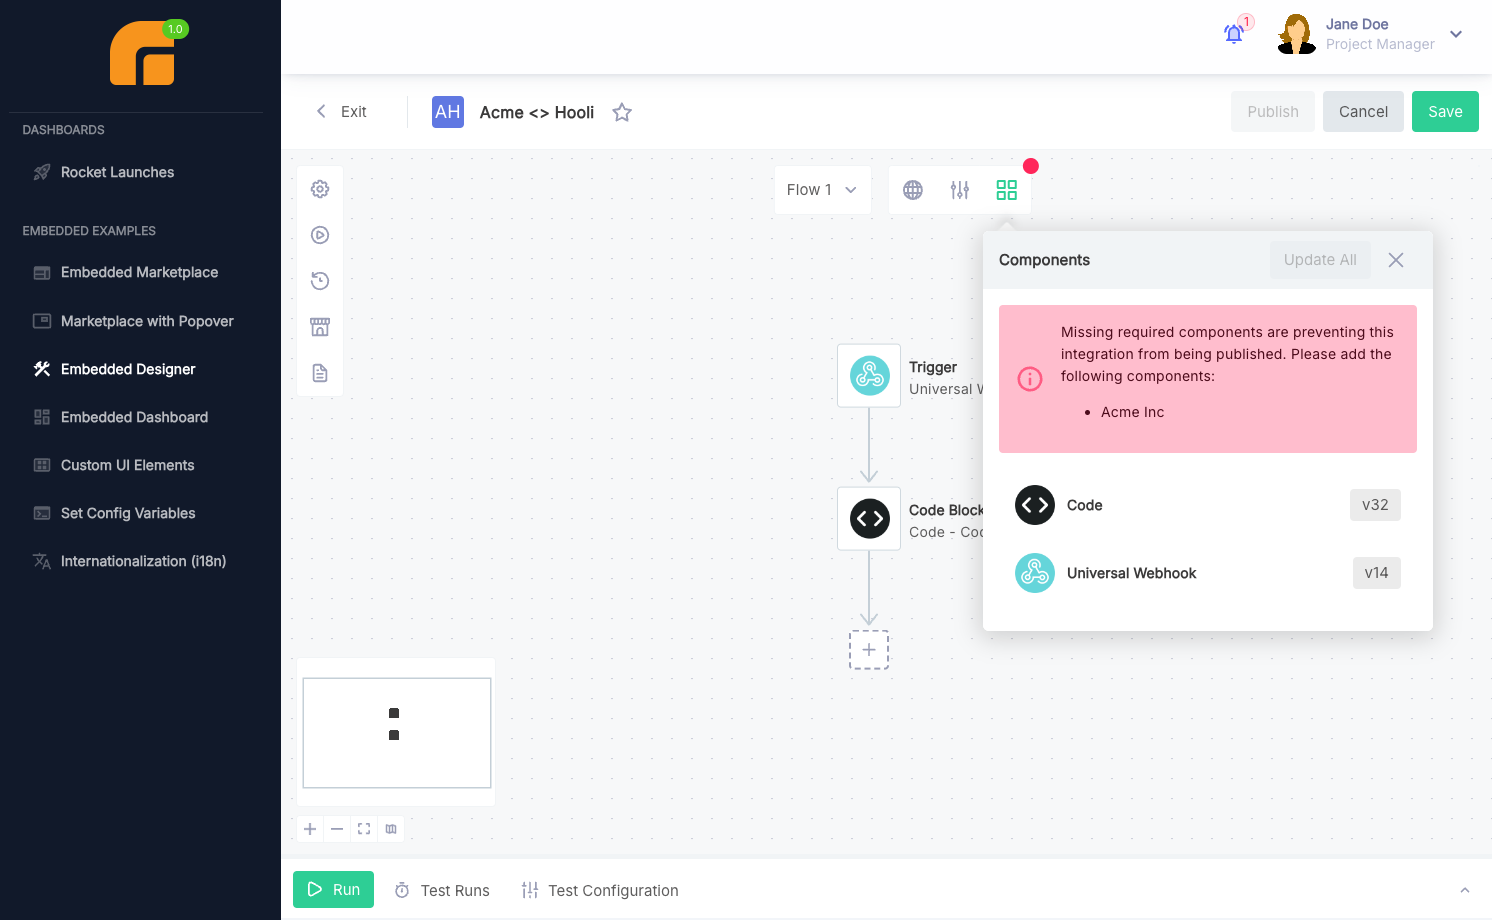
Requiring components
To require that customers use certain components within their integrations, open your organization settings page and select the Embedded tab. Add any components you want to require under the Required components section.
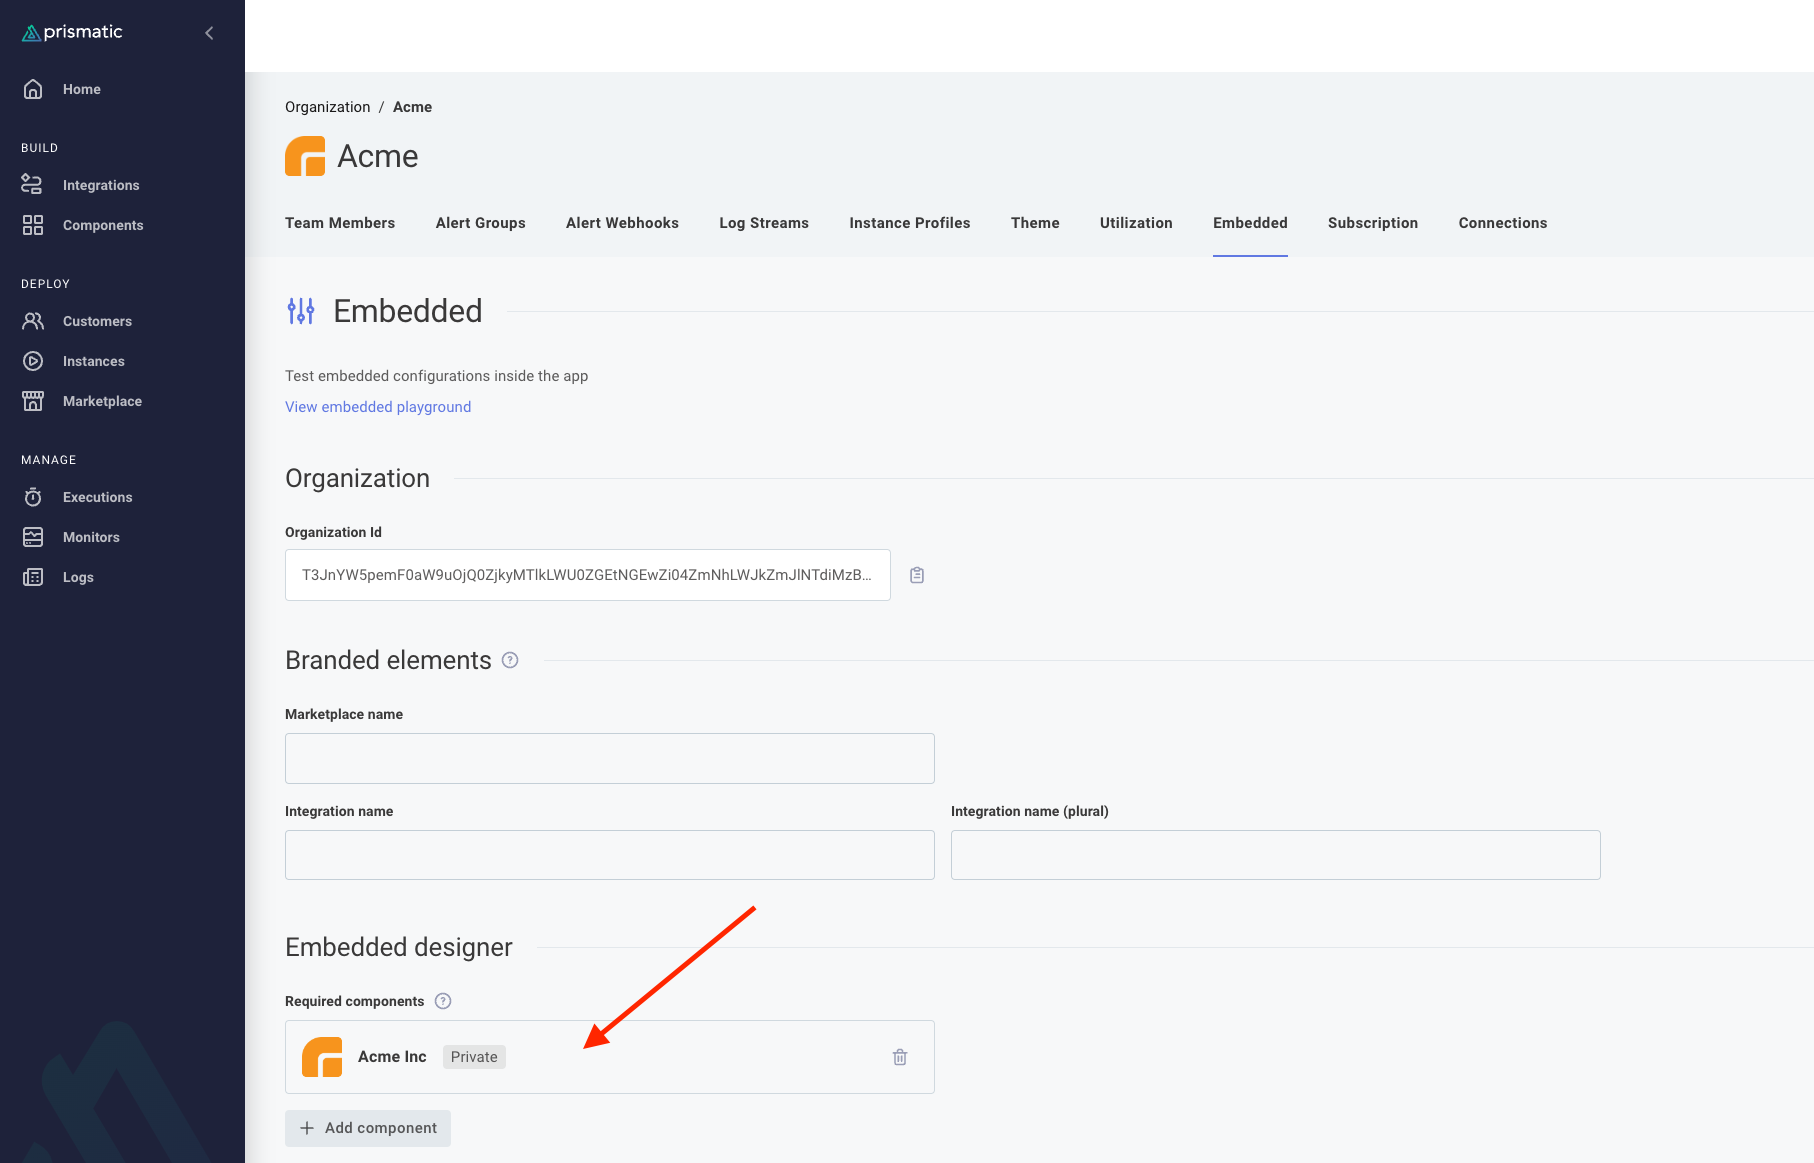
Embedded builder users must include components you specify before they can publish their integration.