Custom Triggers
Writing custom triggers
Integrations are usually triggered on a schedule (meaning instances of the integration run every X minutes, or at a particular time of day) or via webhook (meaning some outside system sends JSON data to a unique URL and an instance processes the data that was sent). The vast majority of integrations built in Prismatic start with a schedule trigger or webhook trigger. There are situations, though, where neither the schedule nor the standard webhook trigger are suitable for one reason or another. That's where writing your own triggers come in handy.
Triggers are custom bits of code that are similar to actions. They give you fine-grained control over how a webhook's payload is presented to the rest of the steps of an integration and what HTTP response is returned to whatever invoked the trigger's webhook URL.
Similar to an action, a trigger is comprised of display information, a perform function and inputs.
Additionally, you specify if your trigger can be invoked synchronously (synchronousResponseSupport) and if your trigger supports scheduling (scheduleSupport).
Suppose, for example, a third-party app can be configured to send CSV data via webhook and requires that the webhook echo a header, x-confirmation-code, back in plaintext to confirm it got the payload.
The default webhook trigger accepts JSON, and responds with an execution ID, so it's not suitable for integrating with this third-party app.
This trigger will return an HTTP 200 and echo a particular header back to the system invoking the webhook, and then it'll parse the CSV payload into an object so that subsequent steps can reference through the trigger's results.body.data:
import {
  input,
  trigger,
  TriggerPayload,
  HttpResponse,
  util,
} from "@prismatic-io/spectral";
import papaparse from "papaparse"; // CSV Library

export const csvTrigger = trigger({
  display: {
    label: "CSV Webhook",
    description:
      "Accepts and parses CSV data into a referenceable object and returns a plaintext ACK to the webhook caller.",
  },
  perform: async (context, payload, { hasHeader }) => {
    // Create a custom HTTP response that echos a header,
    // x-confirmation-code, that was received as part of
    // the webhook invocation
    const response: HttpResponse = {
      statusCode: 200,
      contentType: "text/plain; charset=utf-8",
      body: payload.headers["x-confirmation-code"],
    };

    // Create a copy of the webhook payload, deserialize
    // the CSV raw body, and add the deserialized object
    // to the object to the trigger's outputs
    const finalPayload: TriggerPayload = { ...payload };

    const parseResult = papaparse.parse(
      util.types.toString(payload.rawBody.data),
      {
        header: util.types.toBool(hasHeader),
      },
    );

    finalPayload.body.data = parseResult.data;

    // Return the modified trigger payload and custom HTTP response
    return Promise.resolve({
      payload: finalPayload,
      response,
    });
  },
  inputs: {
    // Declare if the incoming CSV has header information
    hasHeader: input({
      label: "CSV Has Header",
      type: "boolean",
      default: "false",
    }),
  },
  synchronousResponseSupport: "invalid", // Do not allow synchronous invocations
  scheduleSupport: "invalid", // Do not allow scheduled invocations
});

export default { csvTrigger };
Notice a few things about this example:
- The
trigger's form is very similar to that of anactiondefinition. - The
responsecontains an HTTPstatusCode,body, andcontentTypeto be returned to the webhook caller. - The second argument to the
performfunction -payload- contains the same information that a standard webhook trigger returns. TherawBody.datapresumably contains some CSV text - thebody.datakey of the payload is replaced by the deserialized version of the CSV data. inputswork the same way that they work for actions - you define a series ofinputs, and they're passed in as the third parameter of theperformfunction.
Instance lifecycle functions
Similar to a perform function, a trigger can also define several lifecycle functions that run when an instance is created, updated or deleted.
These include onInstanceDeploy and onInstanceDelete functions that are called when an instance is deployed or deleted, respectively.
They are handy for creating or deleting resources in a third-party system that are associated with an instance (like custom record types, file directories, etc).
Additionally, if your trigger is a webhook trigger, you can define webhookLifecycleHandlers that contain create and delete functions that run when an instance is deployed or deleted, respectively.
These functions also run in the integration designer when you enter Listening Mode.
Adding a trigger to your component
Once you've written a trigger, you can add it to an existing component the same way you add an action to your component, but using the triggers key:
import { csvTrigger } from "./csvTrigger";

export default component({
  key: "format-name",
  public: false,
  display: {
    label: "Format Name",
    description: "Format a person's name given a first, middle, and last name",
    iconPath: "icon.png",
  },
  actions: {
    improperFormatName,
    properFormatName,
  },
  triggers: { csvTrigger },
});
App event triggers
It's common for users to want to know when records are created or updated in a third-party app. There are a couple of ways you can achieve this:
- An event-based system uses webhooks to notify your flow whenever something happens.
- A trigger polls the third-party API for changes on a time interval.
Generally speaking, webhook triggers are preferable over polling triggers as they provide near real-time updates.
App event webhook triggers
An app event webhook trigger takes advantage of webhookLifecycleHandlers.create and webhookLifecycleHandlers.delete functions (described above).
When a customer configures and deploys an instance of your integration, webhookLifecycleHandlers.create configures a webhook.
When the instance is removed, the webhookLifecycleHandlers.delete trigger removes the webhook.
Additionally, in the integration designer if you enter Listening Mode, the webhookLifecycleHandlers.create function will run to create a temporary webhook for testing purposes, and when you exit Listening Mode, the webhookLifecycleHandlers.delete function will run to clean up the temporary webhook.
Example app event trigger using webhooks
This example trigger will create a webhook in a third-party app when an instance is deployed, storing the webhook ID in persistent data, and delete the webhook when the instance is deleted:
const acmeWebhookTrigger = trigger({
  display: {
    label: "Acme Webhook Trigger",
    description: "Acme will notify your app when certain events occur in Acme",
  },
  scheduleSupport: "invalid",
  synchronousResponseSupport: "invalid",
  inputs: {
    connection: input({
      label: "Acme Connection",
      type: "connection",
      required: true,
    }),
    events: input({
      type: "string",
      label: "Events",
      comments:
        "The events that would cause an Acme webhook request to be sent to this flow",
      collection: "valuelist",
      model: [
        { label: "Lead Created", value: "lead_created" },
        { label: "Lead Updated", value: "lead_updated" },
        { label: "Lead Deleted", value: "lead_deleted" },
      ],
    }),
  },

  /** Run when a trigger is invoked. This function could contain additional logic for verifying HMAC signatures, etc. */
  perform: async (_context, payload, _inputs) => {
    return Promise.resolve({ payload });
  },

  /** Run when an instance with this trigger is deployed */
  webhookLifecycleHandlers: {
    create: async (context, inputs) => {
      // Get the current flow's webhook URL
      const flowWebhookUrl = context.webhookUrls[context.flow.name];

      // Create a webhook in Acme
      const { data } = await axios.post(
        "https://api.acme.com/webhooks",
        {
          endpoint: flowWebhookUrl,
          events: inputs.events,
        },
        {
          headers: {
            Authorization: `Bearer ${inputs.connection.token?.access_token}`,
          },
        },
      );

      // Store the webhook ID in persisted state for deletion later
      // Use stableId for consistency (id changes each version, and name may change)
      return {
        crossFlowState: { [`${context.flow.stableId}-webhook-id`]: data.id },
      };
    },

    /** Run when an instance with this trigger is removed */
    delete: async (context, inputs) => {
      // Get the webhook ID from the persisted state
      const webhookId =
        context.crossFlowState[`${context.flow.stableId}-webhook-id`];

      // Delete the webhook from Acme
      await axios.delete(`https://api.acme.com/webhooks/${webhookId}`, {
        headers: {
          Authorization: `Bearer ${inputs.connection.token?.access_token}`,
        },
      });
    },
  },
});
Either the external third-party API, or your trigger, should be designed to be idempotent - meaning that if the webhookLifecycleHandlers.create is created twice, it won't cause any problems.
To test your trigger's webhookLifecycleHandlers.create and webhookLifecycleHandlers.delete functions in the integration designer, open the Test Runner drawer and click Test Deploy or Test Delete within the Trigger tab.
Note that webhookLifecycleHandlers.create and webhookLifecycleHandlers.delete functions do not have access to flow-specific persisted data.
Both functions should read and write data at the crossFlowState level.
You can store unique data for each flow using key names that include the flow name in order to generate unique persisted data keys, like ${context.flow.stableId}-webhook-id in the example above.
App event polling triggers
Polling triggers are used when you want to be notified of changes in an external app, but the app does not support webhooks. The trigger's job is to fetch any new data since the last time it ran.
A pollingTrigger is similar to a standard trigger that supports running on a schedule.
Its perform function receives an additional parameter, context.polling, which has a few functions:
context.polling.getState()will fetch existing poll state.context.polling.invokeAction()can invoke an existing component's action (if one exists) to fetch data from the external app. This is handy if you don't want to duplicate logic in your trigger and an action.context.polling.setState()sets state for the next execution to load.
Generally, a polling trigger's perform function will look like this:
- Get current poll state from
context.polling.getState(). This state will represent a cursor of some kind, depending on the API you're working with. If the API is paginated with pages that are numbers, your state may represent the number of the last page you fetched. If records in the API have "updated at" timestamps, this state may represent the most recent timestamp you've processed. - Fetch new records.
Using the cursor you loaded, fetch records that you have not yet processed.
You can either use
context.polling.invokeAction()to run an action that fetches new data, or you can implement the logic yourself. If the API uses numbered pagination, fetchlastPage + 1. If the API uses "updated at" timestamps, query for records whereupdated_at > ${previous_updated_at}. Implementations will be different depending on the service you're integrating with. - Update poll state using
context.polling.setState(). Save the newest page number of "updated at" timestamp that you fetched. - Return new records for the flow to process.
If no new records were found, return
polledNoChanges: truewhich will cause the execution to stop immediately.
Example PostgreSQL polling trigger
This example polling trigger connects to a PostgreSQL database and queries a table called people which has columns firstname TEXT, lastname TEXT and updated_at TIMESTAMP.
While PostgreSQL can trigger a webhook request when data changes through a combination of a postgresql TRIGGER function and HTTP plugin, implementing webhooks in your database can cause the database to slow down considerably, since every INSERT or UPDATE waits for an HTTP request. Polling makes more sense when looking for updates in a PostgreSQL database.
The first time this polling trigger runs, it finds MAX(updated_at)::TEXT.
We cast the timestamp to TEXT so that it can be stored in persisted state readily, and so that PostgreSQL returns a timestamp with microseconds (it normally returns just milliseconds).
On subsequent runs, we load the cursor (previous timestamp) that was found, and execute "SELECT firstname, lastname FROM people WHERE updated_at > ${cursor}", polling any record that has an updated_at timestamp greater than the previous timestamp.
import { pollingTrigger } from "@prismatic-io/spectral";
import { connectionInput } from "./inputs";
import { createDB } from "./client";

export const pollPeople = pollingTrigger({
  display: {
    label: "Poll people table for changes",
    description: "Fetch any updated records in the Acme people table",
  },
  inputs: {
    postgresConnection: connectionInput,
  },
  perform: async (context, payload, inputs) => {
    const db = createDB(inputs.postgresConnection);
    const state = context.polling.getState();

    const cursorQuery = "SELECT MAX(updated_at)::TEXT AS cursor FROM people";

    try {
      if (!state?.cursor) {
        // No previous cursor was found. This is the first time this
        // trigger has run, so fetch an initial cursor and then exit
        const { cursor: newCursor } = await db.one(cursorQuery);
        context.polling.setState({ cursor: newCursor });
        context.logger.log(
          `First time running. Next time records with "updated_at" greater than "${newCursor}" will be fetched.`,
        );
        return {
          payload,
          polledNoChanges: true,
        };
      }

      // The trigger has run previously. Fetch results since it last ran
      const result = await db.tx(async (task) => {
        return {
          recordsQuery: await task.manyOrNone(
            "SELECT firstname, lastname FROM people WHERE updated_at > ${cursor}",
            { cursor: state.cursor },
          ),
          cursorQuery: await task.one(cursorQuery), // Also fetch new cursor in the same transaction
        };
      });

      const newCursor = result.cursorQuery.cursor;
      const records = result.recordsQuery;

      context.polling.setState({ cursor: newCursor });

      if (records.length > 0) {
        // If any new records were found, return them
        return {
          payload: { ...payload, body: { data: records } },
          polledNoChanges: false,
        };
      } else {
        // If no results were found, return nothing and exit
        return { payload, polledNoChanges: true };
      }
    } finally {
      await db.$pool.end();
    }
  },
});
Note that if you return polledNoChanges: true, the runner will immediately stop and your flow will not continue to run.
Use this property if you checked for new changes, but found none.
Example polling trigger using existing action
In this example, imagine you already have a custom component with an action listProducts that returns a result like this:
{
  "products": [
    {"id": 123, "color": "red", "name": "Widget"},
    {"id": 456, "color": "red", "name": "Gadget"}
  ]
  "page_info": {
    "limit": 100,
    "page": 20
  }
}
You can leverage this already-existing action in a polling trigger using the pollAction property, and context.polling.invokeAction() function:
import { pollingTrigger } from "@prismatic-io/spectral";
import { listProducts } from "./actions";
import { connectionInput } from "./inputs";

interface MyPollingState {
  limit?: number;
  page?: number;
}

interface Product {
  id: number;
  color: string;
  name: string;
}

interface ListProductsResult {
  products: Product[];
  page_info: {
    limit: number;
    page: number;
  };
}

const myPollingTrigger = pollingTrigger({
  display: {
    label: "Poll products API for changes",
    description: "Fetch new products from Acme",
  },
  pollAction: listProducts,
  inputs: { connection: connectionInput },
  perform: async (context, payload, inputs) => {
    const { limit, page: oldPage }: MyPollingState = context.polling.getState();

    const { data } = (await context.polling.invokeAction({
      connection: inputs.connection,
      limit,
      page: oldPage + 1, // Fetch the next page of results
    })) as ListProductsResult;

    const { page: newPage } = data.page_info;
    const { products } = data;

    if (products.length) {
      // Some products were found
      return {
        payload: { ...payload, body: { data: products } },
        polledNoChanges: false,
      };
    } else {
      return {
        payload,
        polledNoChanges: true,
      };
    }
  },
});
Large data syncs
By default, a polling trigger hands its entire payload to a single execution. That works well when a trigger fetches a few records at a time, but it can be problematic when a trigger fetches thousands or millions of records at once:
- The flow may run out of memory
- The execution may take longer than 15 minutes to complete
You can add batching to a trigger so that Prismatic splits the records your trigger produces into batches and runs your flow's steps once per batch, in parallel. When one request isn't enough to fetch everything, Prismatic handles pagination for you - your trigger fetches one page of records at a time and returns a cursor, and Prismatic re-invokes your trigger until you signal that there are no pages left.
Each batch runs as its own "batch execution" (multiple "batch executions" make up an execution), so each one gets its own memory allocation and 15-minute execution limit.
Examples: Several built-in connectors include batching support. You can reference their code on GitHub:
Adding batching to a polling trigger
To support batching in a polling trigger, you need to add a few properties to your trigger definition:
triggerResolverSupportdeclares whether your trigger can batch. Use"valid"to make batching opt-in, so the person building the flow decides whether to enable it. Use"required"if your trigger always batches. Omitting the property (or setting it to"invalid") means the trigger does not support batching.batchConfigdeclares the defaultbatchSize(records per batch) and optionalconcurrentBatchLimit(batches allowed to run at once). It's required whenever you declare a resolver. These are defaults - the person building the flow can override them.triggerResolvercontains the functions that tell Prismatic how to read the payload yourperformfunction returned:resolveItemsreturns the array of records to split into batches. If your trigger previously returned a nested payload, this function can flatten it into a single array of records.getNextPaginationStatereturns a cursor for the next page, ornullwhen there are no more pages. A non-null return re-invokes yourperformfunction with that cursor onpayload.paginationState.
To also backfill records on deploy, add onDeployPerform - the deploy-time sibling of perform - and an onDeployResolver, which reads its payload the same way triggerResolver reads perform's.
Prismatic runs onDeployPerform when an instance is deployed and re-invokes it page after page for as long as onDeployResolver.getNextPaginationState returns a cursor.
Example large data sync trigger
In this example, we fetch posts from JSON Placeholder in pages of 20, and process them in batches of 5, with a maximum of 3 batches running concurrently. We also limit the total number of posts fetched per execution to 50 to prevent runaway executions.
So, if there are 100 total posts, the first execution will fetch 50 posts, and run 10 batches of 5, 3 batches at a time. The second execution will fetch the remaining 50 posts. If 7 additional posts were added to the source, the third execution would fetch those 7 posts and run two batches: one of 5 records and one of 2.
import { pollingTrigger } from "@prismatic-io/spectral";
import axios from "axios";
import z from "zod";

// Fetch 20 posts at a time, processing them in batches of 5, and running
// 3 batches concurrently. Fetch a maximum of 50 posts per execution.
const MAX_POSTS_PER_EXECUTION = 50;
const POSTS_PAGE_SIZE = 20;
const POSTS_BATCH_SIZE = 5;
const CONCURRENT_BATCH_LIMIT = 3;

const postSchema = z.object({
  userId: z.number(),
  id: z.number(),
  title: z.string(),
  body: z.string(),
});
const postsArraySchema = z.array(postSchema);
type Post = z.infer<typeof postSchema>;

const paginationSchema = z.object({
  startId: z.number(),
  postsFetchedThisExecution: z.number(),
});

export const pollPosts = pollingTrigger({
  display: {
    label: "New Posts",
    description: "Polls historical and new posts from JSON Placeholder",
  },
  inputs: {},
  batchConfig: {
    batchSize: POSTS_BATCH_SIZE,
    concurrentBatchLimit: CONCURRENT_BATCH_LIMIT,
  },
  triggerType: "polling",
  perform: async (context, payload, inputs) => {
    // Return types are slightly different for batch and non-batch polling triggers, so we need to check if this is a batch execution.
    const isBatchExecution = context.batch?.enabled === true;

    // Get state from previous execution, regardless of batch or non-batch execution. This is where we store the pagination state for the next execution.
    const pollingState = context.polling.getState();

    // If batching is enabled, this perform is invoked until paginationState is null / undefined.
    // Get startId and postsFetchedThisExecution from pagination state, or fall back to polling state
    // since this may be a non-batch execution or the first invocation of a batch execution
    const { startId, postsFetchedThisExecution } = paginationSchema.parse(
      payload.paginationState || {
        startId: pollingState.startId || 0,
        postsFetchedThisExecution: 0,
      },
    );

    // If we've already fetched the maximum number of posts for this execution, return early.
    if (postsFetchedThisExecution >= MAX_POSTS_PER_EXECUTION) {
      return {
        payload: { ...payload, body: { data: [] }, paginationState: undefined },
      };
    }

    // Fetch up to POSTS_PAGE_SIZE posts, but do not exceed MAX_POSTS_PER_EXECUTION overall
    const postsToFetch = Math.min(
      POSTS_PAGE_SIZE,
      MAX_POSTS_PER_EXECUTION - postsFetchedThisExecution,
    );
    const { data: posts } = await axios.get<Post[]>(
      "https://jsonplaceholder.typicode.com/posts",
      {
        params: {
          _start: startId,
          _limit: postsToFetch,
        },
      },
    );

    payload.body.data = posts;
    const nextStartId = startId + posts.length;

    // Write out polling state for the next execution. This is used to determine where to start fetching posts from in the next execution.
    context.polling.setState({ startId: nextStartId });

    if (isBatchExecution) {
      return {
        payload: {
          ...payload,
          body: { data: posts },
          paginationState: {
            startId: nextStartId,
            postsFetchedThisExecution: postsFetchedThisExecution + posts.length,
          },
        },
      };
    } else {
      // Non-batching, no data returned. Don't create an actual flow execution
      if (posts.length === 0) {
        return {
          payload,
          polledNoChanges: true,
        };
      } else {
        return { payload };
      }
    }
  },
  triggerResolver: {
    resolveItems: (_context, result) => {
      return postsArraySchema.parse(result.payload.body.data);
    },
    getNextPaginationState: (_context, result) => {
      if (postsArraySchema.parse(result.payload.body.data).length === 0) {
        return null;
      }
      return paginationSchema.parse(result.payload.paginationState);
    },
  },
  triggerResolverSupport: "valid",
});

export default { pollPosts };
Notice a few things about this example:
performreturns the ordinary trigger payload, with its records onbody.data. The resolvers don't fetch anything themselves - they only read the payload the perform function already returned and massage the data into an array if needed. Do the fetching in the perform function, and compute the next cursor there, while the API response is still in scope.paginationStateis optional on the payload, so omit it (rather than settingnull) when there are no more pages.getNextPaginationStateis wherenullbelongs.
Batches run in parallel, so the steps in your flow multiply the request rate against the systems they call.
If the API your flow writes to has a tight rate limit, set a low concurrentBatchLimit (1 dispatches one batch at a time).
Omit the property to leave the number of concurrent batches unlimited.
What your flow's steps receive
When batching is enabled, Prismatic replaces the trigger's body.data with the batch that execution is responsible for.
With a batchSize greater than 1, results.body.data references an array of records; with a batchSize of 1, it references a single record.
Because of that, design resolveItems to return records that stand on their own.
If your perform function fetches related groups of records - created, updated, and deleted, for example - flatten them into one array of self-describing records rather than returning nested objects:
interface PostChange {
  changeType: "created" | "updated" | "deleted";
  post: Post;
}
Each record then carries everything a step needs, no matter which batch it lands in.
Configuring batching on a flow
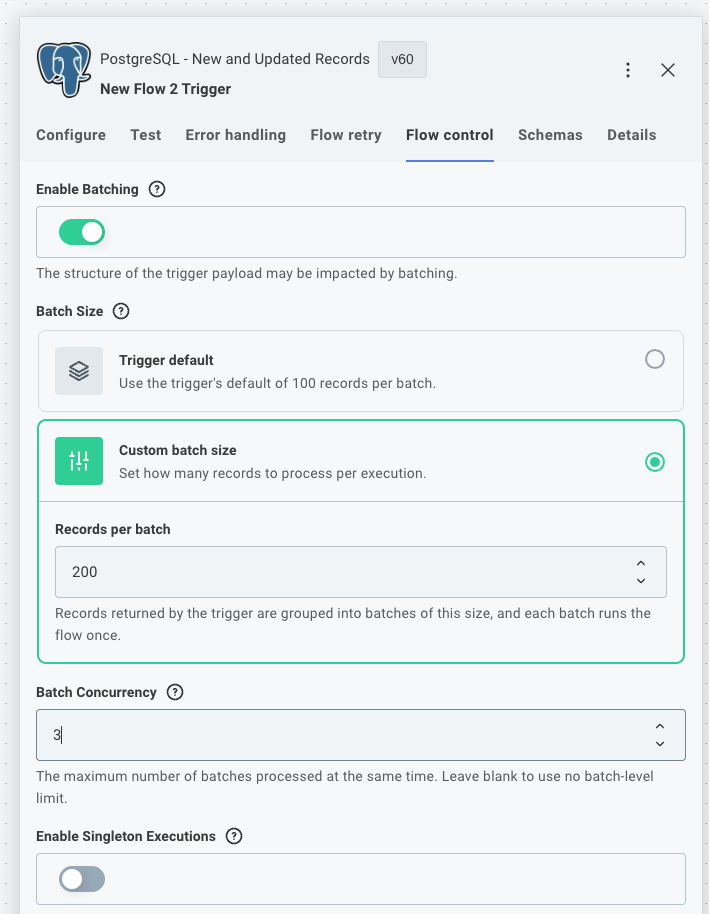
If your trigger supports batching, click the trigger, open its Flow control tab, and toggle Enable Batching.
Under Batch Size, keep Trigger default to use the batchSize your trigger declares, or select Custom batch size and set Records per batch.
Then set Batch Concurrency to cap how many batches from a single execution run at once, or leave it blank for no batch-level limit.
Running batching on deploy
If you want to backfill records when an instance is deployed, you have a few options:
- If you would like the flow to run only once when an instance is deployed, open the polling trigger's Schedule input and select Run once. This will cause the trigger to run just one time (on the top of the next minute) and never again.
- If you would like to backfill records and then continue polling for new records, you can enable batching on the trigger and select a schedule for the trigger to run on. Older records will be imported in batches on the next execution, and eventually all older records will be imported. New records will be imported in batches on subsequent executions.
- If you would like to backfill records and then listen for new records via webhook, write an app event trigger and add the
onDeployPerformandonDeployResolverproperties to it. WriteonDeployPerformto fetch all existing records and return them in the same format as theperformfunction in the example above, and writeonDeployResolverto read that payload the same waytriggerResolverreadsperform's. The trigger then backfills records on deploy and continues to listen for new records via webhook.
Additional resources
- Large Data Sync - a similar
batchFlowTriggerpattern for code-native integrations that supports both an initial data sync and incremental webhook receiver - Instance lifecycle - other functions that run when an instance is deployed or deleted