Custom Actions
Overview
A component is comprised of zero, one or many actions.
For example, the HTTP component contains actions to GET (httpGet), POST (httpPost), etc.
An action can be added as a step of an integration.
An action has three required properties:
displaywhich affects how the action renders within the Prismatic web application- A series of
inputfields - A function to
performwhen the action is encountered in a flow.
An action may return some data that can be used in a subsequent step.
import { action, input } from "@prismatic-io/spectral";

const myAction = action({
  display: {
    label: "Say Hello",
    description: "Concatenate the first and last name of a person",
  },
  inputs: {
    firstName: input({ label: "First Name", type: "string", required: true }),
    lastName: input({ label: "Last Name", type: "string", required: true }),
  },
  perform: async (context, params) => {
    const myMessage = `Hello, ${params.firstName} ${params.lastName}`;
    return Promise.resolve({ data: myMessage });
  },
});
Action inputs
Components can take inputs. Each input is comprised of a required label, and type and optional placeholder, default, comments, required and model.
Consider this example input:
const middleName = input({
  label: "Middle Name",
  placeholder: "Middle name of a person",
  type: "string",
  required: false,
  default: "",
  comments: "Leave blank if the user has no middle name",
  clean: (value) => util.types.toString(value),
});
This contributes to an input prompt that looks like this:
Note where the label and placeholder text appeared in the web application, and note that First Name and Last Name are required - indicated with a *, but Middle Name is not.
Action input types
An input can take a number of types, which affects how the input renders in the Prismatic web application:
- string will allow users to input or reference a string of characters.
- password will allow users to input or reference a string of characters, and the string will be obfuscated in the UI.
- boolean allows users to enter one of two values: true or false.
- code opens a code editor so users can enter XML, HTML, JSON, etc.
Syntax highlighting can be added to a code input's definition and can reference any language supported by PrismJS.
(e.g.
input({ label: "My Code", type: "code", language: "json" }))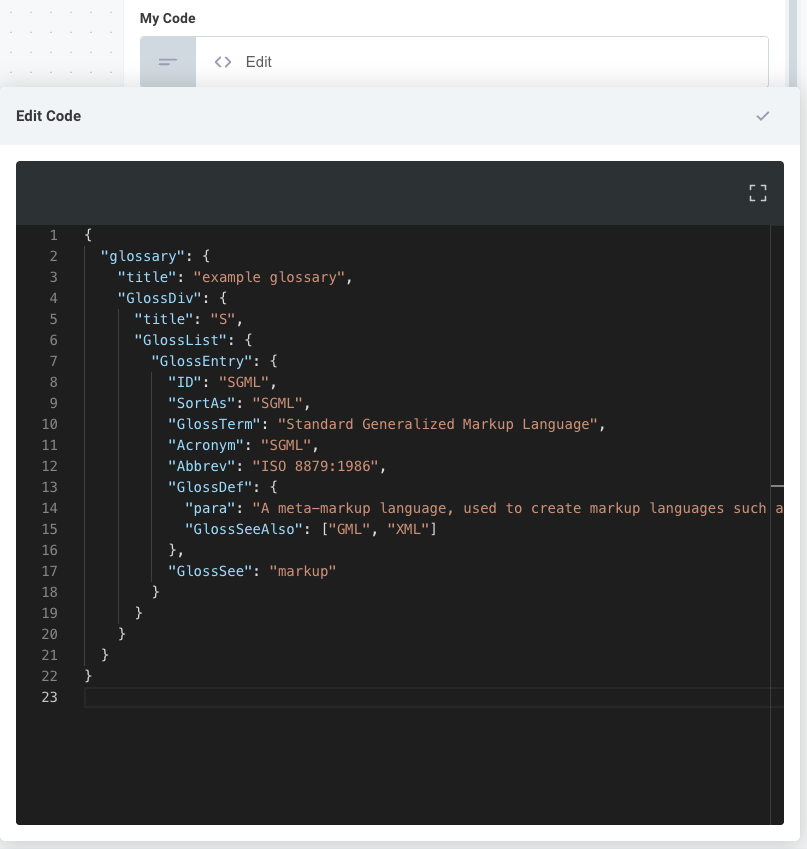
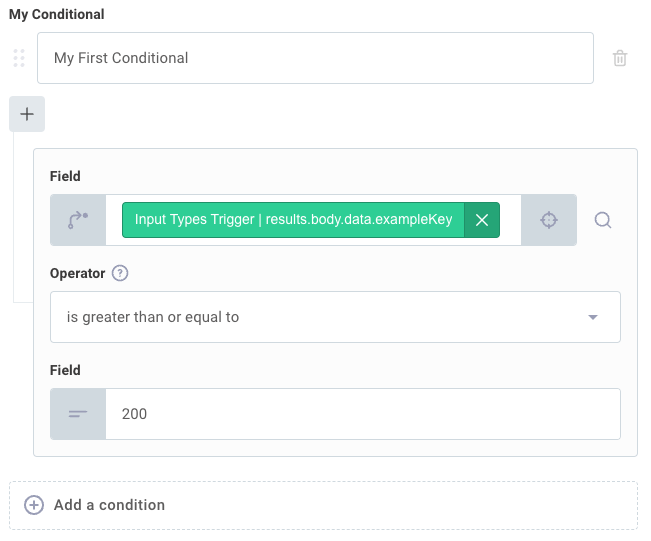
- conditional allows users to enter a series of logical conditionals.
This is most notably used in the branch component.
You can also create connection inputs for actions. Read more about connections.
Dropdown menu inputs
Rather than allowing integration builders to enter values for an input, you might want to have users choose a value from a list of possible values. You can do that by making your input into a dropdown menu.
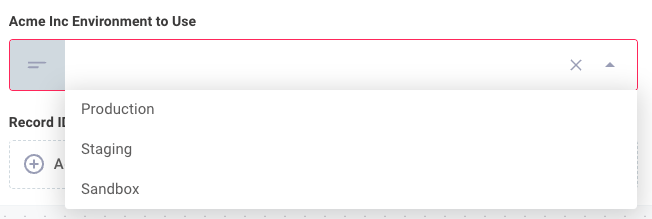
To create an input with a dropdown menu, add a model property to your input:
export const acmeEnvironment = input({
  label: "Acme Inc Environment to Use",
  placeholder: "ACME Environment",
  type: "string",
  required: true,
  model: [
    {
      label: "Production",
      value: "https://api.acme.com/",
    },
    {
      label: "Staging",
      value: "https://staging.acme.com/api",
    },
    {
      label: "Sandbox",
      value: "https://sandbox.acme.com/api",
    },
  ],
});
The model property should be an array of objects, with each object containing a label and a value.
The label is shown in the dropdown menu.
The value is passed in as the input's value to the custom component.
Collection inputs
Most inputs represent single strings. A collection input, on the other hand, represents an array of values or key-value pairs. Collections are handy when you don't know how many items a component user might need.
Value list collection
For example, your component might require an array of record to query, but you might not know how many record IDs a component user will enter.
You can create a valuelist collection in code like this:
const assetIdsInputField = input({
  label: "Asset ID(s)",
  type: "string",
  collection: "valuelist",
  required: true,
});
The corresponding UI in the integration designer would then prompt a user for any number of record IDs that they would like to enter:
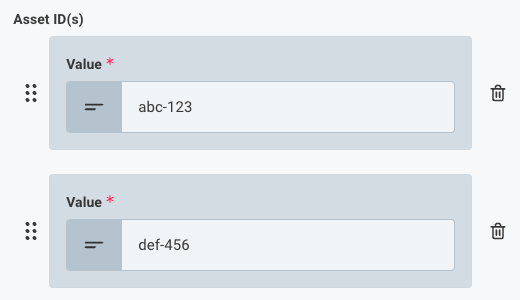
When the input is received by an action's perform function, the input is a string[].
Key value list collection
If you would like users to enter a number of key-value pairs as an input, you can use a keyvaluelist collection.
The Header input on the HTTP component actions is an example of a keyvaluelist collection, and is defined in code like this:
export const headersInputField = input({
  label: "Header",
  type: "string",
  collection: "keyvaluelist",
  required: false,
  comments: "A list of headers to send with the request.",
  example: "User-Agent: curl/7.64.1",
});
The "Header" input, then, appears like this in the integration designer:
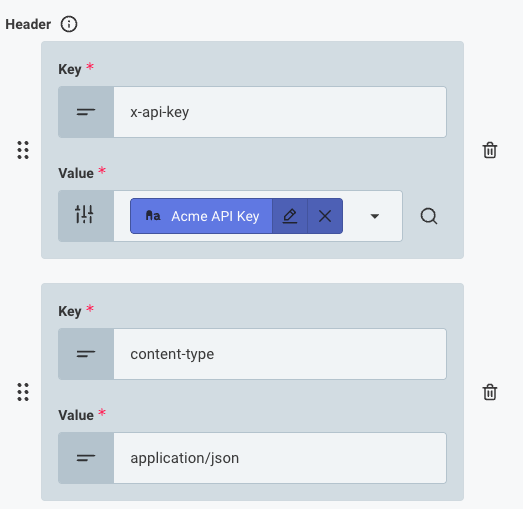
When the input is received by an action's perform function, the input is an array of objects of the form:
[
  {
    key: "foo",
    value: "bar",
  },
  {
    key: "baz",
    value: 5,
  },
];
If you would like to convert the input to a key-value pair object, you can use the built-in Spectral function, keyValPairListToObject:
import { util } from "@prismatic-io/spectral";
const myObject = util.types.keyValPairListToObject(myInput);
// { foo: "bar", baz: 5 }
Cleaning inputs
An input of an action can be anything - a number, string, boolean, JavaScript Buffer, a complex object with lots of properties, etc.
If you reuse an input for multiple actions, it's handy to do some preprocessing and type conversion on the input.
That's where a clean function on an input comes in.
For example, suppose you expect an input to be a number.
But, inputs by default are presented to perform functions as strings.
You can leverage the util.types.toNumber() utility function and clean property to ensure that the input is presented to the perform function as a number:
const serverPortInput = input({
  label: "Server Port",
  placeholder: "The port of the API server",
  comments: "Look for the number after the colon (my-server.com:3000)"
  type: "string",
  default: "3000",
  required: true,
  clean: (value) => util.types.toNumber(value),
});
You can also add validation to the input.
For example, if you want to validate that the input is an IPv4 IP address, you can build a more complex clean function:
const validateIpAddress = (value: unknown) => {
  const ipAddressRegex =
    /^(?:(?:2(?:[0-4][0-9]|5[0-5])|[0-1]?[0-9]?[0-9])\.){3}(?:(?:2([0-4][0-9]|5[0-5])|[0-1]?[0-9]?[0-9]))$/;
  const inputValue = util.types.toString(value);
  if (!ipAddressRegex.test(inputValue)) {
    throw new Error(`The value "${inputValue}" is not a valid IP address`);
  }
  return inputValue;
};

const ipAddressInput = input({
  label: "IP Address",
  placeholder: "Server IP Address",
  type: "string",
  default: "192.168.1.1",
  required: true,
  clean: validateIpAddress,
});
Handle complex inputs in a custom action
When an API endpoint that you're wrapping in a custom action expects a simple payload, like
POST /widgets

{
  "name": "string",
  "color": "string",
  "quantity": "number"
}
it's easy to map each value in the POST request to an input.
Here, we'd create a "name" input, a "color" input, and a "quantity" input.
Then, we'd apply a clean: util.types.toNumber clean function to the "quantity" input to ensure it is cast to a number.
But, some endpoints expect complex payloads that may contain arrays of objects with optional properties, etc.
POST /widgets
{
  "externalId": "abc-123",
  "variants": [
    {
      "name": "Variant 1",
      "color": "red",
      "price": {
        "usd": 5,
        "ca": 5.5
      }
    },
    {
      "name": "Variant 2",
      "color": "blue",
      "price": {
        "usd": 6
      }
    }
  ]
}
In this case, it's likely that an integration builder will want to construct a property like variants programmatically, and it's probably best to present two inputs, "External ID" which is type: "string" and "Variants" which is type: "code".
To accommodate both JSON and JavaScript object inputs, use the util.types.toObject function to ensure that what is entered becomes a JavaScript object.
For example,
const createWidgets = action({
  display: {
    label: "Create Widgets",
    description: "Create widgets and their variants",
  },
  inputs: {
    connection: connectionInput,
    externalId: input({
      label: "External ID",
      type: "string",
      comments: "The ID stored in Acme for this Widget type",
      clean: util.types.toString,
    }),
    variants: input({
      label: "Variants",
      comments:
        "Variant types of the widget. Ensure you provide an array of variant objects.",
      type: "code",
      language: "json",
      clean: util.types.toObject,
      example: JSON.stringify(
        [
          {
            name: "Variant 1",
            color: "red",
            price: {
              usd: 5,
              ca: 5.5,
            },
          },
          {
            name: "Variant 2",
            color: "blue",
            price: {
              usd: 6,
            },
          },
        ],
        null,
        2,
      ),
    }),
  },
  perform: async (context, params) => {
    const client = createAcmeClient(params.connection);
    const { data } = await client.post("/widgets", {
      externalId: params.externalId,
      variants: params.variants,
    });
    return { data };
  },
});
The perform function
Each action contains one perform function, which is an async function with two parameters that may or may not have a return value.
In this example firstName, middleName, and lastName, are input parameters for this perform function:
export const properFormatName = action({
  display: {
    label: "Properly Format Name",
    description: "Properly format a person's name (Last, First M.)",
  },
  perform: async (context, params) => {
    if (params.middleName) {
      return {
        data: `${params.lastName}, ${params.firstName} ${params.middleName[0]}.`,
      };
    } else {
      return { data: `${params.lastName}, ${params.firstName}` };
    }
  },
  inputs: { firstName, middleName, lastName },
});
perform Function Parameters
The perform function takes two parameters, context and params, that can be destructured into their respective properties:
perform: async (context, params) => {},
// or
perform: async (
  { logger },
  { paramName1, paramName2, ... }
) => {},
The context parameter
The context parameter is an object that contains the following attributes:
loggerallows you to write out log lines.debugis an object which you can use when debug mode is enabled to emit additional debug log lines or measure time or memory costs of specific portions of your code.instanceState,crossFlowState,integrationStateandexecutionStategives you access to persisted state.stepIdis the ID of the current step being executed.executionIdis the ID of the current execution.webhookUrlscontains the URLs of the running instance's sibling flows.webhookApiKeyscontains the API keys of the running instance's sibling flows.invokeUrlwas the URL used to invoke the integration.customeris an object containing anid,name, andexternalIdof the customer the instance is assigned to.useris an object containing anid,name,email(their ID) andexternalIdof the customer user whose user-level config was used for this execution. This only applies to instances with User Level Configuration.integrationis an object containing anid,name, andversionSequenceIdof the integration the instance was created from.instanceis an object containing anidandnameof the running instance.flowis an object containing theidandnameof the running flow.invokeFlowis a function that lets you invoke another flow by name. Generally, you'll want to use the Invoke Flow action which wraps this function.
Step ID
context.stepId contains the unique identifier (UUID) of the step.
It is used by the Process Data - DeDuplicate action to track what items in a array have or have not been previously seen.
You can use it similarly in a custom component to persist step-specific data.
Webhook URLs
You can reference an instance's webhook URLs through the context.webhookUrls object.
This is useful when writing actions to configure and delete webhooks in a third-party app.
perform: async (context, params) => {
  const inventoryUrl = context.webhookUrls["My Inventory Flow"];
};
You can reference context.flow.name to fetch the current flow's webhook URL:
perform: async (context, params) => {
  const myCurrentUrl = context.webhookUrls[context.flow.name];
};
Logger object
context.logger is a logging object and can be helpful to debug components.
perform: async ({ logger }, params) => {
  logger.info("Things are going great");
  logger.warn("Now less great...");
};
Available log functions in increasing order of severity include logger.debug, logger.info, logger.warn and logger.error.
You can also execute logger.metric on an object, which helps when streaming logs and metrics to an external logging service.
Note: Log lines are truncated after 4096 characters. If you need longer log lines, consider streaming logs to an external log service.
Execution, instance, and cross-flow state
context.executionState, context.instanceState, context.integrationState and context.crossFlowState are key/value stores that may be used to store small amounts of data for future use:
context.executionStatestores state for the duration of the execution, and is often used as an accumulator for loops.context.instanceStatestores state that is persisted between executions. This state is scoped to a specific flow. The flow may persist data, and reference it in a subsequent execution.Shouldn'tinstanceStatebe calledflowState?Great question! We developed state storage prior to multi-flow, and the name
instanceStatewas retained for historical reasons.context.crossFlowStatealso stores state that is persisted between executions. This state is scoped to the instance, and flows may reference one another's stored state.context.integrationStatestores state between flows in instances of the same integration. Customer A's flow 1 can share data with Customer B's flow 2.
State is most notably used by the Persist Data and Process Data components, but you can use it in your custom components, too.
If, for example, a previous flow's run saved a state key of sampleKey, you can reference context.instanceState['sampleKey'] to access that key's value.
To do the reverse, and save data to a flow's state storage for subsequent runs, add an instanceState property to your perform function's return value:
return {
  data: "Some Data",
  instanceState: { exampleKey: "example value", anotherKey: [1, 2, 3] },
};
Note: To remove a key from persisted state, set it to null:
return {
  data: "Some Data",
  crossFlowState: { exampleKey: null },
};
Input parameters
The params parameter is an object that has attributes for each input field the action supports.
For example, for the perform action defined above, params has params.firstName, params.middleName, and params.lastName.
firstName, middleName, and lastName are based off of the input objects that are provided to the action as inputs.
You can use shorthand property names for inputs.
If your input object variables have different names - say you have a const myFirstNameInput = input ({...}), you can structure your action's input property like this:
inputs: {
  firstName: myFirstNameInput,
  middleName: myMiddleNameInput,
  lastName: myLastNameInput,
}
and the params object passed into perform will have keys firstName, middleName, and lastName.
Using non-shorthand property names is preferable to some developers to avoid variable shadowing.
The function is written with a destructured params parameter.
It could be rewritten without being destructured.
perform: async (context, params) => {
  if (params.middleName == "") {
    return { data: `${params.lastName}, ${params.firstName}` };
  } else {
    return {
      data: `${params.lastName}, ${params.firstName} ${params.middleName[0]}.`,
    };
  }
},
Coercing input types
TypeScript-based Node libraries often have strict rules about the type of variables that are passed into their functions, but inputs to perform functions are of type unknown since it's not known ahead of time what types of values users of components are going to pass in.
For example, you might expect one of your inputs to be a number, but a user might pass in a string instead.
That's obviously a problem since "2" + 3 is "23", while 2 + 3 is 5 in JavaScript.
The Spectral package includes several utility functions for coercing input to be the type of variable that you need.
Looking at the number/string example, suppose you have some input - quantity - that you need turned into a number (even if someone passes in "123.45" as a string), and you have another input - itemName - that you'd like to be a string.
You can use util.types.toNumber() and util.types.toString() to ensure that the input has been converted to a number and string respectively:
import { action, util } from "@prismatic-io/spectral";
import { someThirdPartyApiCall } from "some-example-third-party-library";

action({
  /*...*/
  perform: async (context, { quantity, itemName }) => {
    const response = await someThirdPartyApiCall({
      orderQuantity: util.types.toNumber(quantity), // Guaranteed to be a number
      orderItemName: util.types.toString(itemName), // Guaranteed to be a string
    });
    return { data: response };
  },
});
If an input cannot be coerced into the type you've chosen - for example, suppose you pass "Hello World" into util.toNumber() - an error will be thrown indicating that "Hello World" cannot be coerced into a number.
Writing your own type checking functions
Prismatic provides a variety of type check and type coercion functions for common types (number, integer, string, boolean, etc). If you require a uniquely shaped object, you can create your own type check and coercion functions to ensure that inputs your custom component receives have the proper shape that the libraries you rely on expect.
You can import an interface or type (or write one yourself) and write a function that converts inputs into an expected shape.
For example, the SendGrid SDK expects an object that has this form:
{
  "to": [string],
  "from": string,
  "subject": string,
  "text": string,
  "html": string
}
We can pull in that defined type, MailDataRequired, from the SendGrid SDK, and write a function that takes inputs and converts them to an object containing a series of strings:
import { MailDataRequired } from "@sendgrid/mail";
import { util } from "@prismatic-io/spectral";

export const createEmailPayload = ({
  to,
  from,
  subject,
  text,
  html,
}): MailDataRequired => ({
  to: util.types
    .toString(to)
    .split(",")
    .map((recipient: string) => recipient.trim()),
  from: util.types.toString(from),
  subject: util.types.toString(subject),
  text: util.types.toString(text),
  html: util.types.toString(html),
});
Perform function return values
An action can return a variety of data types. To return a simple string, number, boolean, array, or object your return block can read:
// return a string:
return {
  data: "some string",
};
// return a number:
return {
  data: 123.45,
};
// return a boolean:
return {
  data: true,
};
// return an array:
return {
  data: [1, 2, 3, 4, "a", "b"],
};
// return an object:
return {
  data: {
    key1: "value1",
    key2: ["value2", 123],
  },
};
Those values can be used as inputs in subsequent steps by referencing this step's results:
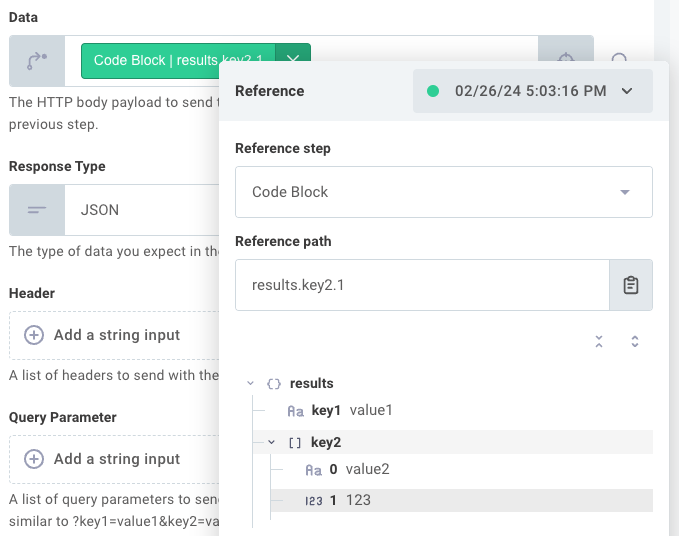
Setting synchronous HTTP status codes
If you invoke your instances synchronously and would like to return an HTTP status code other than 200 - OK, you can configure the final step of your integration to be a custom component that returns any HTTP status code you want.
To return an HTTP status code other than 200, return a statusCode attribute in the object you return from your custom component instead of a data attribute:
return {
  statusCode: 415,
};
If this custom component is the last step of an integration, then the integration will return an HTTP status code of 415 if invoked synchronously.
Note: When an integration is invoked synchronously, by default the integration redirects the caller to a URL containing the output results of the final step of the integration.
If the final step of the integration is a Stop Execution action, or any custom component action that returns a statusCode, the redirect does not occur.
Instead, the caller receives an HTTP response with the statusCode specified.
Read more about HTTP status codes for synchronous integrations.
Example action payloads
As noted above, actions return results for subsequent steps to consume.
It's often handy for an integration builder to have access to the shape of the results prior to a test being run.
Your action can provide an examplePayload that can be referenced before test data is available:
{
  /* ... */
  examplePayload: {
    data: {
      username: "john.doe",
      name: {
        first: "John",
        last: "Doe",
      },
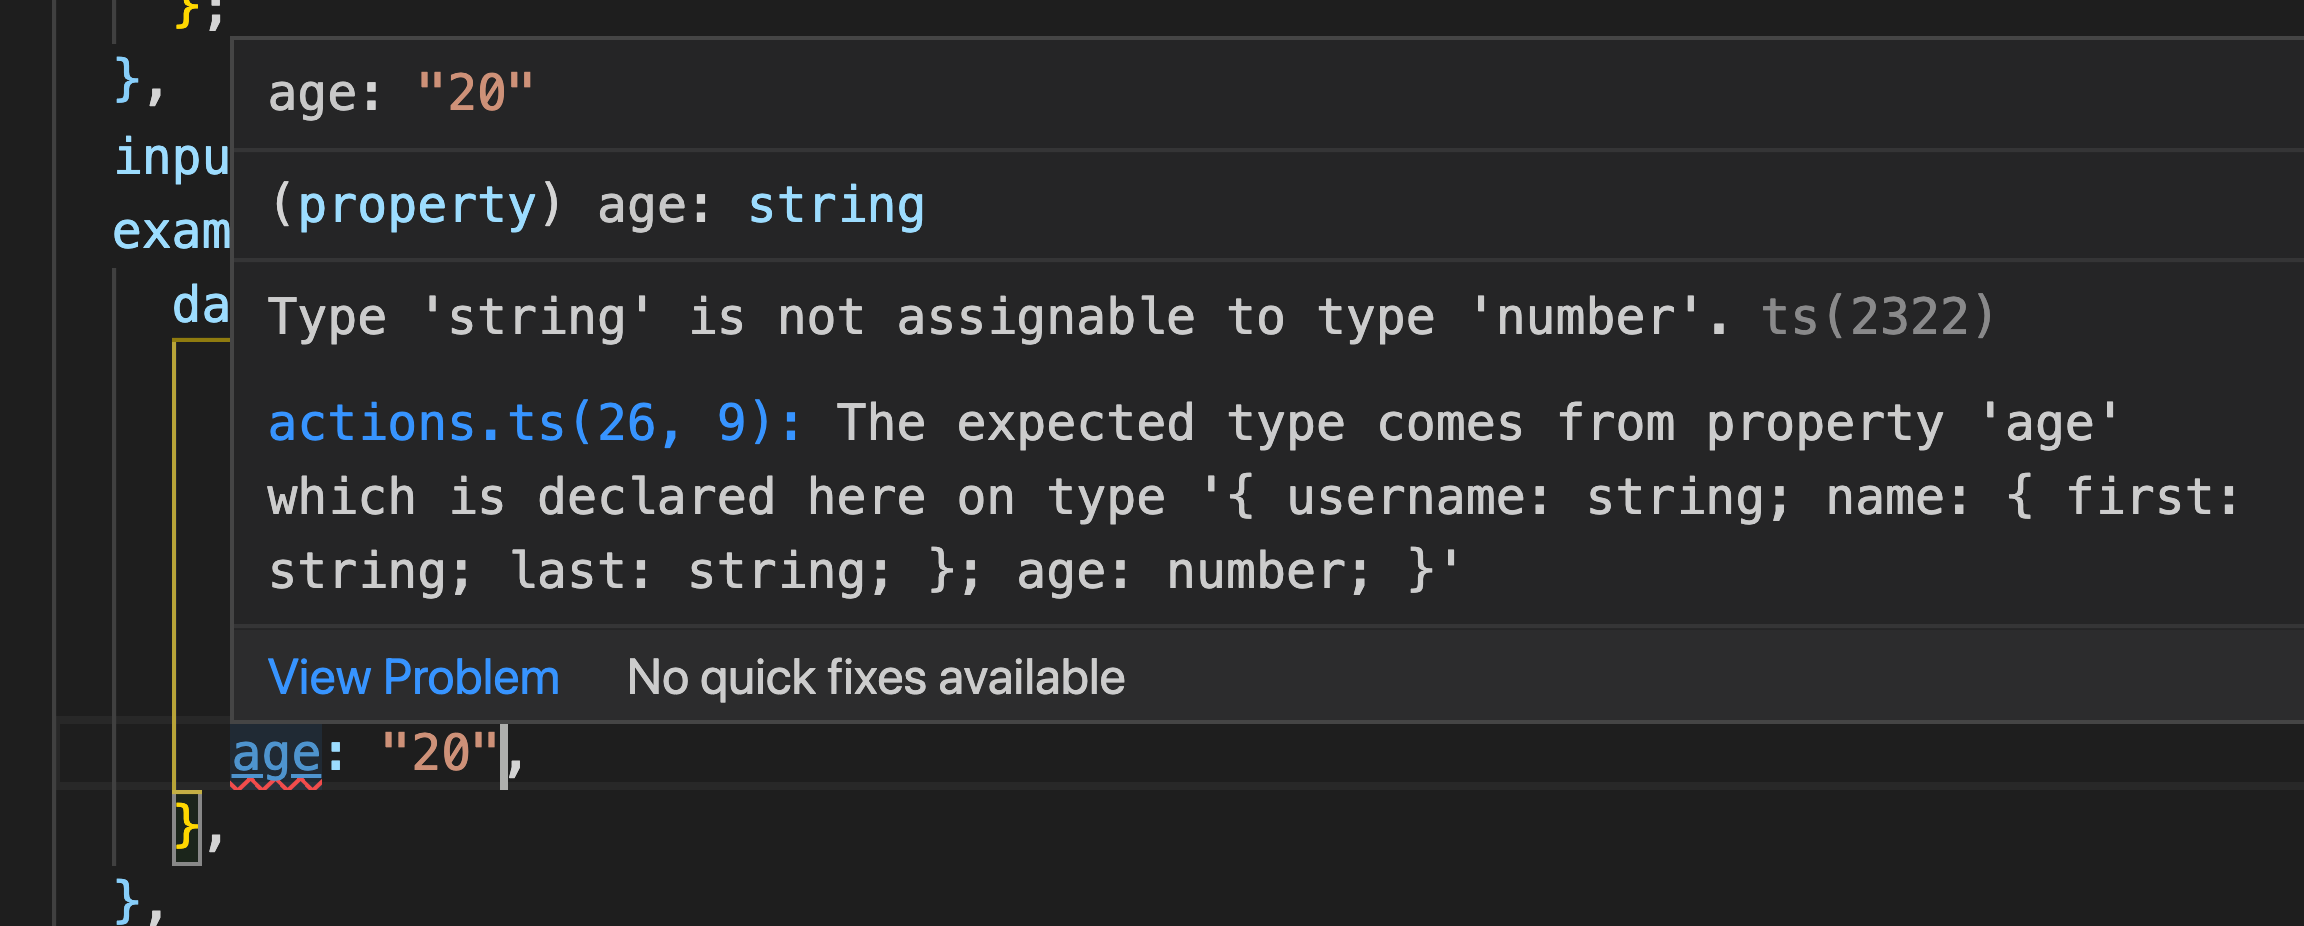
      age: 20,
    },
  },
}
In the integration designer, this example payload can be referenced as an input.
Note: your examplePayload must match the exact TypeScript type of the return value of your perform function.
If your perform function's return value does not match the type of the example payload, TypeScript will generate a helpful error message:
